Monitoring and logging are important parts of application development and support. This statement relates not only to the production environment but to staging and others as well. What would be a solution to have all the metrics and logs from different environments or clusters in a single place?
Let’s assume that you have 2 separate K8S clusters for our environments. We don’t want the additional load in our main cluster, but still want to get the required metrics and logs from there.
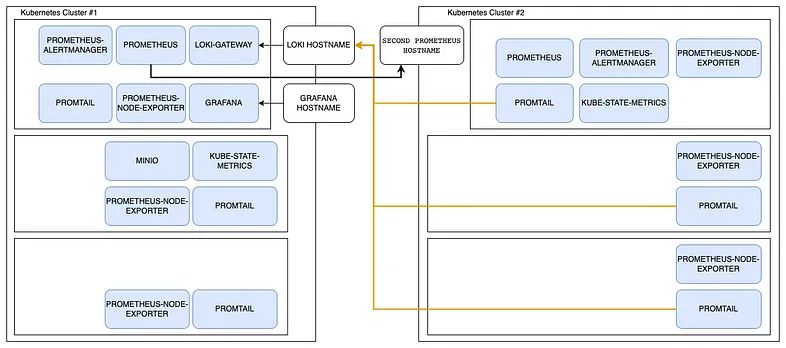
The solution below will keep all the parts that can create any additional load in one cluster[Cluster #1 in the diagram] and have only the required tools in the main cluster[Cluster #2]. Please note that all the blue parts are in the monitoring namespace.
Monitoring toolset diagram
A couple of words before we start — we use the Prometheus stack for monitoring. Prometheus is a standard de facto in K8S world. It’s going to store all the metrics we get from the applications. Grafana will help us with making all these metrics and logs visible. Loki is an open-source software for logging. We also use some other tools like MinIO, Promtail, etc.
Install MinIO
MinIO is an Object Storage solution compatible with AWS S3 API, which would allow us to store our logs and other data directly in our cluster.
First of all, we have to create our monitoring namespace:
An important note — make a rough analysis of how many logs and metrics your application will generate and want to store simultaneously. The example above create a persistence volume with 20Gb space.
Install Loki
Loki is our solution for logging aggregation that we are going to use. We are going to connect it to MinIO so our logs would be hosted in MinIO.
And this is the values file we are using to configure Persistent Storage, Alert Manager Ingress, and disable default Grafana as we are going to use a standalone one.
Grafana allows you to query, visualize, alert on and understand your metrics no matter where they are stored. Create, explore, and share beautiful dashboards with your team.
And in order to install it, we are using a Helm chart:
To provide the configurations we need, we are using this values file. You might notice that we pass OIDC configuration to Grafana to enable login with the Google authentication method. It’s the auth.google part of the config.
Hashicorp Vault is a tool that allows you secure, store, and control access to different types of secrets, like credentials, certificates, tokens, etc. It could be used to share secrets within teams as well as be incorporated into CI/CD pipelines.
Installing Hashicorp Vault
The first step is to add official HashiCorp repo to apt sources:
Once Vault is installed go to /etc/vault.d/ directory and edit the vault.hcl file. Replace it with the example below. As a part of general practice, we set Vault to listen to the internal IP address and will expose it to the outside world using Nginx later.
Once it’s done, run the command below to check that the config is fine.
vault server -config=/etc/vault.d/vault.hcl
If everything is fine, execute the next command to run Vault as a service and check its status. Please note that these commands might vary depending on Linux distribution you use and what process management software is installed.
systemctl start vault
systemctl status vault
After this, you MUST init Vault server with the command below. This command will respond with seal keys and an initial root token. Ensure you keep them in a safe and secure place. These credentials would require to access Vault in order to configure OIDC authentication and further setup.
vault operator init
Configure Nginx proxy
As it was mentioned before we use Nginx as a proxy before Vault server. Let’s install it first:
apt-get update
apt-get install nginx
And configure it using the template below. You can use cert-manager to generate valid SSL certificates.
Next step is to enable login methods. The main login method will be “Login with Google“. We will need to create a default role, default policy and configure OIDC auth.
The first is policy. It set the minimum required permissions for users.
# Allow tokens to look up their own properties
path "auth/token/lookup-self" {
capabilities = ["read"]
}# Allow tokens to renew themselves
path "auth/token/renew-self" {
capabilities = ["update"]
}# Allow tokens to revoke themselves
path "auth/token/revoke-self" {
capabilities = ["update"]
}# Allow a token to look up its own capabilities on a path
path "sys/capabilities-self" {
capabilities = ["update"]
}# Allow a token to look up its own entity by id or name
path "identity/entity/id/{{identity.entity.id}}" {
capabilities = ["read"]
}
path "identity/entity/name/{{identity.entity.name}}" {
capabilities = ["read"]
}# Allow a token to look up its resultant ACL from all policies. This is useful
# for UIs. It is an internal path because the format may change at any time
# based on how the internal ACL features and capabilities change.
path "sys/internal/ui/resultant-acl" {
capabilities = ["read"]
}# Allow a token to renew a lease via lease_id in the request body; old path for
# old clients, new path for newer
path "sys/renew" {
capabilities = ["update"]
}
path "sys/leases/renew" {
capabilities = ["update"]
}# Allow looking up lease properties. This requires knowing the lease ID ahead
# of time and does not divulge any sensitive information.
path "sys/leases/lookup" {
capabilities = ["update"]
}# Allow a token to manage its own cubbyhole
path "cubbyhole/*" {
capabilities = ["create", "read", "update", "delete", "list"]
}# Allow a token to wrap arbitrary values in a response-wrapping token
path "sys/wrapping/wrap" {
capabilities = ["update"]
}# Allow a token to look up the creation time and TTL of a given
# response-wrapping token
path "sys/wrapping/lookup" {
capabilities = ["update"]
}# Allow a token to unwrap a response-wrapping token. This is a convenience to
# avoid client token swapping since this is also part of the response wrapping
# policy.
path "sys/wrapping/unwrap" {
capabilities = ["update"]
}# Allow general purpose tools
path "sys/tools/hash" {
capabilities = ["update"]
}
path "sys/tools/hash/*" {
capabilities = ["update"]
}# Allow checking the status of a Control Group request if the user has the
# accessor
path "sys/control-group/request" {
capabilities = ["update"]
}# Allow a token to make requests to the Authorization Endpoint for OIDC providers.
path "identity/oidc/provider/+/authorize" {
capabilities = ["read", "update"]
}
Next step — create a role. The example below will get user emails and set them as alias in Vault. Also we set additional mappings for claims like name, email and sub as alias metadata to get more info about user.
After years of working adjacent to software development, first in sales and then in recruitment, I abruptly decided to take the plunge into the other side, and start coding to automate or speed up tasks of my everyday job.
The idea came by when I started using Google Sheets more heavily, and realized how powerful it is by itself, and how much more it can become with the addition of Google Apps Script, which I discovered to my surprise is actually modern JavaScript.
A bit of background (you can skip this)
I have a distant, small, and self-taught programming background, dated almost 25 years, in times when there was no stackoverflow.com, but a lot of stack overflow errors popping up on Windows… I learned Basic first as a kid, on an already-ancient Commodore 64, and following the advice of a cousin who was studying software engineering, switched directly to C++, to write desktop applications for a long-gone (but beautiful) operating system named BeOS, which was so nice it was remade from scratch by fans into an opensource OS called Haiku.
When my platform of choice died I was 15, and while I had managed to develop a couple of more-or-less useful applications, other than personal websites using then-new techs like XHTML 1.0 (HTML 4 + XML), SSIs, and CSS2, I decided to quit programming for good, thinking that anyway I wanted to work in a different sector. Many people told me I was a fool to waste what I had learned, and not continue further, but from the height of my teenage wisdom, I thought I knew better… Obviously I didn’t, but the choice was made, and I decided to study Earth Sciences (Geology) at university, and never wrote code again for 20 years.
Fate had a sense of humor, and I never actually worked in geology, with my first office job being already closer to IT, and each subsequent job getting closer and closer to it. It seems like it was destiny!
This is how I got to FusionWorks — an IT company with 11-year history and 57 clients in 18 countries. Here I’m a geekruiter — not sure because I’m considered to be a geek or I need to recruit geeks — they don’t tell me.
Learn while working: JS, HTML, CSS, all within Google Apps Script
During the last couple of years of working closely with web developers, I often wondered what it would take to learn JavaScript. I still remembered the basics of HTML and CSS from my teenage years, but for some reason, JavaScript felt like a scary step. Maybe it was because I knew how much JavaScript developers were sought-after in the job market, or because when I looked at it, I felt like it was touching on too many elements I didn’t know, and that it would have taken me too much time and effort to learn.
But when I started using Google Apps Script from Google Sheets, at first using the resources of the great Spreadsheet Dev website, I realized that JavaScript came pretty natural to me, if it was used to manipulate the stuff I used every day on Google Sheets. The scope of what you can do is small at first, but the more you progress, the more you learn JavaScript, and can even add HTML and CSS to the mix if you’re into creating custom UIs. In my first hours of excitement, I was going in that direction, and I will cover this briefly here, although I later abandoned this path because I discovered more efficiency in getting rid of UI, instead of adding to it.
Btw, as being learning-driven is one of FusionWorks’ main values, they support my desire to code while recruiting.
I will now detail a few useful things you can do with Google Apps Script, without any previous knowledge of JavaScript, and possibly nothing but the very basics of programming in general.
Custom buttons to do simple operations (safely skippable)
Perhaps the easiest and most straightforward way to learn Google Apps Script and put it to good use is creating custom buttons. It’s a two-part process: writing a small script, and then associating it to a drawing, where you can create an actual button (or if you’re lazy like me, write an emoji into it that will work as a button.)
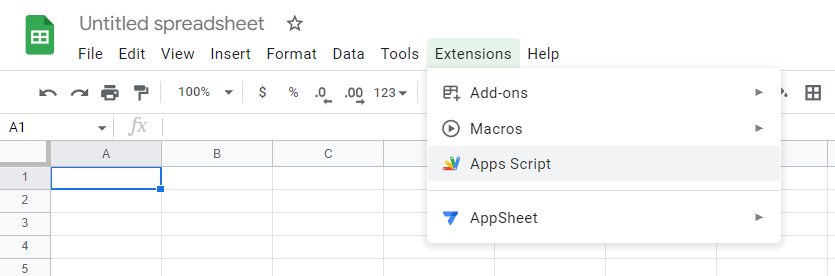
To start writing your scripts, you head over to “Apps Script” within the “Extensions” menu:
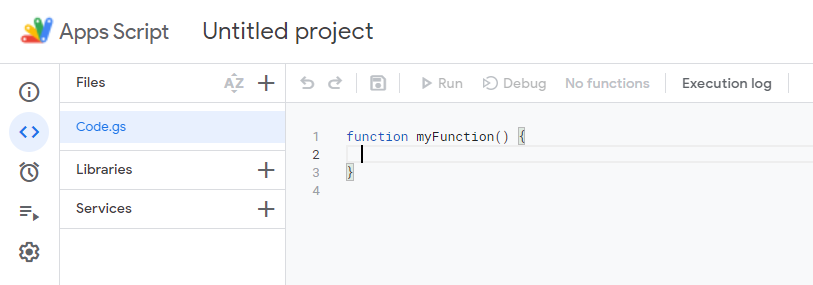
If you never used it before, you will find yourself on a page like this:
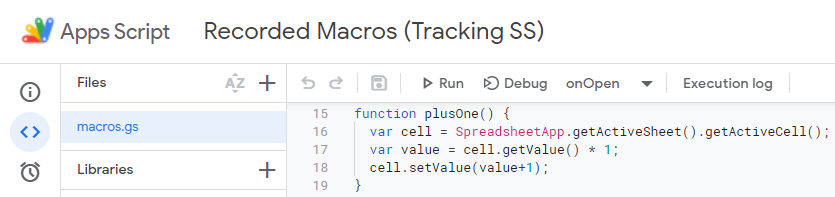
Or if like me you first started messing around with macros, thinking it might be easier (it isn’t), it might be called “Recorded Macros (your sheet name)”. Here below is the first function I wrote, which saved me some clicks when needing to add 1 to a value, back when I was counting things manually…
If you know anything about coding, the above will feel pretty obvious and you can safely skip the whole section, but I will talk about it a little bit for those that like me started from scratch.
First, let’s make the code more visible with a Gist (I just googled this):
What this does is described in the first comment line, and I was going to write a line-per-line explanation as well, for those of you who are beginners like I was when writing this, but this article would become super-long, so feel free to ask for details in comments, and I will be glad to go over it.
In any case, it’s all very well-documented by Google, and if the documentation seems a bit difficult at first, head over to Spreadsheet Dev, and look at the many how-to’s, which are explained in a much less technical way.
After writing this and saving it, you can test it by associating it with a button, which as mentioned is created from a drawing:
Which can even contain just a big emoji inside a text box, to make it quick:
Careful with the text box size: all its area will be clickable as a button, so make it very close to its content!
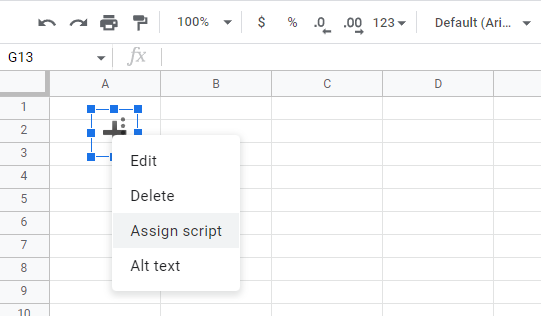
After you save it, it will appear in your spreadsheet and you will be able to associate the function you made, by clicking on the three dots appearing when you select it (they might overlap the contents and be difficult to see like here below), and clicking on Assign script, where you will just type the name of the function you just created.
And that’s it, a small step for a coder, but a big step for a noob!
Now, this is useful in very few scenarios, mainly when working in split screen and not wanting to switch windows a lot when counting some stuff.
But what if we want to make sure we update a specific cell based on some parameters, and not whatever is currently selected? In particular, let’s see how to do it in case what we need to count is based on the day of the week:
This one teaches something non-trivial: arrays and how they work, plus working with dates.
(Feel free to skip this if you understand how it works.)
We create an array with “Const Days = [‘B’, ‘C’, ‘D’, ‘E’, ‘F’]”. If you’re a beginner, you can think of this like an ordered list, where those letters will always be in that order, and be accessible by their position, with the first being in position number 0. For example, Days[1] will refer to ‘C’, while Days[0] to ‘B’.
Note that these are meant to refer to cells, which in the so-called A1 notation are described by a letter for the column, and a number for the row. The columns in these cases referred to days of the week, with B being Monday, and F being Friday (by chance.) So how to let the script know where to write, based on what day it is?
By playing with the array index and the “getDay()” function, which gives a number depending on the day, from 0 for Sunday to 6 for Saturday. Therefore, if we want Monday to be associated to letter B from the “Days” array above, all we need to do is subtract 1 from the getDay() value: like in the line “const Day = Days[Today.getDay()-1];”
The next line will get a Range (a group of cells, in this case just one cell) by associating the letter we stored as “Day” to a number of the row we need (in my case it was 50), using the easy way JavaScript gives to build a string from variables, chaining them with the + sign, like in “getRange(Day+50)”. Like this it will be B50 for Monday, C50 for Tuesday etc.
Enough with the basics, what about useful things?
This stuff was useful for a stats sheet I had, but quickly became outdated when I discovered how much more could be done with Google Apps Script. For example, why writing the statistics myself, adding stuff manually, when I can just calculate statistics automatically?
Here the code becomes quite long, and I can’t show you the sheet it works on since it’s where we keep all of our recruitment stuff, but here is a snippet from a function that classifies the daily work done in various arrays, perfect for compiling automated statistics:
There would be quite a lot to write about this, but in short, you can see the following interesting bits:
You can use sheets to store settings which you use to process other sheets! This is much easier than using databases, and with some setup work, it lets you change what a script does without touching its code anymore.
If you organize your sheet with some default values that always start in the same way, like in this case my “statuses” starting with numbers or letters, you can check their values easily and quickly by looking only at the first character of the cell value, instead of the whole cell.
Using the push() method of arrays is great for counting things and saving them in lists at the same time.
Using arrays instead of separate variables for concepts like contacts that are new, to-be-contacted (TBC in the script) and contacted, I am then able to procedurally go through them by cycling through their index. It makes the code harder to read, but if you comment it properly, you can have the best of both worlds: the speed and brevity of doing things procedurally in nested loops, and code that can be easily explained.
All this stuff can be used to generate statistics either as popup messages, or full-on sheets:
Here I use the same bidimensional array to build a report that just gets displayed on screen via the alert() function, and copied to a sheet, since the setValues() function takes a bidimensional array.
I was also surprised by how the usage of a few emojis can make both the code and the result more readable and clear. Notice for example how I create toasts (popup notifications within the application) showing the time elapsed and what the script is doing, by showing a progressively later time in the clock emoji.
On an empty day like this Sunday, this generates all 0s, but here is the result for you to get an idea:
As you can see, here a lot of titles of skills/positions are mentioned which were not on the script, because they come from a settings sheet:
It’s not pretty because I keep it hidden, and generate it from another script, and another document: you can make your sheets talk to each other this way!
But what about the HTML and CSS? Where’s the UI?
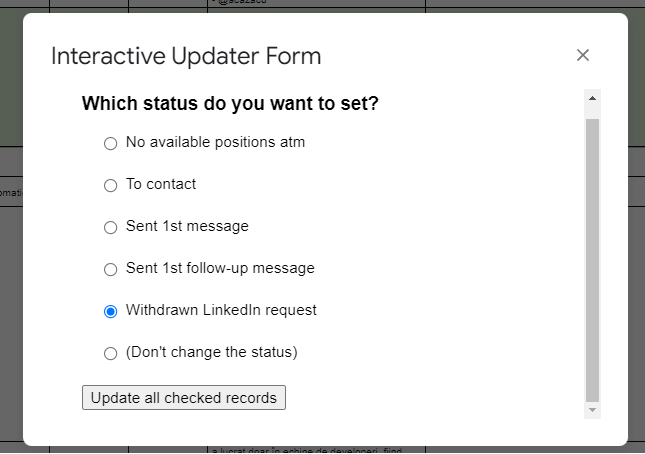
Well, at some point I made something like this:
It’s HTML with simple CSS, and it talks with Google Apps Script, and is done from the same Google Apps Script interface.
It seems trivial stuff, but when combined with the checkboxes I added to the sheet, it could save me a lot of time (especially in cases in which it needed to calculate a specific reminder for some actions, which I was previously doing manually.)
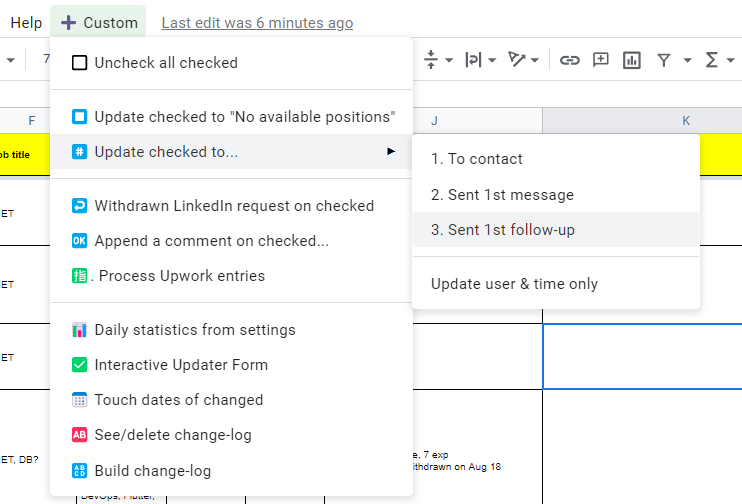
However, I realized it was much slower to display such a window to start my functions, compared to having them in a custom Google Sheets menu which you can easily build!
A lot can be done this way, but still, nothing compared to what can be done with time-driven triggers to fully automate some tasks, or what I managed to do writing my own Chrome Extension for internal use, which interacts two-ways with my Google Sheets, without even asking me anything. As mentioned before, I think the best UI for productivity is no UI at all..!
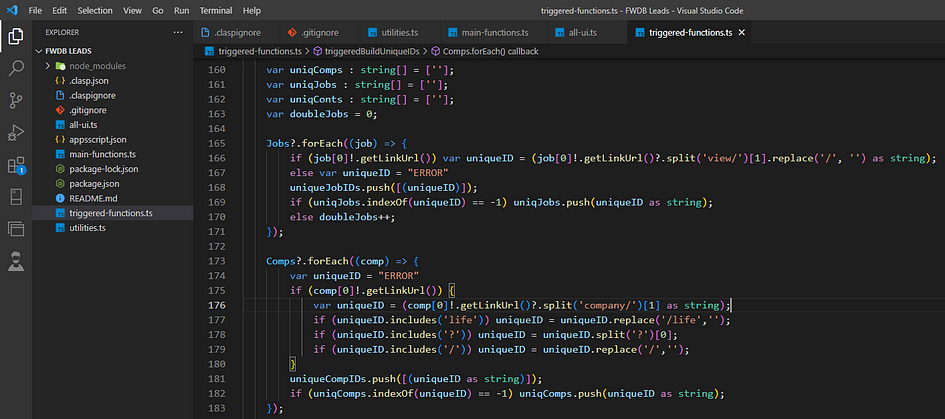
Next time I will dig into these topics, showing also how to step up the game by using a standard development environment instead of Google’s nice but limited interface, and switching to TypeScript.
Now it feels like coding for real! 😀
If you were not into coding and you have questions about the code snippets or how to do other things, please feel free to ask in the comments, or directly to me, maybe by contacting me on LinkedIn.
No such thing as a stupid question, and by explaining to me what you’re trying to achieve, you might also give me a good idea for a new script or app.
In any case, whether you felt like this was trivial or difficult, I totally recommend starting to try this stuff yourself: it taught me many things, increased my productivity, and even improved my logical thinking in general!
Also do not hesitate to join our FusionWorks team to work together, we have lots of brilliant products in the pipeline.
User authentication is a functionality every web app shares. It should have been perfected a long time ago, considering the number of times it has been implemented. However, there are so many mistakes made and vulnerabilities that haven’t been patched yet.
Below is a list of best practices regarding user authentication. This list will cover as many of the related pitfalls as possible. So here is the list of things that will make your backend authentication mechanisms much more secure:
Always use TLS. Every web API should use TLS (Transport Layer Security). TLS protects the information your API sends (and the information that users send to your API) by encrypting your messages while they’re in transit. In case you don’t use TLS on your website, a third party could intercept and read sensitive data that is in the process of transfer.
Use bcrypt/scrypt/PBKDF2 for password storing. Don’t use MD5 or SHA, as they are not the best for password storage. Long salt (per user) is mandatory (the aforementioned algorithms have it built-in).
Use API keys to give existing users programmatic access. While your REST endpoints can serve your own website, a big advantage of REST is that it provides a standard way for other programs to interact with your service. To keep things simple, don’t make your users do OAuth2 locally or make them provide a username/password combo — that would defeat the point of having used OAuth2 for authentication in the first place. Instead, keep things simple for yourself and your users, and issue API keys.
Use CSRF protection (e.g. CSRF one-time tokens that are verified with each request). Frameworks have such functionality built-in.
Set session expirations to avoid having forever-lasting sessions. Upon closing the website tab — the user’s session should expire.
Limit login attempts.
Don’t allow attackers to figure out if an email is registered or not by leaking information through error messages.
Forgotten password flow. Send one-time (or expiring) links to users when trying to reset a password.
Use the secure option for cookies. It will tell the browser to send cookies over SSL/TLS connections.
Don’t leak information through error messages — you shouldn’t allow attackers to figure out if an email is registered or not. If an email is not found, upon login, just report “Incorrect credentials.” On password resets, it may be something like “If your email is registered, you should have received a password reset email.” This is often at odds with usability — people don’t often remember the email they used to register, and the ability to check a number of them before getting in might be important. So this rule is not absolute, though it’s desirable, especially for more critical systems.
At FusionWorks we enjoy using the NestJS framework, which helps a lot to keep our Node.js code clean and well-structured thanks to its modular architecture. But what if you only have Express at a hand? Could we achieve something similar?
Image generated by MidJourney AI for “developer creates smart routing system using Express”
In this tutorial, we’ll set up routes with “dummy” handler functions. On completion, we’ll have a modular structure for our route handling code, which we can extend with real handler functions. We’ll also have a really good understanding of how to create modular routes using Express!
Let’s say we have three routes (/, /home, /about), each one with two different HTTP verbs (get, post).
Our goal here is to create a separate file for each path and make use of the Express Router object. The Router object is a collection of middleware and routes. It is a mini-app within the main app. It can only perform middleware and routing functions and can’t stand on its own.
By having each route in its own file, we’re achieving a less messy code in the index.js file. The problem that still persists here — is that every time we add a new route file, the main file has to change as well, in order to map the path to the file.
Achieving a greater number of routes — produces the same problem: the main file gets bigger and messier.
We can solve this issue by creating a separate file that maps all the other routes and making use of it inside the main file.
The routes folder index file receives the app instance from the main file and makes the path mapping. Now we have a cleaner main file, but we still have the problem that it’s required to manually map each path to its file.
This can be improved if we would loop through the routes folder’s files and map them accordingly. We’ll be using the filesystemreaddirSync method. This method is used to synchronously read the contents of a given directory, it also returns an array with all the file names or objects in the directory.
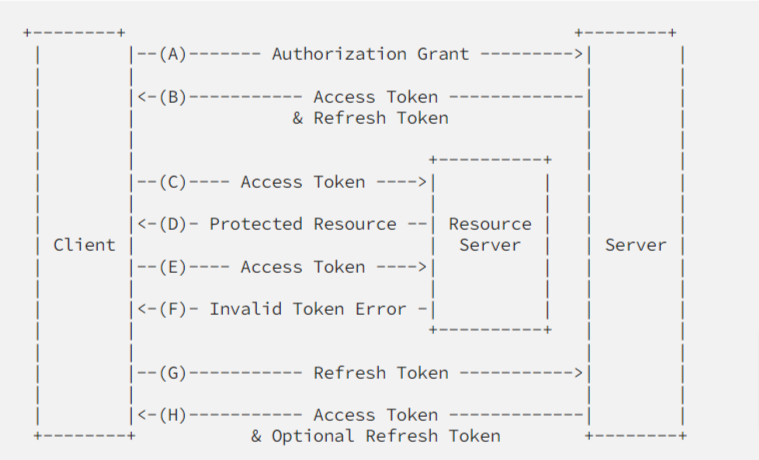
In today’s article, we’ll be building a complete JWT-based authentication module with logout and refresh functionality. Also, we’ll get through on how to use access and refresh tokens with PassportJS and NestJS. But first, let’s understand how this mechanism works in theory.
Image generated by MidJourney AI for “json web token protects API from hacker attacks”
After authenticating successfully the client receives an access token.
The client provides an access token every time a protected request is made.
The server checks if the access token is valid, if so, the request is successful.
In case the token is invalid, the server throws an error about the token being invalid.
The client is able to get a new access token by authenticating or refreshing it by presenting the refresh token.
The server validates the refresh token, and if valid, issues a new access token and a refresh token.
Now that we have a solid grasp of how the mechanism works in theory, let’s try and put it into practice.
Prerequisites
In this guide we’ll be using regular REST for our endpoints and Prisma as our ORM system, we’re also gonna need a hashing library to hash users’ passwords and tokens — we’ll be using bcrypt. For our authentication strategy, we’re gonna installnestjs/jwtand passport-jwt.
We won’t cover the project setup or the Prisma & JWT setup, since this is not the purpose of our today’s article. You could check the respective NestJS documentation if you need more details on this:
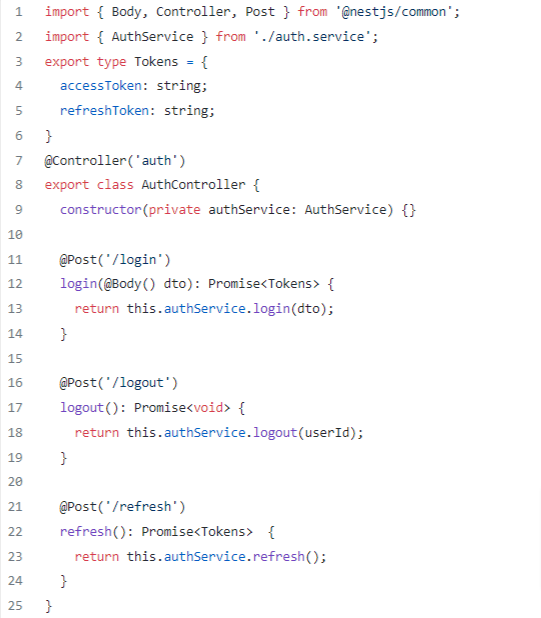
Once done with the basics let’s dive in by setting up our authentication controller:
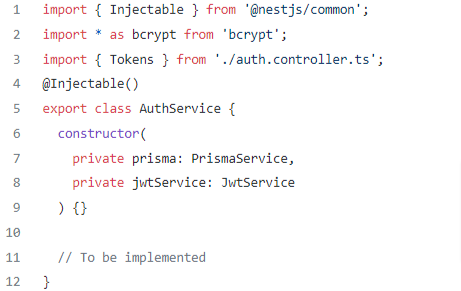
And the authentication service should look like this:
Now let’s add our first method in our auth.service.ts to retrieve a user’s tokens, use env variables for the expiresIn field, the refreshToken expiration time is usually about a week and the accessToken expiration time should be about 15 minutes.
Let’s also add a method that will update a user’s hashedRefreshToken field, see more here.
Let’s implement the login functionality inside auth.service.ts, we’ll be using the above-implemented methods, signTokens and updateRefreshToken:
So what happens here is — that on each login, we supply the client with fresh tokens and update the current user’s state with a hashed token which will be used in the future to refresh both the refresh token and the access token.
Let’s implement both the logout and refresh methods, the logout method will delete the user’s stored hashed token and the refresh method will compare if the issued token matches the one stored inside the user, if that’s the case — it will issue the client a pair of fresh tokens.
Let’s move on to our auth.service.ts, see more here.
Pay attention that our logout and refresh method — received userId as a parameter, we’re not gonna pass that parameter inside the body of our request but rather get it from the JWT of the current user — we’ll achieve that by implementing both strategy and guardfunctionality (we’ll use the @nestjs/passportAuthGuard for now), it will help to manage the state of the authenticated users (by issuing JWT tokens in our case and verifying their credentials).
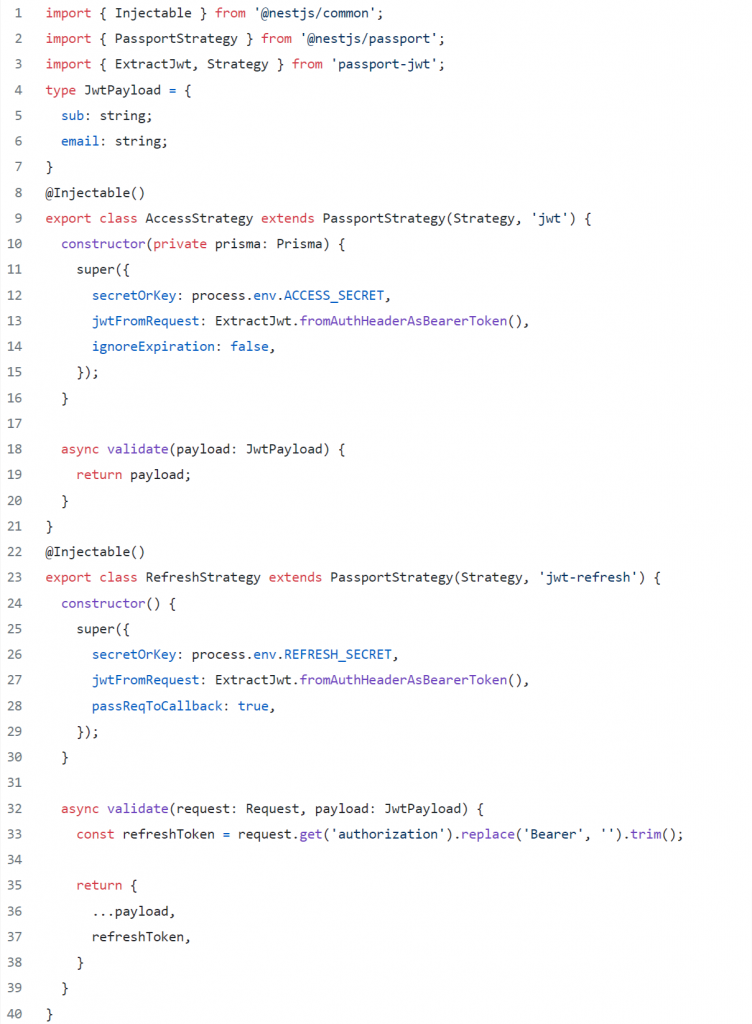
We’ll need 2 different strategies, one for accessing all the endpoints and one for our refresh endpoint.
The first strategy will decode the JWT from the request, by setting the ignoreExpiration to false — it will also check its expiration and send it back through the AuthGuard, so we’ll be able to access it from the Req() decorator (by default under the property user).
By setting the passReqToCallback to true inside the second strategy, we have access to the request object inside the validate method, the “refresh strategy” will take the refresh token from the authorization header and send it to the controller through the AuthGuard.
Let’s proceed by implementing our strategies first:
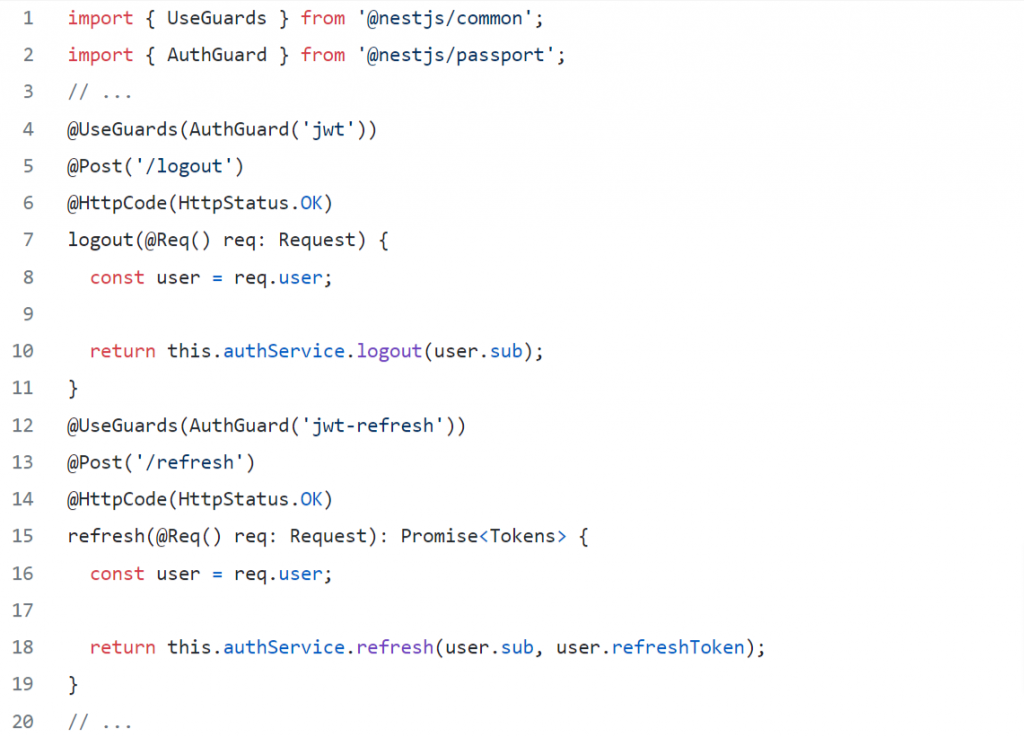
Now, let’s update our logout and refresh endpoints inside the auth.controller.ts, we’ll pass our newly created strategies to the AuthGuard which will be passed inside the @UseGuards decorator, thus our endpoints will be secured accordingly, that way we’ll create a connection between our endpoint and the created strategy and we’ll have access to the request object that is fulfilled with JWT data inside the strategy.
So let’s go once again through what’s happening really:
The logout endpoint is secured by our guard that implements the jwt strategy, thus it can be accessed only if the client provides a valid access token, if the access token is invalid — the refresh endpoint should be called by the client to ask for a new pair of tokens.
The refresh endpoint has one important job — to let the client refresh his tokens (without having to log in again), in case the provided refresh token by the client is not valid, the user is forbidden from accessing any endpoints other than login (in the case of our guide).
So now — we have our own refresh token mechanism implementation. This can be improved of course by creating a custom AuthGuard for both of our cases (access and refresh), we may also create a custom decorator that will return the JWT data from the ExecutionContext, instead of accessing the Req() decorator.
Bonus
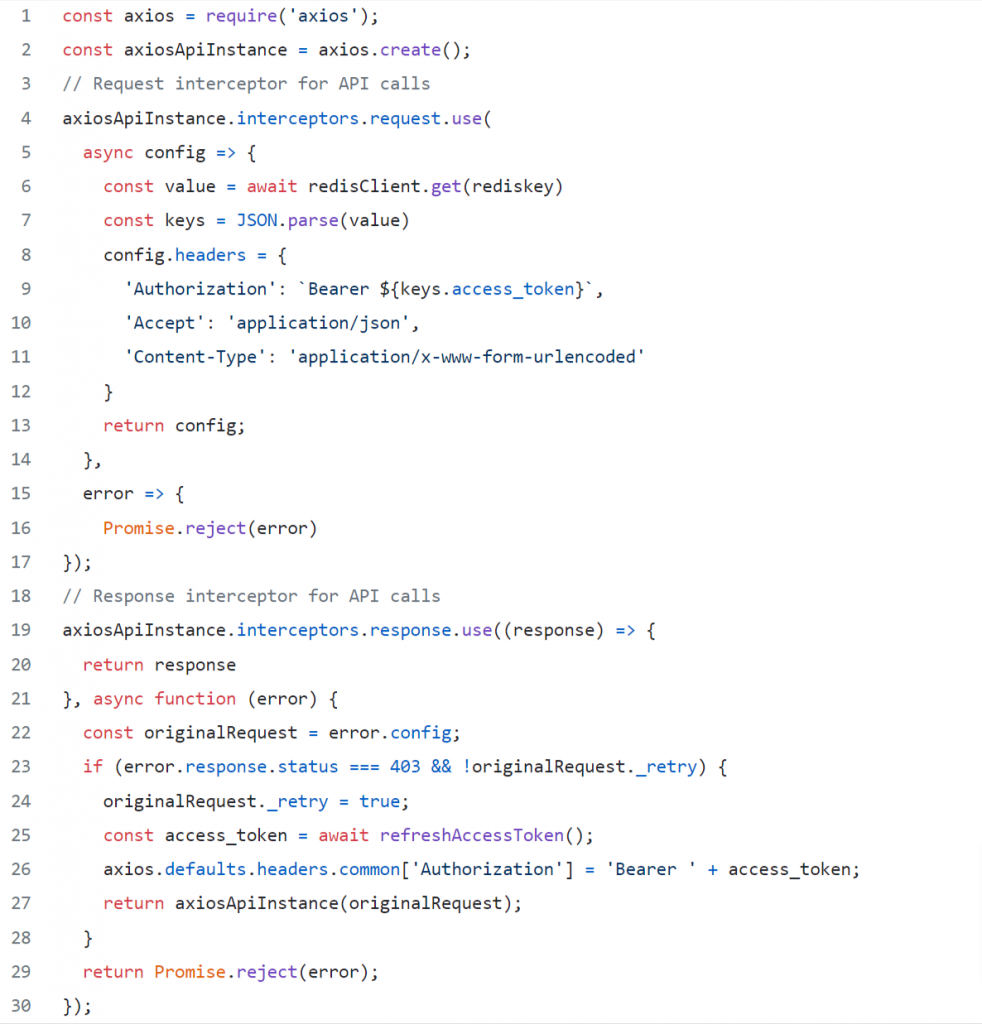
Since we have the backend implementation, let’s try to go through the frontend part. As was mentioned before, the client asks for new tokens using the refresh token as soon as the main token expires, and then the client needs to use the freshly retrieved token for the next API call until that token expires as well. You can send the request for new tokens after the first 403 response for example, but in this guide, we’ll be using Axios for the HTTP requests and Redis to store the tokens:
The response interceptor verifies if the server returned a status code that shows an access token has expired. If that’s the case, a function that refreshes the access token gets called. That function returns and stores the tokens in Redis.
Flutter comes with many packages that grant the possibility to run web pages in mobile apps. After research, the leader has been found: webview_flutter.
Why webview_flutter
First of all, it is currently maintained by the official Google team. When the development started, there were no official recommendations by the Flutter team on which package should be used.
The second reason why we started using this package — it gives us the possibility to share data between the web page and the flutter application in two directions. This feature was crucial when we investigated this case.
On iOS the WebView widget is backed by a WKWebView; On Android, the WebView widget is backed by a WebView.
How to set up webview_flutter
The setup is pretty easy. Install the library using the description on the official page.
How do we get data from a web page
JavascriptChannel gives us possibility to get data from web page. We set it up in the javascriptChannels list:
Firstly we choose the name for the channel in name parameter. This name will used to access channel from inside the web page. When we call the method channel from the page, onMessageReceived will be fired transporting the message.
Now let’s see how to send messages from the page. Firstly, webview_flutter mutates window object. If a web page has been loaded using this package it will have a property that we have defined in JavascriptChannel. In our case we can access the channel by calling:
We can use postMessage method to pass data to WebView and trigger onMessageReceived callback.
If you should use TypeScript in your project, you will need to override Window interface using following syntax:
How to pass data to a web page
In this particular case, we can not just use a JavascriptChannel, we should somehow inject some JavaScript code that will fire messages inside the web page. In this case, the web page will have a subscriber that will process the data received from the app.
The packagewebview_flutter comes with a solution. We can use WebViewController class that has runJavascript(String script) method:
Once script is executed and message is fired, a callback from inside the page is triggered:
Summary
In this article we have successfully transported data from a web page into Flutter application using WebView and vice versa.
Version control software (VCS) is essential for most modern software development practices. Among other benefits, software like Git, Mercurial, Bazaar, Perforce, CVS, and Subversion allows developers to save snapshots of their project history to enable better collaboration, revert to previous states, recover from unintended code changes, and manage multiple versions of the same codebase. These tools allow multiple developers to safely work on the same project and provide significant benefits even if you do not plan to share your work with others.
Although it is important to save your code in source control, it is equally important for some project assets to be kept out of your repository. Certain data like binary blobs and configuration files are best left out of source control for performance and usability reasons. But more importantly, sensitive data like passwords, secrets, and private keys should never be checked into a repository unprotected for security reasons.
Checking your Git Repository for Sensitive Data
First of all, once you started managing your secret security you need to check the repository for certain data. If you know an exact string that you want to search for, you can try using your VCS tool’s native search function to check whether the provided value is present in any commits. For example, with git, a command like this can search for a specific password:
git grep my_secret $(git rev-list --all)
Setting the security
Once you have removed sensitive data from the repository you should consider setting some internal tools to ensure you did not commit those files.
Ignoring Sensitive Files
The most basic way to keep files with sensitive data out of your repository is to leverage your VCS’s ignore functionality from the very beginning. VCS “ignore” files (like .gitignore) define patterns, directories, or files that should be excluded from the repository. These are a good first line of defense against accidentally exposing data. This strategy is useful because it does not rely on external tooling, the list of excluded items is automatically configured for collaborators, and it is easy to set up.
While VCS ignore functionality is useful as a baseline, it relies on keeping the ignore definitions up-to-date. It is easy to commit sensitive data accidentally prior to updating or implementing the ignore file. Ignore patterns that only have file-level granularity, so you may have to refactor some parts of your project if secrets are mixed in with code or other data that should be committed.
Using VCS Hooks to Check Files Prior to Committing
Most modern VCS implementations include a system called “hooks” for executing scripts before or after certain actions are taken within the repository. This functionality can be used to execute a script to check the contents of pending changes for sensitive material. The previously mentioned git-secrets tool has the ability to install pre-commit hooks that implement automatic checking for the type of content it evaluates. You can add your own custom scripts to check for whatever patterns you’d like to guard against.
Repository hooks provide a much more flexible mechanism for searching for and guarding against the addition of sensitive data at the time of commit. This increased flexibility comes at the cost of having to script all of the behavior you’d like to implement, which can potentially be a difficult process depending on the type of data you want to check. An additional consideration is that hooks are not shared as easily as ignore files, as they are not part of the repository that other developers copy. Each contributor will need to set up the hooks on their own machine, which makes enforcement a more difficult problem.
Adding Files to the Staging Area Explicitly
While more localized in scope, one simple strategy that may help you to be more mindful of your commits is to only add items to the VCS staging area explicitly by name. While adding files by wildcard or expansion can save some time, being intentional about each file you want to add can help prevent accidental additions that might otherwise be included. A beneficial side effect of this is that it generally allows you to create more focused and consistent commits, which helps with many other aspects of collaborative work.
Rules that you need to consider:
Never store unencrypted secrets in .git repositories. A secret in a private repo is like a password written on a $20 bill, you might trust the person you gave it to, but that bill can end up in hundreds of peoples hands as a part of multiple transactions and within multiple cash registers.
Avoid git add * commands on git. Using wildcard commands like git add *or git add . can easily capture files that should not enter a git repository, this includes generated files, config files and temporary source code. Add each file by name when making a commit and use git status to list tracked and untracked files.
Don’t rely on code reviews to discover secrets. It is extremely important to understand that code reviews will not always detect secrets, especially if they are hidden in previous versions of code. The reason code reviews are not adequate protection is because reviewers are only concerned with the difference between current and proposed states of the code, they do not consider the entire history of the project.
Use local environment variables, when feasible. An environment variable is a dynamic object whose value is set outside of the application. This makes them easier to rotate without having to make changes within the application itself. It also removes the need to have these written within source code, making them more appropriate to handle sensitive data.
Use automated secrets scanning on repositories. Implement real time alerting on repositories and gain visibility over where your secrets are with tools like GitGuardian
In this article, we’ll talk about how a company’s values and culture help it implement its strategies and mission. We’ll start with some definitions and introductions and then will identify the possible issues and practical solutions.
Disclaimer: we’ll be using an IT company as an example, so some aspects may appear a bit subjective.
Values, Mission, Strategy
The mission defines the company’s global goal, while strategy leads to its implementation through culture and values.
To develop high-tech products the world and future you will be proud of — FusionWorks
Company values must change through the years. Not because the old ones were bad, but because they are bad for what the company represents now. This is a normal process of getting mature. Just see how Uber changed its initial ‘pirate’ values into more enterprise ones — or you may watch the “Super Pumped” series instead. The same changes we experience in our personal lives. Several times. If not — this is a sign to think your life over.
At FusionWorks, we are going through the same process over and over again, sometimes it’s painful and time-consuming. There are core values such as honesty, openness and inclusion that should not be changed, but upgrades are inevitable for lots of things you thought are here forever. I love this process, but you? Will be great to see your thoughts in the comments.
Values determine the company’s culture code. Here are some aspects of why culture is so important:
Culture is not the thing you write in the company’s employee handbook, it’s what people talk about when you are not around.
Strategy is a promise, corporate culture is the execution.
Culture eats strategy for breakfast.
Culture is formed around what you do, not what you say. If you say you are a company that values health and wellness but then brings in doughnuts every morning there is a disconnect. It’s fine to value doughnuts, who doesn’t love them but it’s not ok when your words don’t match your actions. It kills the trust you have in your team.
Job seekers are most likely to choose one job over another because of the chosen employer’s culture, according to talent acquisition professionals surveyed by the Korn Ferry Institute.
Having this said, a strong company needs to make sure it has its culture code and it’s working. At FusionWorks we use the people and culture approachwhichis a more progressive way of dealing with people. It is people-based, not policy-based.
If you treat people like people, they will be happier.
We can have a meaningful impact on people’s lives by giving them a working environment where they can be themselves and thrive. Understand and help your team grow together through positive activities and encouragement.
Manifesto
The manifesto is a more deliberate expression of your values and also supports the mission you have. It’s typically an emotional story that captivates your audience, emotionally connects with them, and persuades them to support your brand. It’s always a good idea to have it before we proceed to practical steps.
We build a no-bullshit company. No secrets, no lies, transparent, accountable, driven by facts, respectful to all. Openness in every aspect.
We love being tech-oriented and this infuses everything we do.
We believe being people-centric motivates and inspires much better than policies and control.
We are committed to being learning-driven, changing with the world, changing the world.
First, let’s list the things that may make employees unhappy. It doesn’t mean your company has all of them, but they should be considered:
Lack of progression and self-development.
Unsatisfactory salary or benefits.
Unhappiness with leadership.
Lack of flexible schedules.
Boring tasks.
Negative experience/incident.
Lack of recognition.
Dissatisfaction with the company culture.
A need for better work-life balance.
So here we go with implementing the People and Culture strategy. We aren’t forgetting about Human Resources, we value it and everything that goes along with it. HR is policies, procedures, and paperwork — all extremely important. But remember, People and Culture is people-based, not policy-based.
Once the employee has been onboarded (by the fabulous Human Resource team), it is time to improve their well-being, integrate them into the company, and show their value. This engagement improves productivity, creates a positive environment for the employee to thrive in, and generates happiness. Lower turnover, happier employees, and better work.
When we identify the issues, we may choose from the solutions below (not all of them work for all companies).
Supporting employees with talent and career development programs
Implement the grading system — Roles and Levels — and make sure it’s well-defined.
Assign employees to their current Levels. Explain their Roles.
Clearly define the steps to progress to the next level.
Revise the employees’ levels once in 6 months.
Acknowledge employees’ successes.
According to LinkedIn, 94 percent of employees would stay at a company if it invested in their career development.
Development programs should be designed to ensure alignment between your expectations for top talent and the organization’s goals and vision. Professional development can include coaching processes, training seminars, networking opportunities, mentoring, special projects, and more.
Creating a more flexible schedule
The reason for that is the world trend toward remote work. So if it is possible with your company — consider it.
Allow flexible schedule.
Allow remote work if possible.
Encourage a healthy work-life balance.
Many employees value a flexible work environment over compensation. In fact, 72 percent of employees would search for new opportunities if their schedule wasn’t flexible. Implementing changes to work policies can help improve retention rates.
Implementing a feedback and performance appraisal process
Regularly get feedback from clients (once in 3-6 months).
Pass feedback to employees.
Feedback is especially useful during the development of retention plans, and 82 percent of employees appreciate it. Feedback is essential in a remote environment; it establishes a benchmark for behaviors and skills and highlights what employees need to remain happy with their employer. Companies must be open to listening to employees and implementing changes and actions required to keep top talent.
Employee turnover can be reduced by up to 31% by managers acknowledging employee successes. Source.
Offering challenging projects where people matter
Work with the clients directly.
Work on interesting projects that matter.
Make sure the clients listen to the voices of the employees.
Make sure our employees are growing and learning on the projects.
Fire bad clients.
Developing an effective employer branding strategy
Showing you are great or being great? Both. Showing your successes with no real wins doesn’t work long-term and leads to internal discontent. Being great without showing this externally won’t make the employees feel proud of the company, as well as your potential customers and employees won’t know how beautiful you are.
Companies are u̶g̶l̶y̶ copies of their founders.
People want to work in a company which grows together with them, faster than them. Also, they rarely work for those and with those whom they don’t respect at least professionally, who are weaker.
Plan marketing strategy: current employees, potential employees, and customers.
Communicate company strategy, mission and successes both internally and externally.
Engage employees in the company’s activities.
According to a LinkedIn study, a strong employer brand can reduce turnover by 28 percent and the cost of hiring by 50 percent.
The communication and dissemination of the company’s image and actions are key to maintaining employees’ interest in remaining with the company and contributing to its success through specific projects.
46% of employees stated that a lack of transparent leadership communication is driving them to seek new employment. Meanwhile, 79% of highly engaged employees have trust and confidence in their leaders. Source.
Making culture work
Clearly define the company’s mission, culture, and values.
Show employees the big picture and goals.
Explain mission and values.
Believe in your mission and values. If you don’t believe — change them.
Follow them — management should be an example.
Show how mission and values work in practice.
Offering competitive benefits
Offer what others have.
Offer what others don’t have (to stand out).
Offer benefits that make employee’s life comfortable and disappear when they leave the company.
Companies that offer competitive compensation and benefits can see 56 percent lower attrition. With the ever-changing labor market, companies need to adapt to employees’ evolving and growing needs and expectations. Nowadays, the most valuable benefits include remote work flexibility, employee discounts, time off, and financial advice.
Creating an open environment
Encourage employees to speak and voice their concerns, ideas, and opinions.
Treat all employees equally, on all levels. No favoritism.
Treat your employees as you treat your best customers.
Create an environment where everyone feels comfortable and safe.
No one wants to feel excluded in an organization they are a part of. New hire wants to feel like they were hired for a reason, and that they are playing a key role in helping the business achieve its objectives.
Josh Bersin, founder and principal at Bersin by Deloitte, found that companies who deliberately work to encourage inclusion, diversity, development planning, and leadership development in their culture were 3.8 times more likely to be able to coach people for improved performance, 3.6 times more able to deal with personnel performance problems, and 2.9 times more likely to identify and build leaders. Source.
Instead of epilogue
In the final chapter, I’d like to show you the FusionWorks values we believe in and share with the team. They determine our culture code:
Shared understanding in everything we do. Nobody has a monopoly on the truth. Decisions are made together and actions are reasoned on all levels.
People over processes. We encourage independent decision-making and believe in the power of freedom and responsibility.
Building cognitive diversity. Inventions are done by teamwork with people with different mindsets and competencies.
Building quality products. The things we do determine who we are, create our reputation step by step and reflect our eternal pursuit of excellence.
Learning never stops. We believe gaining knowledge is a continuous process and help you invest in your education for mutual benefit.
Sharing is caring. We share our experience — successes and failures — to help others learn and grow.
Building long-term relationships. Both our employees and clients are the people we want to work with long-term.
Learn, make impact, have fun. We always support initiative, awareness, quality, spirit and creativity. As simple as it sounds.
A trust or corporate trust is a large grouping of business interests with significant market power, which may be embodied as a corporation or as a group of corporations that cooperate with one another in various ways. — FusionWorks
In the past, interpersonal relationships were created on the concept — I trust you until you will demonstrate I shouldn’t.
Today, due to competitiveness and many cultural reasons, interpersonal relationships are based on the concept — I do not trust you until you demonstrate I may.
I am not sure which theory is better, but we may surely agree that you may be an enthusiast, competent, and genius, but this means nothing for your success until others believe in you.
Any interpersonal relationship is based on trust and the relationship between employee-employer or the one between client-provider are not exceptions at all. Trust is like a safe feeling in someone’s sincerity. It is the firm belief that a company (it’s management, your colleagues and its services) retains its integrity, quality, and brand for a predictable period of time.
In practice, inspiring someone to trust you is a really hard work of mixing 7 essential elements. These are 7 ”C”-s of trust. Let’s discover them together.
First C is for CHARACTER A company’s character, its Identity is the most difficult to fake, as this is the moral quality that manifests itself through perseverance, the firm will, and fairness. These are the primordial elements for someone to be trustworthy. One of the best ways to prove that you could be trusted is to accept when you are wrong. Everyone appreciates the courage to admit one’s own imperfection.
Second C is for COMPETENCE It is very important to always find time for the personal and professional development of your skills. This is why, FusionWorks is always for sharing knowledge and we inspire our employees to learn continuously as learning is life, especially in our field. Competence in any field means training, reading, learning, and implementing in practice any single skill.
Nr. 3 C is for CONSOLIDATION of the company’s values This aspect is crucial as this is one of the first things to be observed by others. One’s first impression of your company is made in the first moments of your communication. The following moments from any discussion are for validating that first impression. This is why, when some of your employees are not sure about your company’s value, this is felt. The whole conversation will be dominated by a wrong/bad — emotions domino.
This article is powered by Empy.io — an all-in-one tool that helps HRs synchronize with the employees and handle all the internal requests in one single place. Try it for free!
4th C is for CONGRUENCE Trust increases every time your actions (any employees ones) confirm your words (company-culture). The key is the harmony between verbal and non-verbal messages you and your employees spread into the world. In the lack of this harmony, your interlocutor could not believe your message and will have no trust in you as a company.
5th C is for CREDIBILITY Credibility is the ability or power to stimulate the trust of others in your company. It means letting the person we spoke with understand that you, as a company, know very well what you are talking about and if they follow your advice, it will be good for them later. This C is the one most felt in the sales and in the recruitment field. As you will never get a super-contract or a rocket star without demonstrating your credibility.
6th C is for CONSISTENCE A consistent company easily gains the trust of others, no matter who are those — partners, clients, candidates, or employees. It is all too well known in marketing that a brand image is not built overnight. People need time to adapt, time to test, to form opinions, and to disseminate them.
7th C equals to COMPLETENESS People generally have a very strong desire to close the processes that have begun. This “closure” eliminates stress. The explanation is given by a subtle psychological mechanism that shows that the value of stress is directly proportional to the number of unfinished processes. More specifically, when you have 15 distinct activities to solve, you will be more stressed than if you have only one, which involves the same length of work/time to complete. On this principle, we prefer not to engage in activities that do not seem to have a clear and predictable purpose. Consequently, in order to inspire trust, it is very important that what you offer, as a company — your product or service has a beginning and an end. When people know the purpose of an idea, they are more likely to believe in it.
When employees/clients are trusting that the organization provides them with (access to) their goal, both the employee/client and the company will benefit because
a) employee trust is the reason for employees to be motivated, productive and happy. What your employees give back makes the decision to focus on employee trust easier for business leaders. Or, as for many organizations who recognize the importance, it makes employee trust a top priority.
b) client trust is crucial for successful and productive-long-collaborations. This means greater advocacy, loyalty, and engagement from clients. This sets the tone for your business, and as clients advocate, businesses will be able to attract more customers who are ready to invest in their offering.