NestJS + JWT: complete hands-on guide
In today’s article, we’ll be building a complete JWT-based authentication module with logout and refresh functionality. Also, we’ll get through on how to use access and refresh tokens with PassportJS and NestJS. But first, let’s understand how this mechanism works in theory.

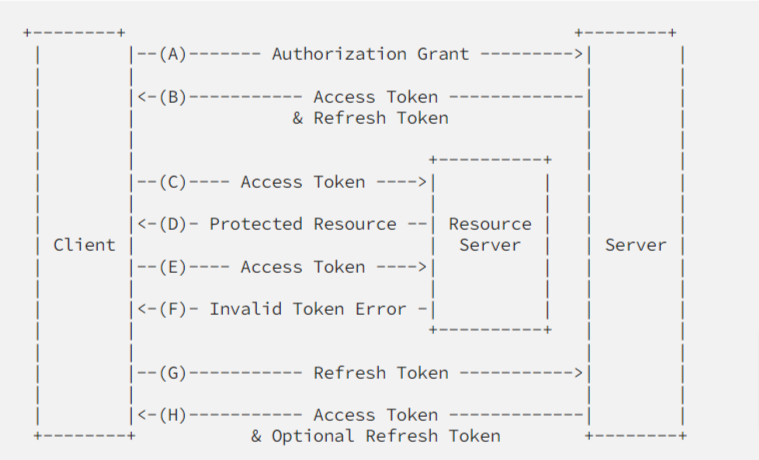
- After authenticating successfully the client receives an access token.
- The client provides an access token every time a protected request is made.
- The server checks if the access token is valid, if so, the request is successful.
- In case the token is invalid, the server throws an error about the token being invalid.
- The client is able to get a new access token by authenticating or refreshing it by presenting the refresh token.
- The server validates the refresh token, and if valid, issues a new access token and a refresh token.
Now that we have a solid grasp of how the mechanism works in theory, let’s try and put it into practice.
Prerequisites
In this guide we’ll be using regular REST for our endpoints and Prisma as our ORM system, we’re also gonna need a hashing library to hash users’ passwords and tokens — we’ll be using bcrypt.
For our authentication strategy, we’re gonna install nestjs/jwt and passport-jwt.
We won’t cover the project setup or the Prisma & JWT setup, since this is not the purpose of our today’s article. You could check the respective NestJS documentation if you need more details on this:
- Basic NestJS setup: https://docs.nestjs.com/first-steps
- Prisma with NestJS: https://docs.nestjs.com/recipes/prisma
- Initial JWT authentication setup: https://docs.nestjs.com/security/authentication#jwt-functionality
Once done with the basics let’s dive in by setting up our authentication controller:
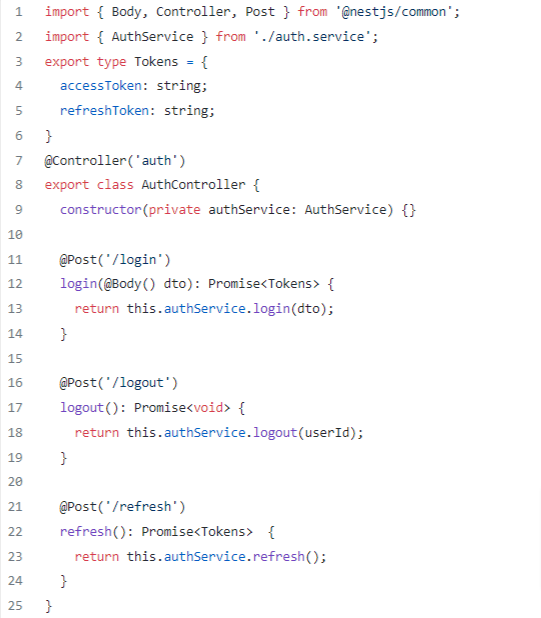
And the authentication service should look like this:
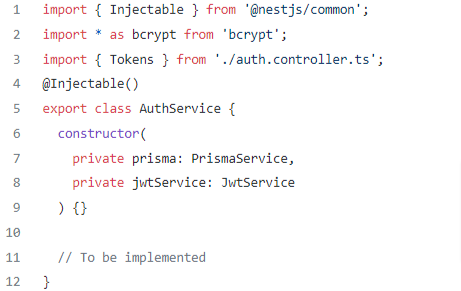
Now let’s add our first method in our auth.service.ts to retrieve a user’s tokens, use env variables for the expiresIn field, the refreshToken expiration time is usually about a week and the accessToken expiration time should be about 15 minutes.
Let’s also add a method that will update a user’s hashedRefreshToken field, see more here.
Let’s implement the login functionality inside auth.service.ts, we’ll be using the above-implemented methods, signTokens and updateRefreshToken:

So what happens here is — that on each login, we supply the client with fresh tokens and update the current user’s state with a hashed token which will be used in the future to refresh both the refresh token and the access token.
Let’s implement both the logout and refresh methods, the logout method will delete the user’s stored hashed token and the refresh method will compare if the issued token matches the one stored inside the user, if that’s the case — it will issue the client a pair of fresh tokens.
Let’s move on to our auth.service.ts, see more here.
Pay attention that our logout and refresh method — received userId as a parameter, we’re not gonna pass that parameter inside the body of our request but rather get it from the JWT of the current user — we’ll achieve that by implementing both strategy and guard functionality (we’ll use the @nestjs/passport AuthGuard for now), it will help to manage the state of the authenticated users (by issuing JWT tokens in our case and verifying their credentials).
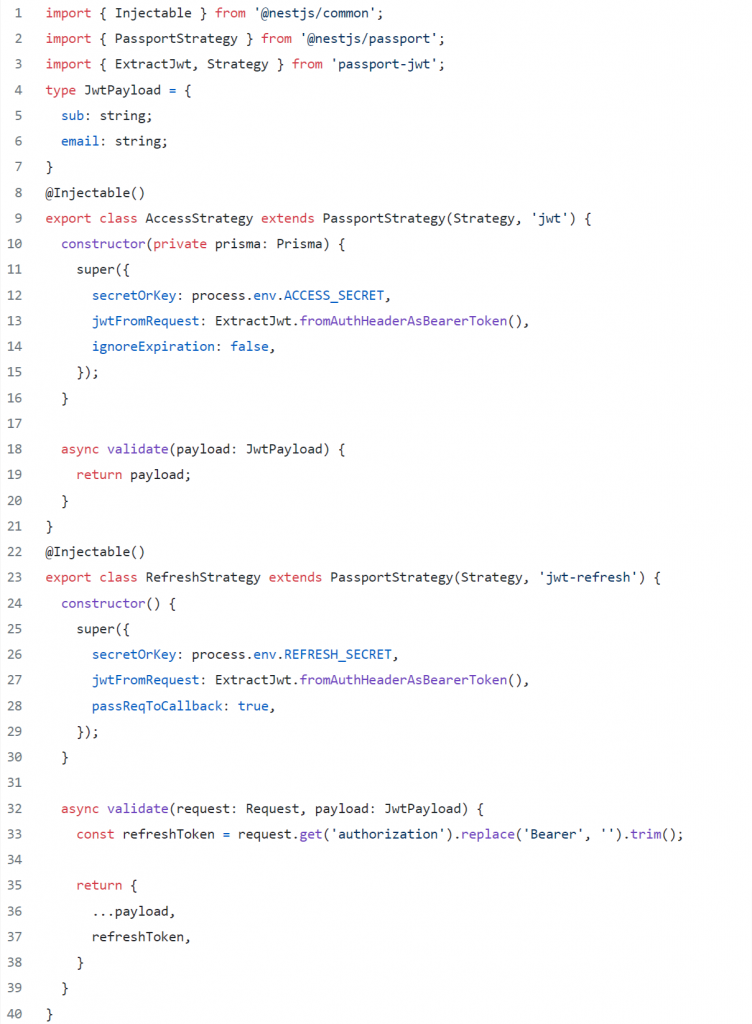
We’ll need 2 different strategies, one for accessing all the endpoints and one for our refresh endpoint.
The first strategy will decode the JWT from the request, by setting the ignoreExpiration to false — it will also check its expiration and send it back through the AuthGuard, so we’ll be able to access it from the Req() decorator (by default under the property user).
By setting the passReqToCallback to true inside the second strategy, we have access to the request object inside the validate method, the “refresh strategy” will take the refresh token from the authorization header and send it to the controller through the AuthGuard.
Let’s proceed by implementing our strategies first:
Now, let’s update our logout and refresh endpoints inside the auth.controller.ts, we’ll pass our newly created strategies to the AuthGuard which will be passed inside the @UseGuards decorator, thus our endpoints will be secured accordingly, that way we’ll create a connection between our endpoint and the created strategy and we’ll have access to the request object that is fulfilled with JWT data inside the strategy.
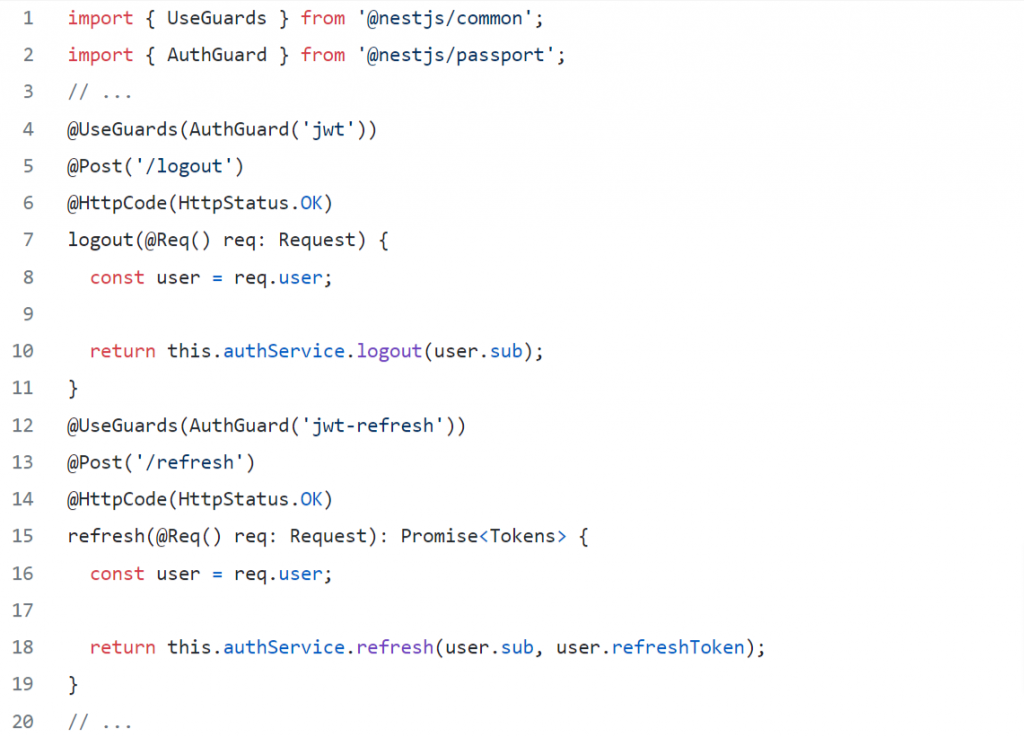
So let’s go once again through what’s happening really:
- The
logoutendpoint is secured by our guard that implements the jwt strategy, thus it can be accessed only if the client provides a valid access token, if the access token is invalid — therefreshendpoint should be called by the client to ask for a new pair of tokens. - The
refreshendpoint has one important job — to let the client refresh his tokens (without having to log in again), in case the provided refresh token by the client is not valid, the user is forbidden from accessing any endpoints other thanlogin(in the case of our guide).
So now — we have our own refresh token mechanism implementation. This can be improved of course by creating a custom AuthGuard for both of our cases (access and refresh), we may also create a custom decorator that will return the JWT data from the ExecutionContext, instead of accessing the Req() decorator.
Bonus
Since we have the backend implementation, let’s try to go through the frontend part.
As was mentioned before, the client asks for new tokens using the refresh token as soon as the main token expires, and then the client needs to use the freshly retrieved token for the next API call until that token expires as well. You can send the request for new tokens after the first 403 response for example, but in this guide, we’ll be using Axios for the HTTP requests and Redis to store the tokens:
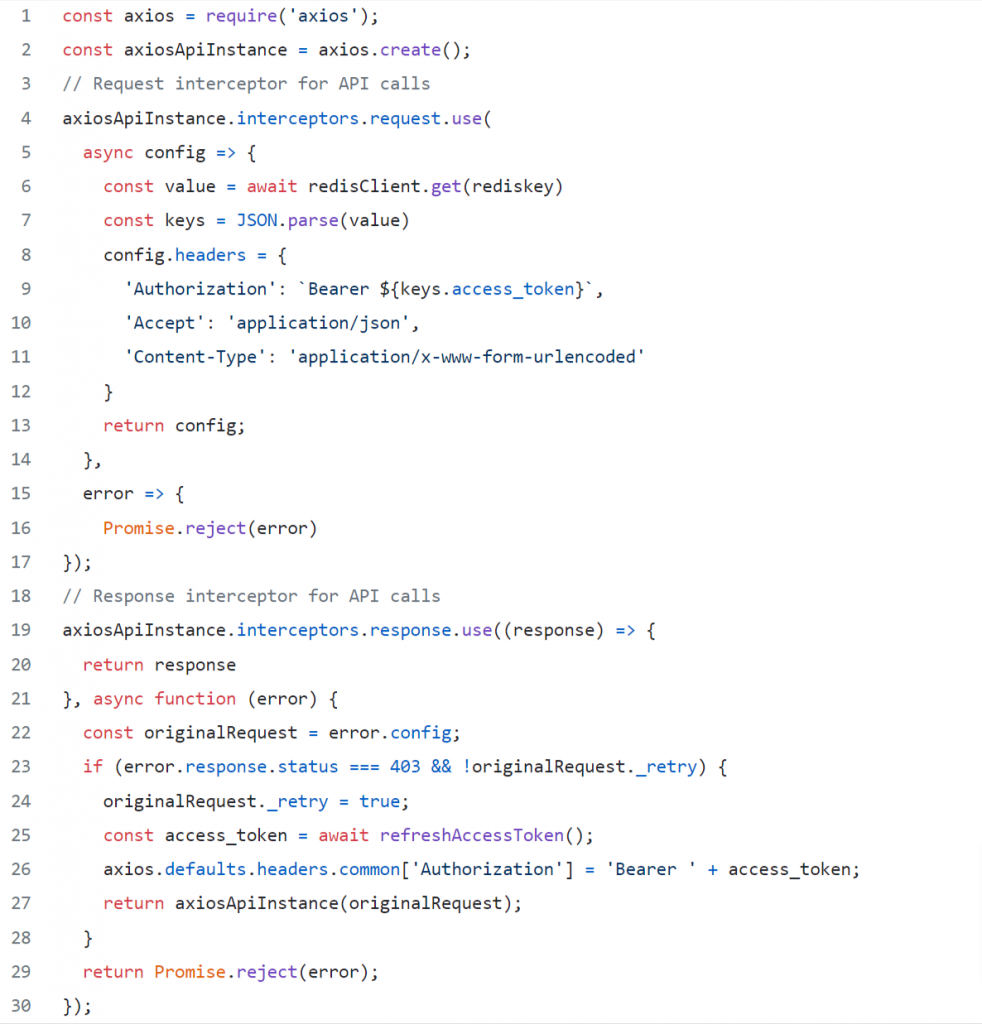
The response interceptor verifies if the server returned a status code that shows an access token has expired. If that’s the case, a function that refreshes the access token gets called. That function returns and stores the tokens in Redis.