In the long and SOMEtimes coherent blog series below, I made a case against web scraping, when justifying why my Google Chrome Extension does what it does, the way it does (very little, but quickly, respectively. 😋)
However, I web-scrape almost daily; not as a recruiter, but as a sales helper, automating the influx of leads at the awesome place that is FusionWorks!
Due to my “90s Computing Mindset ™” (described here and there) I’m obsessed by optimization (even if apps run on superfast Cloud servers! 🤪) So I always web-scraped “the hard way”: manipulating the hell out of strings via JavaScript (almost a forced choice on Google Apps Script.)
But as I discovered a couple of times already, while this mindset is good for performance tuning, it can often prove to be overkill nowadays, as small speed differences are not noticeable on small workloads. Nobody wants to tune a Toyota Prius for racing, at least nobody sane! 🤣
So I told myself: let’s see what the normal people are using, for once… And now I’ll report what I learned in little more than 2 hours of deep dive, comparing stuff for your convenience… Or amusement!
The hard way: the (lovely) hell of string manipulation
While I see many don’t like JavaScript string manipulation, I find it fascinating, and much easier than the hell I remember from my self-taught C++ years (although I can’t be sure: it was almost 25 years ago! 🧓)
NOTE: This assumes no access to the DOM, because of environment constraints. It’s the worst-case scenario: treating pages as strings!
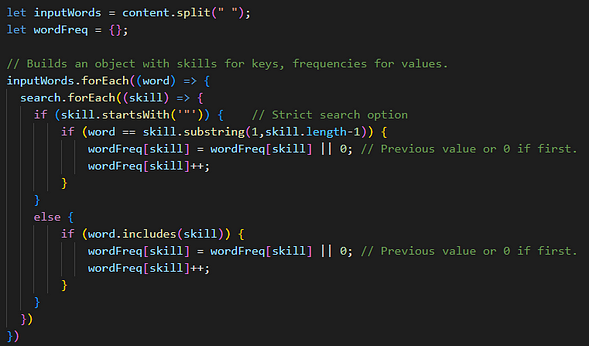
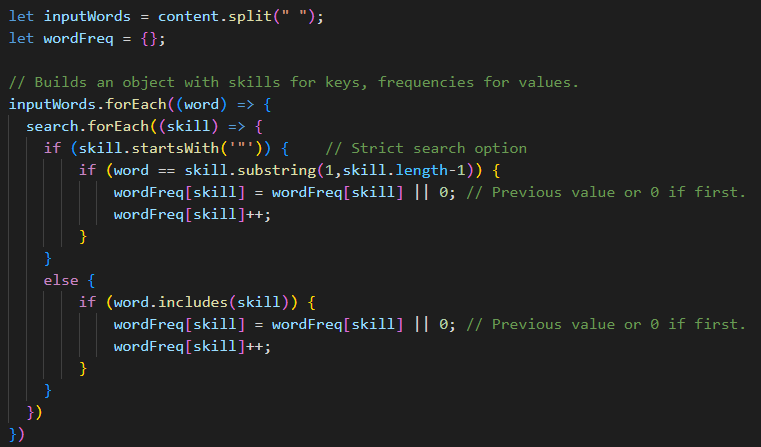
I went from “blunt force” splits, forEach cycles, and bad if/else’s (I had just started coding 😅) like this function for the extraction of keywords:
To the less “janky”, less nested, faster version here, using a Set for the dictionary and a for…of on it. Gained around 15% in speed! (The additional stuff existed in some form in the previous one too, but I can’t be bothered to dig the old commits… 🤣)
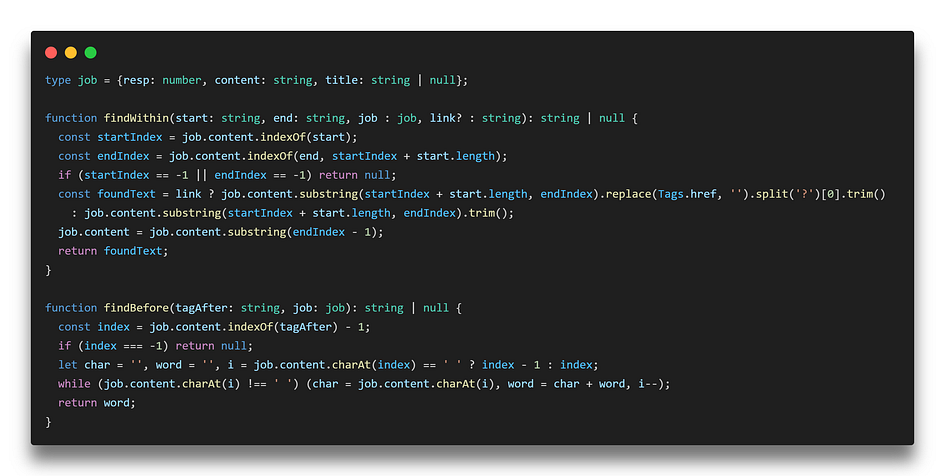
… To working directly with indexOf and substring (in a different use-case.)
See what you lose chasing performance…?
The difficult part here is understanding what works best when it comes to finding the HTML elements/attributes we need.
As I found out, it’s often not worth thinking too much about this stuff: whether you split everything and work on string arrays, use indexOf and substring, or do something more spLice-y (dev-dad joke 🧓)performance will be similar. E.g.: a version of the above using split got almostthe same speed.
Speed is more influenced by loops, and where/how/when you store stuff.
I recommend using Map and Set objects when it makes sense, since they can be even faster than arrays when looking up stuff, or just being mindful of when you’re copying stuff, and when you’re just referencing objects.
About loops, more serious people than me found that the fastest is usually the classic for (bad for other reasons) or forEach, while “for in” and “for of” are usually slower, though the latter is amazing with Sets and Maps.
If like me you do this stuff from Google Workspace Apps, which run on GCP for free, you won’t feel much of a difference, so just go for what’s more readable for you, or if working in a team, what the team agrees is best! 👍
Cheerio: a library that makes things easier… Especially screwing up!
Yes, I didn’t become a fan of this cheerful library, at all…
I think it exists just to make jQuery veterans happy. Performance is very similar to regular string manipulation (obviously, since that’s what’s under the hood), but you’ll find that any dynamic content that takes time to load on a page is totally out of reach for Cheerio, when even puny URLFetchApp on Google Apps Script can actually get it!
If like me you’ll look for a solution to this on Stack Overflow, you’ll find replies telling people to just stop using Cheerio, and use Puppeteer, instead! 🤣 (Which I did!)
To be sure, I also asked ChatGPT, and indeed it confirmed that dynamically-loaded content is not going to be seen by Cheerio. ⛔
I couldn’t believe this, so I tried introducing some artificial delay (after asking ChatGPT and being told it could solve this) but none of my or ChatGPT’s solutions actually worked. Thanks for nothing, AI! 😏
So funny! 🤣 In the end it’s “Just use Puppeteer”, like Stack Overflow’s repliers…
Puppeteer: now we’re talking! Unless you want to deploy for free…
Puppeteer is widely considered one of the best tools/frameworks to scrape the web using JavaScript, thanks to its headless browser approach.
This is what you want to use to actually interact with pages, for example logging into websites, or just waiting for content before extracting data.
I really liked Colby Fayock’s guide to deploy Puppeteer serverless.
But if you try the same now it won’t work because of dependencies’ versions conflicts, and an increase in size of chrome-aws-lambda plus puppeteer-core, above the memory limits of Netlify’s serverless Functions. (For once my 90s Computing Mindset ™ is relevant! 🤣)
You might have some luck if you use his exact same dependency versions…
But I didn’t try because I realized: I don’t need it hosted as an API! While it’d definitely be cool, I can actually just run it locally, and make it send data to a web app I already have online, like my own Google Apps Script!
As an HR Professional with a strategic mindset and 9+ years of experience in this mysterious field, one of the most important aspects of my team’s job is to ensure that we have the best talent available for our organization. In today’s digital age, when everything is changing so fast, the reality of work has changed as well, and hiring dedicated skilled freelancers has become a popular choice for businesses. In this article, I will highlight the advantages of working with dedicated skilled freelancers who have been selected by a team specially tailored to your organization’s needs, along with a solution that may save you time and money.
“A stress-free way to hire tech teams” — Talents.Tech
Advantage Nr.1 — Flexibility to scale your workforce up or down based on your business needs. This means that you can easily tap into a pool of talent who are readily available to work on your projects, without having to worry about overhead costs such as office space, benefits, and training expenses. In addition, the ability to scale your workforce means that you can easily adapt to changing market conditions or project demands.
Advantage Nr.2 — Bring a wealth of expertise and experience to your organization. By working with a team that has been specially selected for your needs, you can be assured that they have the right skills, knowledge, and experience to deliver quality work. This means that you can tap into a pool of talent that has already been vetted and evaluated, which saves you time and resources in the recruitment process.
Advantage Nr.3 — Opportunity to tap into a global talent pool. This means that you can access talent from different parts of the world, who bring unique perspectives and skills to the table. By working with a diverse pool of talent, you can analyze their different backgrounds and experiences to create innovative solutions for your organization.
Advantage Nr. 4 — Long-term relationships with your talent pool. By establishing ongoing relationships with your freelancers, you can build trust and loyalty, which translates into a stronger and more productive workforce. This means that you can tap into a pool of talent that is committed to your organization’s success, and who is willing to go the extra mile to ensure that your projects are delivered on time and within budget.
Did you know that Talents.Tech works in just 4 easy-steps?
(1) The client submits a request
(2) AI algorithms select a list of suitable profiles
(3) The client chooses a candidate from this list
(4) Work Starts
When a company chooses to work with a freelancer, there are a number of potential challenges they may face. Here are some of the most common problems a company may encounter when choosing to hire a freelancer:
a) Finding the right candidate: This requires a deep understanding of the job requirements and a thorough screening process to identify candidates who possess the necessary skills, experience, and cultural fit.
b) Time constraints: Companies often have to work within tight deadlines and face pressure to fill job vacancies quickly. This can be particularly challenging when there are multiple positions to fill simultaneously.
c) Quality control: It can be difficult to ensure consistent quality when working with freelancers, especially if they have different work styles or standards than your company.
d) Communication: This can be more difficult with freelancers, as they may not be as readily available for meetings or check-ins.
e) Accountability: Because freelancers are not full-time employees, they may not feel as invested in the project or company, and may not take accountability as seriously as an employee would.
f) Dependability: Freelancers may have other clients or commitments that take precedence over your project, making it difficult to rely on them for timely delivery.
g) Cost: While hiring a freelancer can be more cost-effective in the short term, it may end up costing more in the long run if the work is not up to standard, or if you have to continually hire new freelancers to replace those who do not work out.
Talents.tech was specifically designed to address these real problems that companies face when working with freelancers. They understand that finding the right talent can be a time-consuming and costly process, especially when you’re trying to build a team that’s tailored to your organization’s specific needs.
Our partner’s platform was created to help companies overcome these challenges by providing a curated pool of talented and skilled freelancers interviewed and tested by a team of experts in their respective fields. AI algorithms select the best from the best and propose you a list of profiles that are suitable for your own project. This means that you can be assured that the freelancers you work with have the right skills and experience to deliver quality work on time and within budget.
Along with these, their platform is designed to offer companies the flexibility and scalability they need to adapt to changing business needs. Whether you need to scale your workforce up or down, our platform makes it easy to find the talent you need, when you need it.
Why work with Talents.tech? Professionally screened candidates. The vast range of specialists. Small service fee.
In conclusion, working with dedicated skilled freelancers who have been selected by a team specially tailored to your organization’s needs offers a range of advantages, including flexibility, expertise, global reach, and long-term relationships. By pointing out these advantages, your organization can tap into a pool of talent that is committed to your success and who can deliver quality work on time and within budget. Talents.tech is the answer to the real problems that companies face when working with freelancers. They provide a simple and effective solution that saves time, reduces costs, and ensures that you work with the best talent. Being a huge part of the HR team, I recommend that organizations explore the benefits of working with dedicated skilled freelancers that were selected especially for their needs and projects. As there is no bad or good professional, there are just collaborations that can not succeed without dedicated magic, present during the recruiting process. In our case — this is done by the harmony between human proficiency and AI correctness.
If all these arguments are not enough and you still want to work and collaborate with ”sweet outsourcing”, feel free to contact our trusted team at FusionWorks. As we know how to build your product from scratch or join the existing team as we are TECH-ORIENTED. PEOPLE-CENTRIC. LEARNING-DRIVEN.
As the freelance workforce continues to grow, companies are increasingly relying on freelance talent to meet their business needs. While hiring freelancers has many benefits, such as cost savings, flexibility, and access to specialized skills, it also comes with its own set of risks.
As an HR specialist with 9 years of experience, I’ve seen firsthand the challenges that companies face when it comes to hiring freelance talent. In this article, I’ll share some best practices and strategies to help companies minimize the risks associated with freelance talent acquisition.
Looking for your next employee? Fill in a form here and the magic will start.
Clearly Define Project Scopeand Expectations— one of the biggest risks when hiring freelancers is the lack of clarity around project scope and expectations. To limit this risk, it’s important to clearly define the project scope and expectations upfront, including deliverables, timelines, and communication protocols. This will help ensure that the freelancer understands what is expected of them and can deliver the project on time and within budget. If you need help here, feel free to contact FusionWorks, as one of their directions is consulting.
Conduct a Thorough Screening Process — when hiring freelancers, it’s important to conduct a thorough screening process to ensure that they have the necessary skills and experience to complete the project successfully. This may include reviewing their portfolio, checking references, and conducting interviews to assess their communication and collaboration skills. No need to hire expensive consultants, start using Talents.Tech.
Use a Contract or Statement of Work — to protect both parties, it’s important to use a contract or statement of work that clearly outlines the terms of the project, including payment, intellectual property rights, and termination clauses. This will help ensure that both parties are on the same page and can avoid any misunderstandings or disputes down the line. You may hire a legal consultant here, in order to draft all needed documents once and you may use them happily after.
Set Clear Performance Metrics — to ensure that the freelancer is meeting expectations and delivering high-quality work, it’s important to set clear performance metrics upfront. This may include deadlines, quality standards, and communication expectations. Regular check-ins and performance reviews can help ensure that the freelancer is meeting these metrics and can help identify any issues early on. Setting clear and correct key metrics is crucial for any organization that wants to succeed, if you need any help here, contact FusionWorks as they always have the solution to your needs.
Build Strong Relationships with Freelancers — building strong relationships with freelancers can help minimalize the risk of turnover and ensure that the freelancer is invested in the success of the project. This may include regular communication, recognition of their contributions, and opportunities for professional development.
In conclusion, hiring freelancers comes with its own set of risks, but by following these best practices and strategies, companies can proactively approach in order to minimize these risks and ensure the success of their freelance talent acquisition efforts. By clearly defining project scope and expectations, conducting a thorough screening process, using a contract or statement of work, setting clear performance metrics, and building strong relationships with freelancers, companies can reap the benefits of the freelance workforce while minimizing the risks.
Additionally, companies can make the process of hiring freelancers even easier by choosing a suitable platform for their needs. One option is a worldwide staffing and recruitment platform that connects businesses with technical teams, providing a stress-free way to hire tech teams and ensure a positive experience while having a productive collaboration with freelancers. By utilizing a platform that offers pre-screened talent, companies can reduce the risk of miscommunication and ensure a successful project outcome.
Another solution here is to forget about freelancers from all over the world and to continue working with outsourced teams. Choose your partner taking into consideration their expertise, portfolio, and of course — other reviews.
Finally reaching the end of this 1–2–and now-3-part series! Or am I..?
Thanks to the great learning opportunities at FusionWorks, even a lowly tech recruiter like me has lots of coding stories to tell, but the question is: are they entertaining for peopleother than the 2 or 3 inside my head? 😂
This time, thanks to the omnipresence of Chat-GPT in my (and many others’) workflow, I think I got a funny story, of which I’ll spoil the conclusion right away: developers, software engineers, or however else “coding people” self-define, are still not going to be replaced anytime soon! 🥳
DISCLAIMER: Like crypto-bros say “don’t take this as financial advice” I’ll say “don’t take this as coding advice”! I’m a tech recruiter, not a developer! 😁
A bit of context/recap!
My Chrome Extension grew almost exponentially since last time we “spoke”, at least in my perception… For the world outside of my head, it’s still quite a simple app that scrapes data and sends it to a Google Apps Script web app I also wrote, which in turn writes it on a Google Sheet.
A well-thought-out extension would surely be able to do all this without the intermediary, but I prioritized speed, or better yet EASE of learning.
A rather accurate diagram of my Chrome Extension coupled with my Google App Script App! 😁
Still, whenchoosingeasypaths, one sometimes ends up doing morework…
For example, it’s not comfortable to maintain 3 different codebases for what is essentially a mass structured copy-pasting, but it’s also conceptually much easier than creating a monolithic app (and anyway the 3rd codebase, the scripted part of the destination Google Sheet, would not be avoided.)
A story within the story (⏩Skip if not into coding!)
New things included a massive refactoring to an async–await pattern I finally decided to learn, replacing nested callback functions which i used to like, and now see ugly as hell! 😂
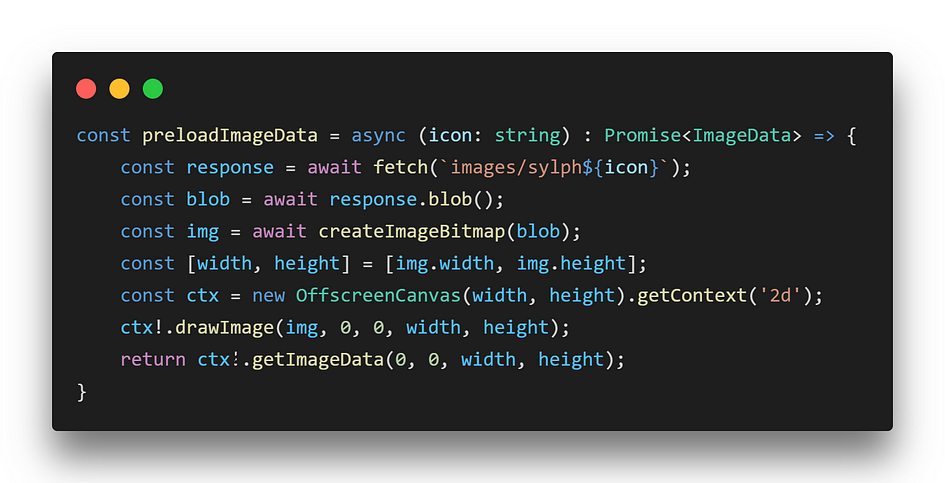
This is also used to preload imageData for the waiting animation, and this part sparked quite a debate online, for my usage of forEach with async…
While not directly related to the main story, which has to do with CRUD operations on Google Sheets, coding-wise both issues have to do with how arrays work in Java/TypeScript: again, DOSKIP this if not into coding!
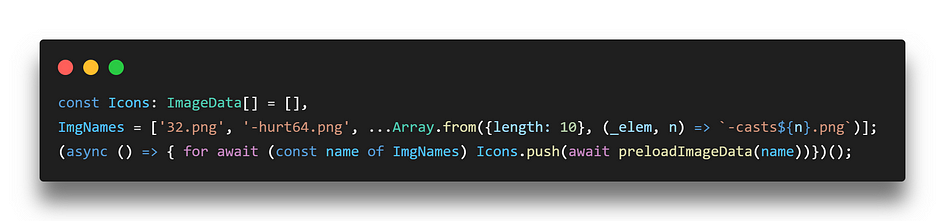
Notice also the fancy way of entering 10 similar filenames into ImgNames: hot or not? 🤔
The question about this code was: will Icons[] be ordered like ImgNames[]?Yes, because even if the promises all fulfill at different times, the array positions the data will fill in the array are explicitly referenced by index.
I get this is not considered good practice, and probably hard to test, but the thing is many more elegant solutions are forbidden in the context! 🤔
First of all, we can’t really draw image elements here, because this is the Service Worker part of the extension, so it has no page/DOM of its own.
This is another context in which ChatGPT could help very little, but I’ll digress…
Second, it can’t use modules or be a module of its own (a recent Chrome update has introduced the possibility, but requiring quite a few systemic change I didn’t yet want to commit to), so “top-level awaits” are not allowed.
An alternative is to use this (IMO ugly) thing called IIAFE (Immediately Invoked Asynchronous Function Expression) to go around the above limitation, by encapsulating the “await” while still executing it right away.
I tested both and didn’t notice any changes, but I’ll be welcoming comments on what you think about this coding debate! 🧑💻💭
The actual story: FAST remote I/O on Google Sheets!
Finally getting to the heart of the topic, the extension now (finally) works using the POST method to communicate with the Google Apps Script part, and that was actually a necessity, since now it can get 25 contacts at a time, and the URL would have gotten extremely big if sending data via GET…
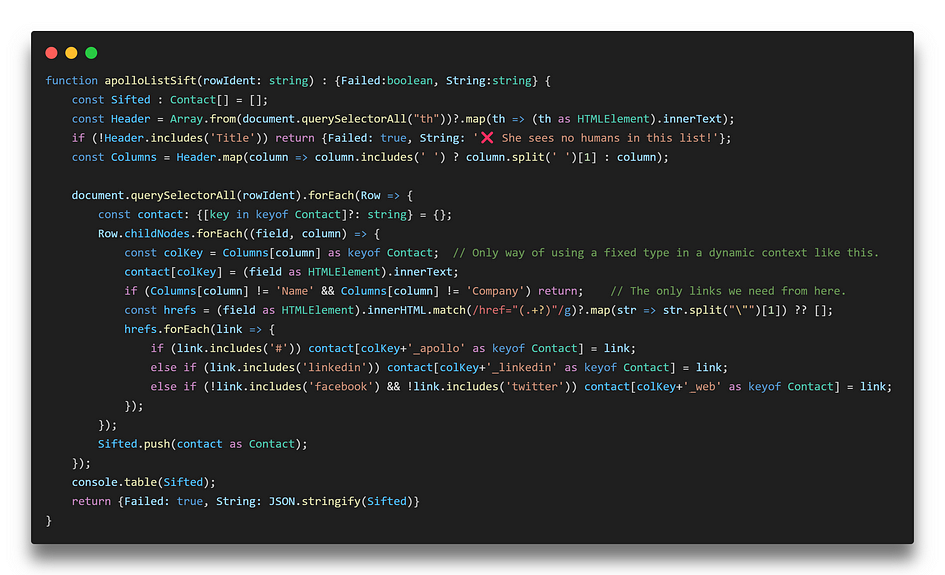
What it does is filling in a custom contact type procedurally, in a typical double-loop fashion going through rows and columns of the table.
The way it manages this neatly is by giving the type definition the same keys as the column titles on the page. Plus a lot of typecasting to force things a bit, which might mean TypeScript is a bit wasted here? 🙄 Let me know!
I know it returns a Failed state and a string instead of an object, but I won’t get into why it does that! 😂
The receiving end is where the story lies. It divides incoming contacts into new or existing, adding or updating accordingly. While this may seem the easiest thing in the world, doing separate I/O operations for each entry would (and did) take FOREVER, even if we’re talking only 25 contacts at a time.
This is due to the positioning of RichTextValues in relation to ones that can’t be RichText on the Google Sheet, and how GAS forces writes to be only in contiguous ranges. It meant 4 writes per contact, if done one by one! 🙈
But something you learn of Google Sheets scripting, is that it’s faster to rewrite THOUSANDS of rows in one go, than 10 rows in separate calls!
So to make sure these 25 updates would be done in a short amount of time, I realized I should have adapted to Google Sheets’ ways, the hard way:
Instead of having values that can’t be RichText in-between values that are, forcing me to differentiate the ranges to read and write the data, have all RichText values as close as possible (fortunately this meant just moving a hyperlink to another column, without changing the content.)
Instead of writing each line separately, process everything in the arrays, then write all lines, INCLUDING those not updated if they are in-between updated ones, so only 2 I/O operations are done respectively for adds and updates: 1 for normal and 1 for RichText.
This could lead to a total of 4 I/O operations from a previous total of 4 ops for all new plus 4 for each updated, so down from 52 on an average of half-new half-updated, or down from 100 if all needed to be updated! 🤯
Me when I realized this!!
Granted, the operations are bigger than before, especially if by chance the contacts to be updated are separated by thousands of rows, but wait and see the performance gains I got, after hoops and hooks with our beloved…
Chat-GPT: endless source of (ridiculous) solutions!
I had several theories on how to approach the problem, and as is usual for a noob like me, I went with the most complicated/stupid approaches first…
At one time for example, I had row numbers written within the raw data, just to be able to find them when the object was “flattened” to the actual fields I needed, so I had to slice out the row number before writing… 🥴
Although performance was not so bad (was still much better due to I/O reduction), it was such a shameful repetition: I already had the row numbers from the first division of new VS existing contacts, so why again?
The problem looked “geometrically” as follows: taking data from a 25-rows 2D array with row numbers, and use it to replace 25 rows within another 2D array of up to 3000 rows, without obvious row numbers… (Obvious 😏)
Asking solutions to Chat-GPT, I got answers that were incredibly weird…Here is a first reply about how to find the start and end row in the first place, which was suggested as a giant array reducing.
I thought it was a waste, and though I couldn’t pinpoint why right away, I proposed thisONE-LINE solution to ChatGPT, asking if it wasn’t better.
ChatGPT admitted it was better, but it noted it could have been slower or more memory consuming for large arrays (25 rows definitely isn’t big.)
Now I wanted to avoid a find on each iteration, although ChatGPT didn’t find it problematic. When prompted, it suggested a lookup object like this:
While it may seem more “elegant”, I still felt like both me and the AI were overlooking a MAJOR way of simplifying the whole problem. It wasn’t about wrong answers, but wrong questions.
The right question was: why mapping 1000s of rows to change 25, instead of going through the 25, and updating only those? Execution time was ok, but my frugal 90s Computing Mindset ™️ was SHOUTING it was a waste! 😣
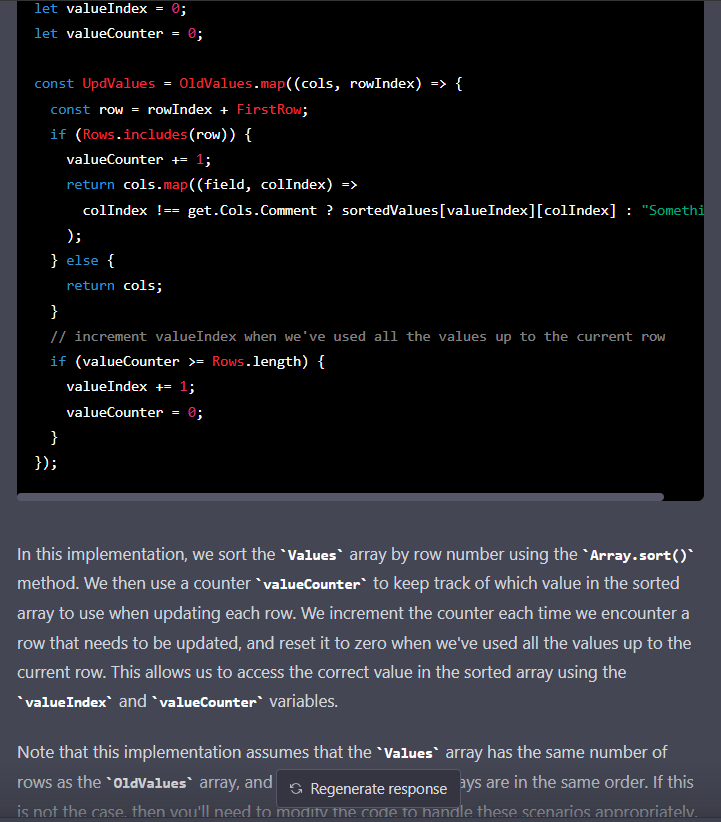
I was slowly catching up to the solution, but the AI didn’t help: when I pointed the issue, it proposed a puzzling double-counter tracking system…
Note the “assumption” it admits at the end: if that would be the case we wouldn’t have a problem, genius! 😂
Here it dawned on me: I already had a list of row numbers mapped in the same order as the data source: what stopped me from just changing the entries from the source, and then writing the updated array?
Nothing! Just my slow mind, and an AI that can’t think creatively!
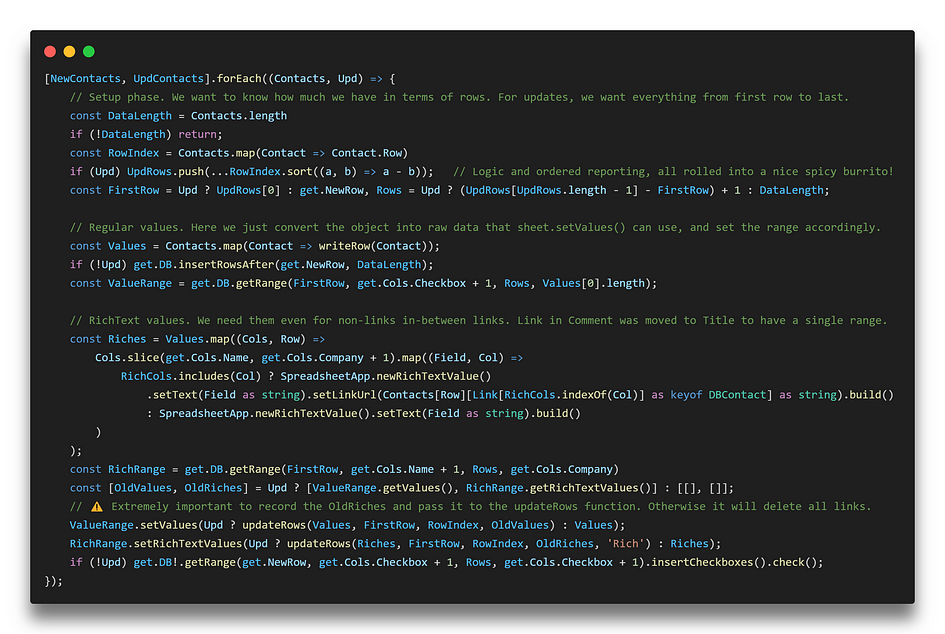
So here’s the super-simple solution I should have thought before…
The trick was once again to think about array positions: since I already had an array of row numbers in the same order as the incoming contacts (created to find the first row to update, as seen above), all I needed was to subtract the value of firstRow from each row, and I had the position in the slice of sheet I was considering, starting from 0 as it should be! 😅
Now using this it takes around 5 seconds to do everything, while before it could be between 12 and 25. Saving up to 80% of the time is BIG! 🥳
The main loop, with my long lines, comments, and all… Hope it’s readable! 😅
Conclusions: we’re STILL SAFE from AI overlords! 😁
And there was not much creativity involved here: it was actually the kind of stuff I expected the AI to shine on, so just imagine the mess on real issues!
Plus, as stated by the blogger above, another point to consider is how much time one can LOSE by using Chat-GPT: we will want to try the solutions it proposes, and more often than not it will result in wild goose chases..! 🦆
Conclusion: use Chat-GPT, but only for very, very simple tasks, asking extremely clear and limited code snippets, just to speed up your writing.
But when it comes to real problem solving: DON’T EVEN! 😂
Delve into the rest of my coding journey at FusionWorks, in the articles below!
Recruiter Codes Chrome Extension: pt.1, pt. 2 (Google Chrome TypeScript)
Hello, and welcome back to this old “series”, that I resurrected for a “mini-episode”, rather disconnected from the rest.
If you’d like to check out the rest (pt. 1, pt. 2, pt. 3), it was basically a trip into my first coding steps with Google Apps Script, at first in JavaScript, then TypeScript, to automate stuff for recruiting, and lead generation.
More recently I wrote a Chrome Extension for recruitment (pt. 1, pt. 2) that basically gives an easy way to copy and sort data from LinkedIn and not only.
So satisfying!! 😎
You can find it on GitHub too, but it won’t work without a web app hosted separately: if interested, let us know!
Diving into what ChatGPT could not “solve”, it’s also related to LinkedIn, and it’s in the context of lead generation. As mentioned previously, for a company like FusionWorks that offers great software engineering services, lead generation is a lot like job-hunting!
So with little more than 1200 lines of code, written little by little, I built a sort of personalized CRM that self-populates with job posts and related contacts. It’s all within Google Sheets, but indexed like a database.
Didn’t think it was so much, actually! 😅 But counting tests and old stuff, useful lines are surely less.
Now, what problem could this system face, that ChatGPT might have helped me solve, but couldn’t? Let’s dive in!
The problem with self-populating spreadsheets is… Population!
Duh, right?
Yes, after a couple of weeks running fully automated, we had too many leads, and the issue was that while color-coding of dates would mark old leads, one would still be curious to check if they were still open or closed…
Yep, Curiosity killed the cat, and can also hurt a lead generator’s KPIs..! 😅
Easily solved, though: make a script that checks jobs’ status automatically. Then you just periodically remove all the closed ones with another few lines of script, and the sheet over-population issue is gone!
Since at that time we were using only LinkedIn as a source, it was pretty straight-forward: just verify how job posts display the open/closed status, and parse for that element. (Although without querySelector or any of the DOM functions JS developers love, since Google Apps Script can’t access those.)
However, there are two problems with this:
If you make the script check thousands of posts at top speed, the IP of the Google server hosting you will get automatically blocked by LinkedIn for excess of requests, so you will get no info after a few fetches.
If you make it wait between each fetch a time random enough to simulate human behavior, and long enough to be meaningful, the script will require more time than what Google allows. (7 minutes, I think.)
You might think ChatGPT couldn’t solve this problem, but that’s not exactly the point. The thing is ChatGPT didn’t realise there was such a problem at all!
ChatGPT sees no problem at all, and that’s the problem!
I can’t produce screenshots of the replies, since ChatGPT spends more time at capacity than being usable these days, especially for old chats, but the thing is it was replying as if there was no execution time limit you can hit.
What it was suggesting, was to write the checking function, and then making it recursively call itself with setTimeout(), at randomized times.
Nope! the script has to run to keep track of time, so it would exceed the Google limit. Even if one would host this somewhere with no limit, it wouldn’t be very efficient: why having something running just to wait?
So I reminded ChatGPT of the time limit issue, and things got even funnier!
It now suggested I run the whole script with setInterval(), so the script would only run when needed… As if I didn’t need another script running all the time, to run a script at intervals!! 🙉
ChatGPT’s idea of funny, maybe? 🤨😅
But I’m not telling the whole truth, here. 🤥 Truth is I knew the solution to this already, and just wanted ChatGPT to write the code… So in the end, I specifically asked code for the solution I wanted.
When you know the solution to a problem, it becomes easier. Duh!
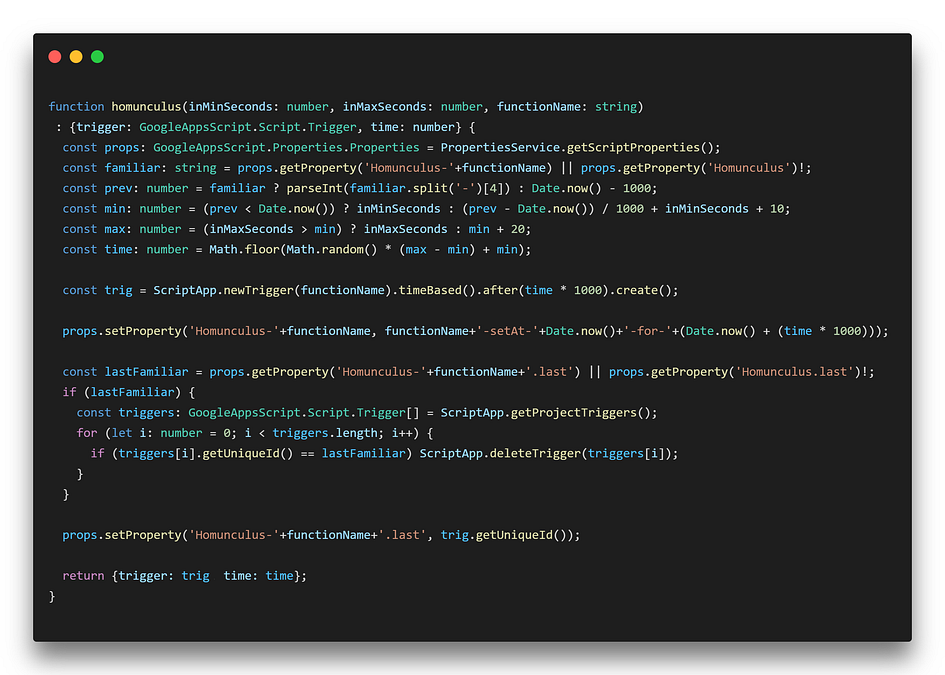
What was needed was a script that would check a small amount of jobs, and then schedule its self-re-run via the Installable Triggers of Google Apps Script.
This way the execution time limit would never be reached, and you’d have enough time between fetches for LinkedIn not to consider it a problem.
With such a prompt, ChatGPT produced a quasi-viable solution: the code to check the jobs was not there of course (I knew it couldn’t know a LinkedIn’s job’s HTML structure, so I didn’t ask it), but the rest was ok, and so was the scheduling of its own re-runs.
It even got right the fact you’d need to use the Apps Script so-called PropertiesService to make it remember the last thing it checked. Tip: if you build something like this, don’t use Document or User Properties, and go for Script Properties instead. This way you can see them in the project settings:
Never mind the “Homunculus” name, my dark fantasy streak can’t be stopped… 🧙♂️
But again, it screwed up on something related to the context in which we were running the code. Such a function would have created a growing number of one-shot triggers that, if not cleaned up manually (one by one) would make you reach the limit of triggers in a very short time.
But at this point, I stopped being lazy and just wrote the thing myself: I just needed something that cleaned up after itself, deleting the trigger that triggered it after installing the next trigger.
Sorry, I had to..! At least I used hipster Ariel, and not a real one!!🤣
I ended up with this “Homunculus” function being a generic scheduler that cleans up after itself using the Script Properties you saw above for storage:
Never mind the dark fantasy streak of the function name… 🧙♂️
I just call it from the function that checks for the jobs status, put min and max seconds, and it will schedule a run for that same function at a random time between the provided ones.
Now through the “ticker system” I mentioned around here, giving status messages in sheet tabs, I always know when and what it checked last, and when it will work next, like this…
It usually looks like this. And if you catch the right time by chance…
… Or if I wait because I wanna see the magic happening live… 😁
It didn’t skip rows, I just missed the right time to screenshot 😅
Yes, it’s conclusions time, because Medium stats tell me people rarely reach half of my usual articles, so we got to cut… 🤣
In conclusion: even with very specific prompts, ChatGPT will make mistakes when you’re working in an environment that has lots of constraints.
It knows those constraints separately, but can’t apply them to code it generates, unless you basically ask a specific questions about them.
If I would have not thought of a solution myself, ChatGPT would have been completely useless here. But if you do know the solution and specify it in the prompt, it is a nice homunculus to write the tedious stuff for you…🧟
Next I’ll dive again into the Chrome Extension, and the web app I built to support it… Unless you have suggestions. Please do have suggestions!! 🤣
P.S.: I wanted to put screenshots of ChatGPT’s replies, but turns out it never saved those conversations, as I guess they happened before it had chat history… So I tried to replicate this, and now it gives the right answers straight away, down to the deletion of old triggers… Did my negative feedback teach it? Were my prompts just terrible before? We’ll never know!
Dependencies are often treated lightly, and few ever consider the risks introduced to the project with every new library you may want to use.
Do you need a lib for it?
According to studies, over 90% of the code in our projects comes from libraries.
The upside is that this removes from you the burden of implementing big, complex systems because someone has already done that before you. On the other hand, 90% of the time you have no idea what’s happening inside your project during runtime, so you lack control over things you are liable for.
Of course, things aren’t as scary as I am putting them here, but I still believe that we should be aware of what we are dealing with.
Obviously, there is no point in us reinventing the wheel, so we depend on dependencies. Still, we should take some precautions. We’ve summed up some things you might want to consider when you need to integrate someone else’s work into yours:
Think of the value the new library brings to your project.
Discuss with your team the problem you are trying to solve and consider and compare alternative solutions. Decide if it’s a viable solution to bring a new tool for the job, or if you’d get by with an in-house solution.
In bigger projects, it is often a problem when similar problems have already been resolved by other project contributors and a fitting library is already installed. Check your project’s codebase for similar problems. You may be surprised and might even save some time.
Assess the library’s credit of trust.
When considering a new tool, study the community’s opinion on it. It should give you an impression of how well it does its job, but also what new issues and overhead it might introduce.
Check the library’s issue tracker, see how well it is supported, and observe the communication between issue reporters and code maintainers. You’ll want to avoid solutions that have an unpredictable or stagnant release cycle, unaddressed questions in issue threads, tiny communities lacking experience in their niche, documentation composed of a few usage examples, and an undocumented API.
The dangers of Open Source
While open-source sounds like a great idea to many enthusiasts because it is maintained by the entire community, the reality is that this ecosystem is very vulnerable to the mistakes of lone individuals (an infamous example).
Security implications
Depending on open source software means you lose control over a critical chunk of your project, and, in the most optimistic case, it means you might get a hard-to-catch bug. In the worst case scenario, you’ll introduce a security vulnerability and your entire production infrastructure will fall prey.
It is a misconception that open source is safe because everyone can review the code and projects are being maintained by groups of individuals with no commercial interest in the project’s path. Reality is different. Usually, most libraries in your projects are rarely maintained (during free time) by the solo efforts of individuals who have just decided to publish their personal tools. And these libraries, in their turn, depend on other libraries, again with variable levels of quality.
Another thing to consider when you decide to use a library is how well it controls its dependencies’ versioning. As it was mentioned before, libraries usually depend on other libraries, and that might become an issue if they do not manage their versions well.
When you install a new library, dependency managers in most programming languages follow the SEMVER versioning pattern, which allows flexible version ranges for your libraries. Many small libraries use ranged versions of dependencies rather than fixed versions. This, potentially, creates an avalanche of bugs in case just one of the dependencies in that tree fails after a minor patch. This kind of situation has occurred multiple times throughout the open-source software development history.
This creates the situation where your project may fail with no obvious reason the next time you clone it from the repo and sync the dependencies.
#ItWorksOnMyMachine
Most dependency managers create a lock file when you install a library. Many of us ignore it, some of us even .gitignore it, but let’s make it clear why it needs to exist in your repo.
When you install your libraries, your dependency manager resolves all the shared libraries, builds a dependency tree, and finds compatible dependencies to download and store. This information contains fixed versions, which should work on every machine if it works on yours.
Why do we need this? When the time comes and we have to publish our efforts to production, usually a Continuous Integration system takes over our code, clones it, syncs the dependencies, builds everything, and… fails with some version mismatch. You’ll be lucky if it fails during build time and not in runtime.
The lock file allows the CI to install exactly the same versions you had in working condition on your machine.
Previously on “Recruiter Codes Chrome Extension”:A LinkedIn Fairy(-tale)! Check out “Season 1”, too:Tech Recruiter Tries Coding, pt 1, pt 2, and pt 3!
Hello again from the messy-but-exciting world of coding as a non-coder!
This time I will dig a bit deeper into the Chrome Extension I talked about in the first article, showing how I expanded it to work on other websites, and made it more useful by making it exchange more data with Google Sheets.
WARNING: I realize the series is putting more and more emphasis on coding; if you think it should be different, please don’t hesitate to be overly critical in comments, being either constructive or destructive: all welcome!
Only if it’s empty!
A brief intro/recap for those who landed here first.
I have very little coding experience, especially with modern languages: this is my first coding project in 20 years, so basically the first as an adult. 😅
In the past 3–4 months though, I experimented and learned a lot with Google Apps Script (which is JavaScript, and can even be written in TypeScript, as I did) and soon after with Chrome Extensions (also in TypeScript), coding this one straight after/during this short uDemy course.
The whole point of this extension is to send profile data from websites like LinkedIn to a Google Sheet of choice, classified/categorized as wanted.
Due to my background/context above, and the fact the main objective was to save time and increase productivity, I figured it was faster to split this in two: the extension just grabs data and sends it via simple HTTP requests, while an intermediary web app, already authorized to work as a proxy of my Google account, pushes and formats the data into Google Sheets.
This perhaps suboptimal choice was very fast to code because it didn’t require me to learn OAuth or an extra Sheets API: authorization is basically skipped (and in fact it’s ok only for internal usage: don’t try to distribute something like this to the world!), and interaction with Sheets is done via regular Google Apps Script, which I already knew, instead of another API.
Cute, but I didn’t want to to be THIS cute… 😂
As a thought experiment (or who am I kidding, just for fun) I envisioned these two components as fantasy characters associated to emojis, so we have: 🧚♀️Sylph, the LinkedIn fairy, and 🧜♂️ Lancer, the Google Web App.
I’ll try to keep the fantasy to a minimum in this second article, but if you see weird names and emojis in the code snippets, now you know why… 😄
Supporting multiple websites in V3 Chrome Extensions. A liturgy.
Why “liturgy”? Well, you will see it does indeed look like a ritualistic thing, if you just follow the official documentation, mainly because of all the places in the code one has to add the same information in, but as you will see, there are multiple ways around it.
First of all, since we’re talking about an extension that works on bookmarks created (or bookmarks.onCreated, speaking in Chromesque) we indeed make it a bit more difficult than it should be, to support multiple websites.
Normally, in V3 Manifest extensions, you would have 2 steps. With bookmarks, we got 3.
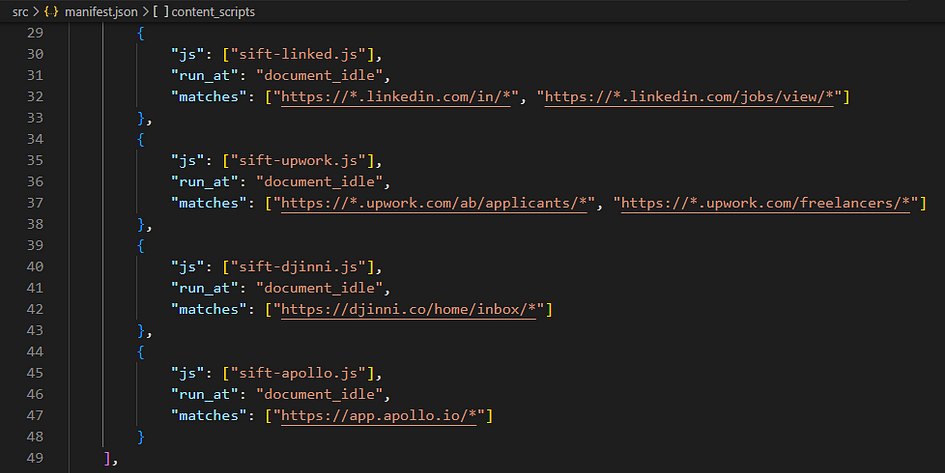
1- Write the “matches” for your content scripts, in your manifest.json file
The asterisks are great but careful: don’t select pages you can’t process. Why jobs, you ask? Hold that thought!
In my case I ended up writing more in the Manifest, you will see why later.
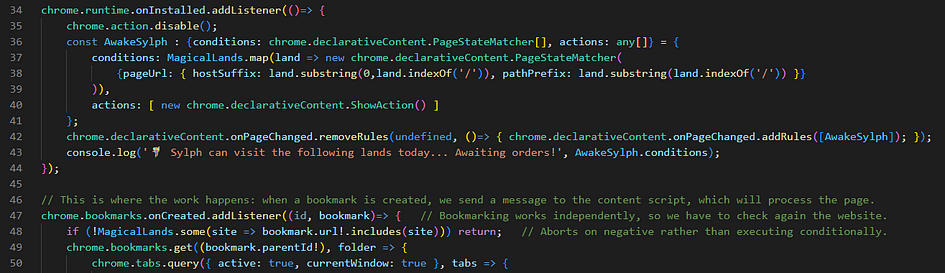
2- Use declarativeContent.PageStateMatchers in the service worker script
So repetitive… Yes, you will see a refactored version of this later!
This lets you simulate the behavior of V2 extensions, with icon disabled or enabled depending on the website. Just takes more code than before…
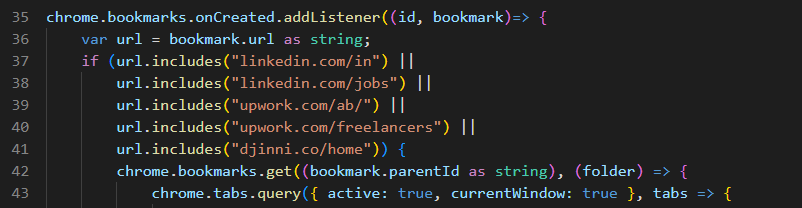
3- If you have to react to bookmarks selectively, update your listener
You can see the rest of this listener’s code on pt. 1 of this series.
Again so much repetition… How to get rid of all this?
Enter array (flat)mapping from objects
My first solution was a cool exercise, but what it did was only avoiding repetition within the service worker, between bookmarks and awakening.
Pop culture reference, and continued usage of my fantasy metaphors, but LOOK at THAT LAST LINE..! 🤯
The object allows to avoid repetition of websites for every internal prefix we want to support, and the array created from the object can be used by both PageStateMatcher and bookmark listener, after these changes:
Now that’s a refactor! This is equivalent to the sum of the code in points 2 and 3, above.
Cool and line-saving, especially the “some” array method, but in the end not so useful: still makes me modify both manifest and code every time I want to support a new website, or even just a new suffix in a website’s url.
Enter getManifest!! (And array mapping from the manifest)
Magical indeed!
With this single line, we replace the object and array from before, without having to change anything else used in the previous refactoring. Bye bye to 6 lines of code, and hello maintainability: now I can change bookmarks AND extension behavior by changing the manifest only. 👍
But I wanted the extension to be more manageable than a single block that contains all the functions for all the websites, so I went a bit farther, and did the following on the manifest.
Modular content script loading: hot or not?
Not sure it’s the best solution: it adds another thing to maintain kind of separately (in the same file at least), but allows to load only the function(s) needed by each website, instead of all functions in all websites.
This won’t change the loading time by much, since nowadays this is so quick you can’t even tell, but it “compartmentalizes” stuff, which is cleaner.
If not seeing a benefit, you can still use multiple files, and just load them all on all matches, adding them to the first array of “js”, in point 1 above.
Adding checks for doubles: a little DIY API, and caching system!
As mentioned previously, this extension is a time saver, but as it was in its first version it suffered from a glaring defect: it could let me add the same profile multiple times in my sheet/database, without even alerting me, so I had to rely on my “DBfication of sheets” to manage that.
In theory, it’s not a big deal, but in practice, it was not as efficient as I wanted this to be, because I would still be curious to go and check if it was double, or keep a tab to check before adding… Precious seconds each time!
So the solution I thought was having my sheet scripts themselves send indexing data to Lancer (the web app talking to the extension), while Sylph (the extension) would ask this data at least the first time it loads a relevant page, to then cache the data and quickly check for doubles before usage.
It was a nice exercise, but involves too many steps/components to describe here without boring you to death, so I’ll talk about the extension side only.
And in fact I don’t think I did. Maybe. Not sure… Anyway, that’s a topic for the next article! 😅
Content script changes: one line! (Although a bit compressed…)
First of all, am I the only one who compresses functions like this?
Yes, I use emojis as object keys, and I think it’s awesome… Change my mind! 😋
This just tells the content script to send a message to the service worker on page load, including the URL of our web app (which is on a separate file in order to easily keep it out of the GitHub repository, and only content scripts can be in multiple files) and the URL of the page visited.
A segment of the onMessage listener, at the end of the service worker code. It reuses the message it receives.
Here we have to find out the tab that “called in”, since the content script doesn’t know it, and then we do the following: – Start the animation (in a new way compared to last time, I’ll get to that!) – Console.log for good measure. – Check the “Stash” (AKA cache): if ready, fire a checkID function using the cached data. Otherwise, grab the data from Lancer (“whose” URL is in Msg[‘🧜♂️’], of course), and check using that.
Here is how the cache/Stash looks like:
I wanted a treasure chest emoji, had to make do with a file cabinet!
It’s more type declaration than anything else, because what this will contain is also an association of tab number/id, and entry id, which is determined by the checkID function, below.
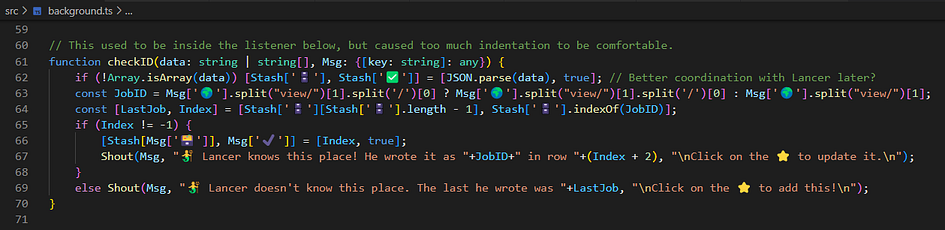
I also made it with less indentation, but at the cost of one more condition checking: that’s my red line! 🚩
Here a cool thing is it can both initialize the cache and use it, depending on the argument type. If it doesn’t receive an array, it means it’s the first time, so it will parse the data into an array, store it in the Stash/cache, and put “✅” to true, so we know it’s good to be used. (Can’t resist emojis in keys!)
Then it will determine if we have the current entry in the database, and report accordingly with the custom “Shout” function.
If it finds it, it adds to the Stash the index of the entry in the database (directly linked to rows on Google Sheet), with the (unique) tabID as key.
Finally, this is the Shout function used for our minimal “UX”:
I love the smell of ternary operators in the morning…
This whole slew of ternary conditionals (I discovered this syntax rather recently, and LOVED it ever since) basically does the same things but in different ways, depending on the success parameter:
1- Console logging or warning, depending on the case. 2- Setting the extension title, which is actually what appears in tooltip, and my replacement for an actual HTML popup (it even changes in real time!) 3- Stopping the flying fairy animation, since whether this comes as a result of ID checking or sending data, it will come after an animation started. 4- Setting the icon either back to normal, or to the “warning” one, which is now also used to show we have that person in the DB already, and there’s no need to use the extension at all.
BONUS: Refactoring the icon animation code to be less TERRIBLE
Although nobody called me out on the craziness of using a separate object to keep track of the animation’s state, I started thinking it was a really lazy amateurish solution, and didn’t this associated to FusionWorks in any way…
Although that was already an improvement upon my first solution, to avoid war declarations…😆
So here’s a refactor that at least encapsulates everything:
Here the emojis REALLY make sense. Right? Right…??
Apart from emojis now being used for functions too, because Play and Stop “buttons” for the animation were irresistible to me, this is cool because from the same object I keep track of the state (from the Tabs member, which replicates the old tabId: animation-frame object) and I can start and stop the animation: no more modifying an object AND calling a function.
In the end, the code is a bit longer, but I guess it’s for a good reason: although technically we still have a global object, now it engulfs all the functions that use it, conceptually and practically.
Also, I don’t know how I didn’t think of this before, but it’s much better to return on a negative condition rather than do everything on a positive one: it avoided a whole level of indentation! ✌️
Is this the end? Kinda! — The lessons learned moment is here
This time around I kept things more technical perhaps, but I think there are still some “philosophical” lessons to be learned here.
First: even a small project can scale fast, so thinking about maintainability is not the waste of time I always thought it was! Adding support for a website or even a new type of usage altogether takes very little effort now: a separate file of 15–25 lines of code to parse a new source (around one data field every 2 lines, or 3 if complex) and 1 place to modify in the rest of the codebase (the manifest.json), instead of messing around in all files, having to edit 3–4 functions all over the place.
Second: communication between components is key! Whether it’s components of the extension itself (content scripts <-> service worker) or the external ones (my web app, and/or the Google Sheet it talks to), communication is essential. As with my articles, I might be a bit verbose in it, but that’s where it’s warranted, to avoid forgetting what does what.
And finally: coding your tools means a lot of extra productivity! Sure, it takes time at first, but to be honest now it’s nearly second nature, and adding a function or changing it can take as little as a couple of minutes. A trick that worked for me is writing “pseudo-code” on physical paper first, and then on screen. It might not work for everyone, but new things come out faster to me this way. That’s how I did my first “big” program 20 years ago, and how I did the best parts of this, which is not big now, but growing!
In the next and last article of this series, I’ll dig a bit more into the Lancer web app, how I made it a bit more secure and “API-like”, and how I extended its functionality to be a bit more than just an intermediary.
Then I’ll also touch upon a new functionality for the Sylph extension, which made it useful outside of Recruitment as well…
The release of ChatGPT provoked another avalanche of “AI will replace developers” speculations with many people trying to generate a project from scratch using it. From my perspective, this is a pointless take on this matter. I would rather concentrate on the following idea and its consequences.
AI is a net for catching relevant information in the big ocean human knowledge.
AI can be thought of as a way to filter and organize vast amounts of information and knowledge, making it easier for people to find and access what they need. AI can help us make sense of complex and overwhelming data sets and extract valuable insights and knowledge from them.
At the moment systems like ChatGPT are bringing this capability to a whole new level by providing a human-friendly chat interface that is context aware. And context awareness is really what makes it stand out!!! I will follow up on this just a few lines later.
AI is like Google on steroids + Udemy
Just think of your usual way to write code in the language or framework you are not totally familiar with. It usually starts with these sources of inspiration:
official documentation
code samples and tutorials found Google
StackOverflow
online courses
And your role here is usually to cherry-pick relevant bits of information and put them in your project in the proper places.
And this is the place where context-aware ChatGPT is replacing you. It is aware of all this information and it can deliver exactly what you need based on your progress with your work. We as humans can’t always express ourselves exactly in one go. We usually start with a simple question and make our requests more complex as we progress. And sometimes we need to go back on our work and improve something we’ve already done. This is where context awareness really shines.
To demonstrate my thoughts above I made up a quick conversation with ChatGPT about creating a simple REST API with NestJS, Mongo, and NATS. The example below is not something sophisticated but it clearly demonstrates the benefits of this capability:
you don’t need to write your request in full detail from the start
you can ask for variations (a moment when I ask him to redo using annotations)
you can go back on the work done and ask for an update based on the changed situation (a moment when I ask him to update the module file after adding NATS)
And during your entire journey, ChatGPT gives you detailed explanations of the code produced, enriching your knowledge.
As a bottom line before you continue to my sample conversation with ChatGPT: don’t take AI as a threat to your position or profession, but rather as an extension of your mind, a valuable companion, and a teacher in your journey to the new exciting goals. Don’t fear AI, embrace it and use it to your advantage.
PS: Some parts of this article were inspired, written, or improved by ChatGPT cause I code better than write texts or communicate with humans 🙂
Example
My replicas are marked as quotations. The rest of the text is ChatGPT output.
please generate a model in TypeScript for Post
Here is a basic model for a Post object in TypeScript:
class Post {
id: number;
title: string;
body: string;
This model has three properties: id, title, and body. The id property is a number, the title property is a string, and the body property is a string. The constructor function is used to create new instances of the Post class and set the initial values for the id, title, and body properties.
You can use this model to create new Post objects like this:const myPost = new Post(1, ‘My Post Title’, ‘This is the body of my post.’);
I hope this helps! Let me know if you have any other questions.
Can you generate a Mongoose schema for it using NestJS
Sure, here is a Mongoose schema for a Post object that can be used with NestJS:import * as mongoose from ‘mongoose’;
This schema defines the structure of a Post object in a MongoDB database. It has three properties: id, title, and body. The id property is a number and is required, the title property is a string and is required, and the body property is a string and is also required.
To use this schema in your NestJS application, you can import it into your code and pass it to the @nestjs/mongoose module’s forFeature function. This will register the schema with Mongoose and allow you to use it in your application. Here is an example:
import { Module } from '@nestjs/common';
import { MongooseModule } from '@nestjs/mongoose';
import { PostSchema } from './post.schema';
This code defines a Post class that extends the Document class from the mongoose module. It uses TypeScript decorators to define the schema for the Post class. The @Schema decorator is used to define the overall schema for the class, and the @Prop decorator is used to define the individual properties of the class.
The PostSchema constant is then created by calling the SchemaFactory.createForClass function and passing the Post class as an argument. This creates a Mongoose schema that can be used with the @nestjs/mongoose module.
To use this schema in your NestJS application, you can import it into your code and pass it to the @nestjs/mongoose module’s forFeature function, just like in the previous example.
I hope this helps! Let me know if you have any other questions.
Can you create controller for it using DTO
Yes, you can use a Data Transfer Object (DTO) to create a controller for a Post object in NestJS. Here is an example:
import { Controller, Get, Post, Body } from '@nestjs/common';
import { PostDto } from './post.dto';
@Controller('posts')
export class PostController {
@Post()
create(@Body() postDto: PostDto) {
// Insert code here to create a new Post
}
@Get()
findAll() {
// Insert code here to find all Post objects
}
}
This controller defines two methods: create and findAll. The create method is used to create a new Post object and is decorated with the @Post decorator. The @Body decorator is used to extract the PostDto object from the request body and pass it as an argument to the create method.
The findAll method is used to find all Post objects in the database and is decorated with the @Get decorator.
The PostDto class is defined in a separate post.dto.ts file and looks like this:
import { IsNumber, IsString } from 'class-validator';
export class PostDto {
@IsNumber()
id: number;
@IsString()
title: string;
@IsString()
body: string;
}
This class defines the structure of the data that is expected in a Post object. It uses TypeScript decorators from the class-validator module to define the data types and constraints for the properties of the Post class.
I hope this helps! Let me know if you have any other questions.
Can you generate service?
Yes, you can use a service to manage the data for a Post object in NestJS. Here is an example:
import { Injectable } from '@nestjs/common';
import { InjectModel } from '@nestjs/mongoose';
import { Model } from 'mongoose';
import { Post } from './post.schema';
import { PostDto } from './post.dto';
This service defines two methods: create and findAll. The create method is used to create a new Post object and save it to the database. It takes a PostDto object as an argument and uses the postModel property (which is injected using the @InjectModel decorator) to create a new Post object and save it to the database.
The findAll method is used to find all Post objects in the database. It uses the postModel property to query the database and returns an array of Post objects.
I hope this helps! Let me know if you have any other questions.
Can you update controller to use this service?
Yes, you can update the PostController to use the PostService to manage the data for Post objects. Here is an example:
import { Controller, Get, Post, Body } from '@nestjs/common';
import { PostDto } from './post.dto';
import { PostService } from './post.service';
@Controller('posts')
export class PostController {
constructor(private readonly postService: PostService) {}
In this updated version of the PostController, the create and findAll methods are removed and the PostService is injected using the constructor. The create and findAll methods are then delegated to the PostService instance, and the controller simply returns the results of those methods.
This separates the business logic for managing Post objects into the PostService, making the controller’s code simpler and easier to understand. It also makes the PostController more testable, since you can easily mock the PostService when testing the controller.
I hope this helps! Let me know if you have any other questions.
Great! Could you also send a message to NATS once a post is created?
Yes, you can use the NATS messaging system to send a message when a new Post object is created. Here is an example of how you might update the PostService to do this:
import { Injectable } from '@nestjs/common';
import { InjectModel } from '@nestjs/mongoose';
import { Model } from 'mongoose';
import { Post } from './post.schema';
import { PostDto } from './post.dto';
import { Client, Message } from 'nats';
This updated version of the PostService injects the NATS client using the constructor. Then, in the create method, after the Post object is saved to the database, a NATS message is created and published to the posts subject.
The NATS message contains the id, title, and body of the Post object that was just created. Other services or applications that are subscribed to the posts subject will receive this message and can take action based on the contents of the message.
I hope this helps! Let me know if you have any other questions.
Could you update module file based on these changes?
Yes, you can update the module file to include the PostService and the NATS client. Here is an example of how the PostModule might be updated:
import { Module } from '@nestjs/common';
import { MongooseModule } from '@nestjs/mongoose';
import { ClientModule } from '@nestjs/microservices';
import { PostController } from './post.controller';
import { PostService } from './post.service';
import { PostSchema } from './post.schema';
This updated version of the PostModule imports the ClientModule from the @nestjs/microservices package and registers the NATS client with the module. It also adds the PostService to the list of providers for the module.
This allows the PostService to be injected into the PostController and the NATS client to be injected into the PostService.
I hope this helps! Let me know if you have any other questions.
This is because I didn’t want to bore you to death with routine stuff like indexing, managing of doubles, and such. 🥱
Trying to keep this merciful objective in view(!), l will try to re-take the subject and talk about some of this stuff, hoping to give good examples of the additional power of GAS (Google Apps Script)-powered spreadsheets over a database or a CRM (which, I love to say, is just a database frontend.)
So I will start with a few basics, without too much code, and then dive into a couple of code examples for the functions that I had more fun coding.
Basic steps to become a heretic DB-fier of spreadsheets
Now, I know I’m making you picture in your mind a lot of stuff since last time: it’s because if I would show you the actual spreadsheet, I’d have to transform it into a rave of censoring-happy emojis!
But you can imagine that managing double entries is quite easy, once everything has a unique ID.
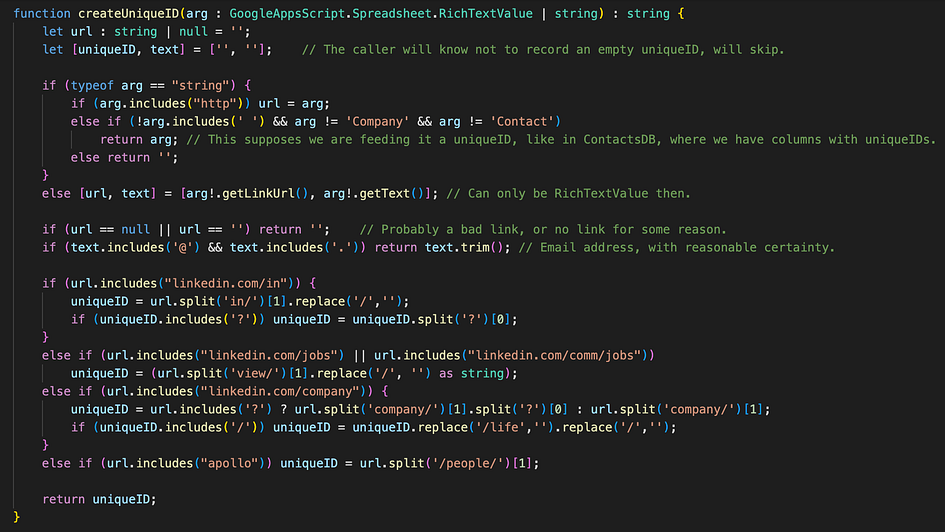
Since all of our entries/rows are associated with at least one URL (if not an Email address, which is unique by definition), what I did was building a function that “sanitizes” the URLs by cutting out anything that can vary, keeping only the unique part, to avoid “false doubles” when the same URL is saved with different parameters or slashes, due to different sources, etc.
Pixelation: hot or not? 😀
Checking for doubles is not interesting at all, save for one nice thing to make searches much faster: using GAS’s Properties Service to keep a reasonably updated list of unique IDs and something more, always ready to use, instead of getting it from the sheet all the time, which is much slower.
Functions that create indexes of uniqueIDs (thus finding double entries) and read/store them with Properties, can be automatized easily with the time-driven triggers that GAS kindly offers, to run at specified times.
Just make sure you set them at times you’re less likely to do changes yourself, especially if you schedule double deletion, that removes rows from the spreadsheet: I learned the hard way! 😅 (Thanks to the Version History feature of Google Sheets, nothing is ever lost anyway, but still…)
The safest choice I found is Day timer, and giving intervals of hours you know are “safe”.
An interesting thing about running this stuff automatically, is that you’ll want some reporting/notification system that doesn’t use the UI, right? … Right?
Here’s the thing: alerts, dialogs, etc. won’t work in triggered scripts. Google will actually prevent the whole script from running if it detects any, and for good reason: imagine discovering you lost tons of writing/editing, because a script started running in the meantime, and opened a pop-up..!
Therefore, to have time-triggered scripts report to you, you could set:
Email notifications from GAS itself (but this won’t report anything custom, it will just tell you if an execution ends because of errors.)
Custom emails that you send to yourself, from your own scripts.
Actually outputting on the sheet, though it better be in frozen cells.
A separate web service to check the status of stuff.
For me, receiving extra emails is always bad, and outputting on the spreadsheet too, since it’s slow, forces me to dedicate “real estate” of the spreadsheet to this, and it also updates the sheet window/view when formatting is involved: not nice if I’m editing stuff in that moment.
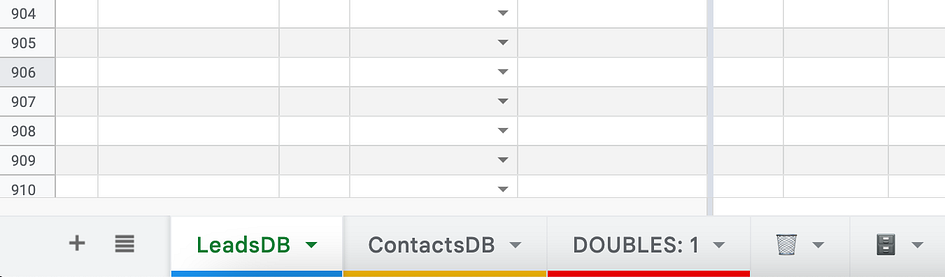
So, since I had built a GAS web service for something else before, I was close to building one for this purpose as well, when I realized a simpler solution: we can use sheet names/tabs for reporting!
The tab becomes green when it reports no doubles! 🙂 (More on those icons on the right later…)
I built a small function for this, just to take care of doubles, and it’s a joy to see it at work, but the potential is even bigger!
It could be used as a dynamic warning sign for when other time-driven scripts are running, or to give dynamic tips… It can almost be animated, although slowly and only through text, emoji, and a single bar of color.
It’s basically a piece of the UI that, since it doesn’t receive frequent input from the user, has been left open even for time-triggered scripts to use. It’s such a nice backdoor, that we better not spread the word about it, or Google might change the rules!🤫
There are a lot more related topics, some big and some small, but I think these were the most-interesting, among the ones I can show. I encourage you to discuss the topic in the comments, or, if you’d like a full-fledged system of this kind, just contact me or FusionWorks about it!
Next, we dive into some code to see how to deal with entries that are not exactly doubles, but that should not be on separate entries either… A very specific case : separate job posts for the same jobs!
“The Piggyback”… GAS + conditional formatting!
Very often, companies will post the same jobs multiple times, so you will have the same title but different URLs: replicas of the same job, maybe for different countries, or more often just for added visibility.
These are important for Lead Generation since in sales-talk they’re additional “buyer intent data”. So keeping them separate, other than being a potential source of errors or double work for Lead Generators, is bad from a lead classification point of view: they should add to a lead’s score!
Now, making a custom check for this, even when indexing unique IDs, can be a bit clunky, since there are three conditions to check:
Same company
Same title
Different URL
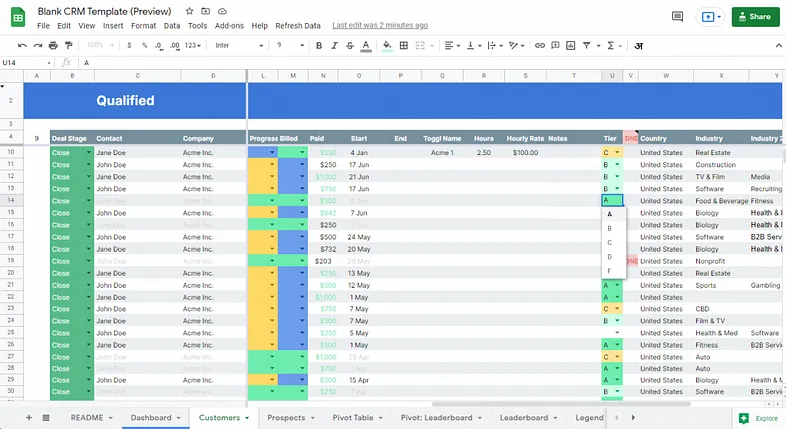
But since I applied some conditional formatting to the spreadsheet, that highlights titles and companies appearing more than once, I thought of a different approach: what if the script could check the colors?
It should look at rows in which BOTH company name and titles are colored.
In this case, only the 3rd line would be one that MAY be a replicated job post, since both the title and the name of the company (censored) are highlighted, but actually it’s not the case: guessed why?
The condition by itself is not sufficient, as the tricky faces in the screenshot suggest: the title might be repeated by another company, like here the 1st one having the same job title as the 3rd one.
So we want cases where this occurs twice or more, to the same couplings.
I totally re-used the logic of word frequency extraction, but with some KEY differences, pun intended…
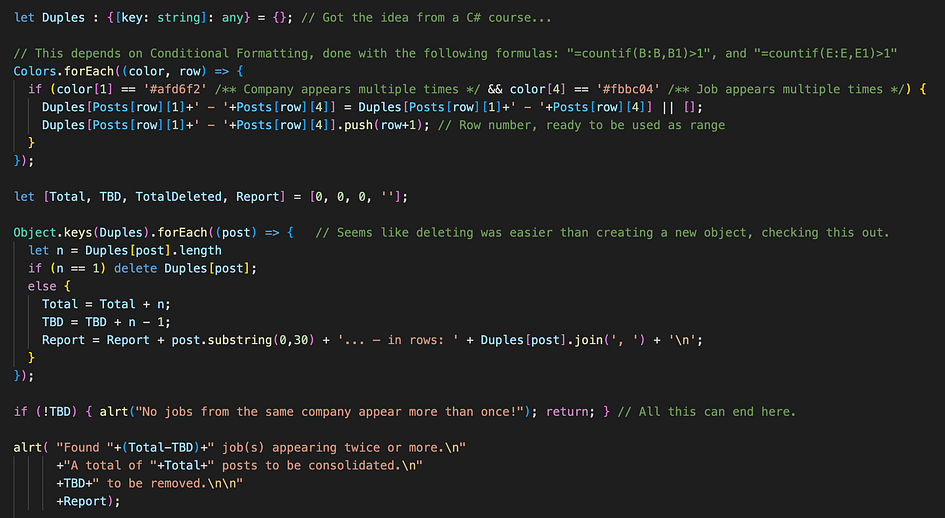
If you can look past the aggressive commenting, you see the condition of the colors being those of the previous screenshot at the same time, is used to build a “Duples{}” object in a very similar fashion as the wordFreq{} object used for skill extraction in pt. 2, with two main differences:
The keys are named after both the company name and job name combined. (To count together only those where BOTH match.)
The values are actually arrays, where we push “row+1”, which converts the index of the forEach loop into the actual row number where the condition is found. (Loops count from 0, Google Sheet counts from 1.)
This way, we end up with {‘company — job title’: [row1, row2, …]}
Or do we? Not right away! The second block of code, where we go through the keys of this new object, is where we filter out the cases where we found only single occurrences (false cases like the screenshot above), by checking the length of the rows array (called “post” in this loop), and straight up delete key-value couples with only 1 element, as they have no interest for us.
Instead, for each case where the length of the array (which is the number of rows respecting the condition) is 2 or more, we record a Total number of posts that will be consolidated, and the number of those to be deleted (TBD), for reporting purposes. (The nice popup message, below).
Work is not finished though. Apart from reporting, we wanna make sure we keep something of the latest post, merged into the first one (we want to keep the old post where it is, but with updated info from the newest one.)
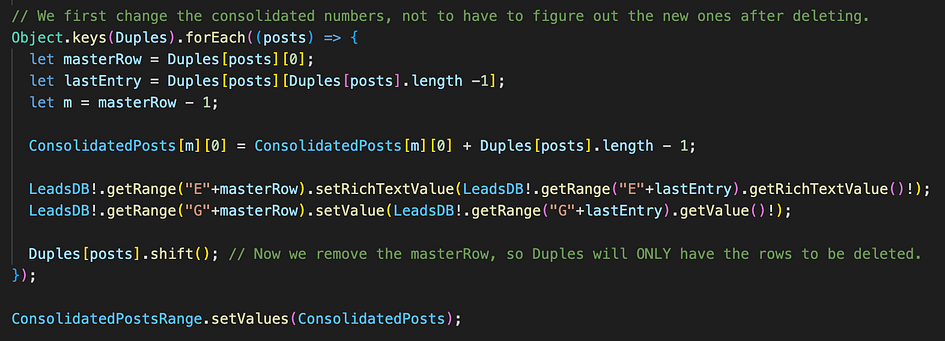
The hefty part looks quite neat this time…
Here (if we hit “OK” previously) we proceed to the real work done by this function: another forEach loop on the keys of the object, which will record a “masterRow” as the first entry found (which as mentioned should be the one we want to keep), and a lastEntry, which is always the most recent.
Then we update the number of a column called “ConsolidatedPosts”, within the masterRow (corrected here in a contrary way because we go from actual row number to position in an array, so minus 1) adding the number of elements minus 1 (not to count twice the original row we keep.)
Then we have to copy one by one (a slow process… In milliseconds, at least 😏) relevant fields from lastEntry into masterRow.
Finally, we shift() the array of the entry in question, which removes the first element: we don’t need the masterRow anymore after it’s updated: we only need the rows to be deleted!
And finally finally we just write the values of ConsolidatedPosts all at once, which is much faster than doing those one by one.
At this point we can delete. But wait! I don’t want permanent deletion: I fetched this data, so I wanna keep copies archived. 🤓 — I want a trash bin!
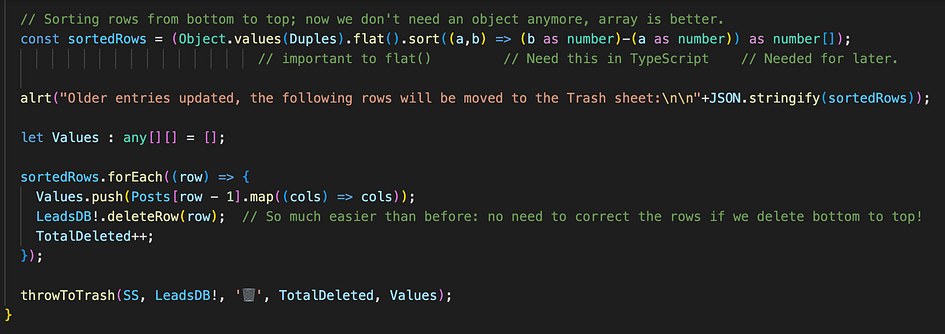
Thanks to the logical soul who shocked StackOverflow by showing the ease of deleting bottom to top! 😅
At the cost of copying the rows to be deleted into the unimaginatively-called Values[][] array, I can invoke my custom “throwToTrash(…)” function.
A few words about row deletion, which you might have noticed comes after sorting of the array… A simple loop to delete could have sufficed, right?
Wrong! For each deletion, all the rows below it will shift, and if we don’t adjust for this, on the next iteration we delete a wrong one, and then cascade like this till we delete all the wrong rows except the first one… (Thanks Google for the Restore Version feature!! 😅)
At first, I figured out a way to adjust for this, which was clunky as hell, because sometimes you have to adjust, sometimes you don’t, depending on where the previous deletion happened: below or above.
Then, looking for better ways to do this on StackOverflow, a kind soul there reminded the whole world to switch on their brain: just sort the rows from bottom to top before deleting, and you don’t have to adjust anything!! 🤯
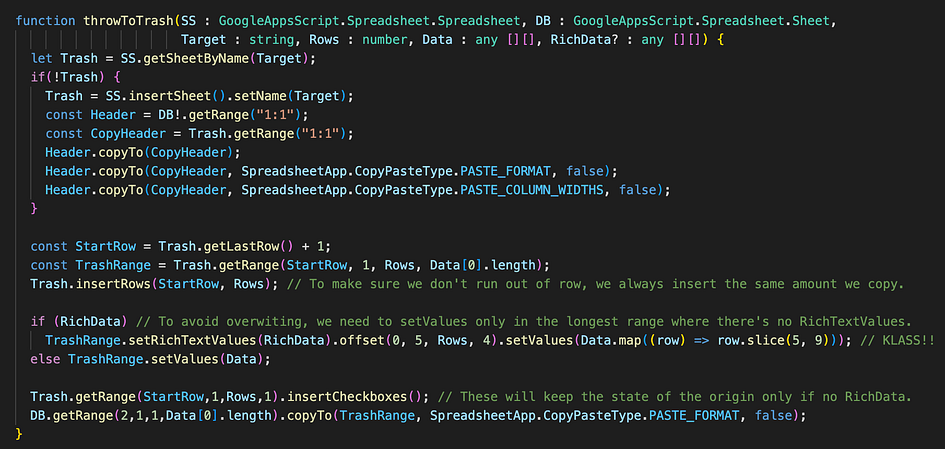
Back to the trash function, I use it for many purposes, like removing posts from incompatible companies, but without losing track of them. Here it is.
A few neat tricks here as well, but nothing fancy, aside from that long line after “if (RichData)”… Details below!
It checks for a sheet called “🗑️”, literally the emoji for the trash bin. 😄
If it finds it, it’s ready to copy the stuff we pass through the function’s arguments (with types specified, so we avoid messing up, thanks to TypeScript!) Otherwise, it creates a news one programmatically, copying the header from the sheet we specify, before proceeding to do the rest.
Here the only neat thing is combining setRichTextValues() (needed for links) and regular setValues() (since I don’t want to format stuff just to make it Rich Text.) It was quite a headache in the beginning of my GAS days!
Because the problem is they will overwrite each other even when they don’t carries values, effectively deleting stuff. So you want to separate the ranges you apply them to.
My solution to this issue in ONE code line [after if(RichData)] inspired me a childish “KLASS!” comment, on the right: it basically chains a call of setValues after RichTextValues, modifying the range in-between, and mapping values to take only a slice of columns. I confess: this used to take me many lines before… It felt so good to find a way to make it a one-liner!! 😆
What you actually want to read is here!
Once again I got carried away, so I hope the non-coders among you (and the many coders for whom this is easy stuff) skimmed carelessly till here.
While last time the focus was performance (and how sometimes it should not be the focus), this time the lesson is more abstract, and it’s been swimming in my mind for some time, as mentioned in the previous post.
In short: sometimes the UI you want to build is already in front of you!
It tickles my mind every day now: there is so much that can be done, programming on top of programs that are already useful, like Google Sheets. The cases above, of using conditional formatting to help a script, sheet tabs as notification space, or entire sheets for trash collection, are small but valuable examples of this.
But it goes beyond UI, like when I saw I could basically cache stuff on the document/script properties for fast access;there are so many things that can work with/for you, and you just have to connect them.
All in all I feel like I just barely scratched the surface of a new world!
Not such a flat world, but you get the picture!
This cloudy (pun intended) thought first came to me when I created my first (and for now only) Chrome Extension for recruitment, which I will talk about in the next post/NOVEL I will write… (I keep postponing it!😅) It basically has no UI, using Chrome’s UI to do extra stuff on top of the usual: new functionality for UI elements I had for free, and had to use anyway…
This is why last time I closed with the following quote, and I’ll do so again:
We are like dwarfs on the shoulders of giants, so that we can see more than they, and things at a greater distance, not by virtue of any sharpness of sight on our part, or any physical distinction, but because we are carried high and raised up by their giant size.
In the IT world, this is true on so many levels, but I feel like I discovered a “new level” of this: one that is not at the very top of the scale, the user level, but also not at the bottom, the develop-from-scratch level: it’s somewhere inside a seldom-explored middle-ground, where we can squeeze everything out from existing software, and build on top, to actually reach higher levels of productivity than with vanilla stuff, faster than developing from scratch.
Once again, magic made possible by FusionWorks!! 😎
Hello again from the world of amateur-ish coding! 😄
In the first part of this now-serial blog, I talked mostly about how to automate recruitment statistics in Google Sheets. But statistics, even when classifying lots of data with lots of rules, are rather trivial in coding terms.
To get into something slightly more advanced, I’ll venture a bit out of the Recruitment domain, and get into what’s usually called Lead Generation.
Retro-engineering the over-engineered world of Lead Generation
For a company that, like FusionWorks, offers awesome software development services, a “lead” is actually quite related to Recruitment:
A job post for a software development role, since it’s a need it can fulfill.
Contact details for relevant people in the company that posted it.
Info about the job, the company, and its people, to classify the lead.
Now, most companies tackle this part of the business doing the following:
Buying leads data, from companies that collect it in bulk, somehow…
Importing them into some expensive CRM SaaS solution aimed at sales.
In such CRM, have one page for each lead where you can change its status, comment on it, and have links for emails, websites, etc.
If it seems overkill, it’s because it is! The truth is CRMs are just fancy interfaces to do basic operations on a database. Actually the simplest of operations, in terms of the underlying logic: basic CRUD (Create, Read, Update, Delete.)
The prize for the most over-engineered CRM goes to… HubSpot! Also thanks to its sales rep ghosting me! 😆 … The No-Bullshit logo instead is from FusionWorks’s manifesto. 😎
And about bulk leads data, let’s just say it’s some doubtfully accurate (and doubtfully legal, in many cases) stuff to populate the database with.
The best of databases without databases (and why this matters)
At its core, a (relational) database is nothing more than a collection of tables, with some codified relations between them.
It might seem reductive, but if you add some validation rules and scripts to sheets on Google Sheets or Excel, where each sheet can be the exact equivalent of a database table, what you get is a relational database, but one that even people without database experience can work on, and with a UI that can be as fancy and usable as that of CRMs, if not more…
A single, simpler, much cheaper solution can kill two techs/products! ✌️
And I see I’m not the first to think about it! Mine looks better, although you’ll have to take my word for it… 😁
Reasonable people might disagree, pointing out that I oversimplified databases, and didn’t account for the fact that databases will always offer more possibilities, and be faster, compared to spreadsheets acting as databases.
These would be valid counterpoints if not for a few details:
For Lead Generation, the extra PROs of databases are largely unneeded.
Perhaps worse than that, direct database usage (without a CRM as a frontend) would raise the learning curve a lot for Lead Generators.
Using a CRM, you lose a lot of the flexibility and power proper of both databases and spreadsheets, AND you pay a premium for it!
While following courses on databases, it dawned on me that the only characteristic of databases one could really want for Lead Generation, is not even exclusive to databases, nor always applied to them: Database Normalization, in particular the first three “Normal Forms”.
Don’t bother looking these up unless you’re into this stuff: most explanations are crazily formal (pun intended). For us this translates mostly into avoiding duplicate contacts or leads: it could lead to bad mistakes in Lead Generation!
To achieve this and more. we could plan things in the following way:
Multiple sheets (like the tables of a database) separating jobs, companies, and contacts, one row per entity.
Each entity associated with a unique identifier, so we can delete doubles without relying on names and titles. [Important not only for contacts: so many different jobs in different places can be titled“JavaScript Developer”!]
Some scripting to keep all of this together, and especially populate the database with updated info, without someone having to manually write or copy-paste tons of data, which is alienating as hell.
About the last topic, automatic lead data collection, I won’t reveal how we did it because it falls within the textbook definition of business secret… Suffice to say it requires specific research and coding: if you’d like to try it out, you can contact either me or FusionWorks, and we’ll be happy to help!
But about the rest, I will talk about some examples, and about how it’s all easily developed from the comfort of VS Code, using… TypeScript!
⏭ Skip/skim the next section, if you’re not into coding! ⏭
Going TypeScript without even knowing much of JavaScript?!? 🤯
Having started to code this stuff using the regular Google Apps Script web IDE, it took me some time and courage to switch to VS Code, and even Git: it’s the stuff of real developers. Very far out of my comfort zone!!
But many creators on YouTube that talk about Google Apps Script (usually abbreviated GAS) were endorsing this method, and as an avid consumer of these videos, I decided to give it a try, and… Oh boy, was I missing out!
The trick is using a tool Google made, called CLASP (for Command Line Apps Script Project), which not only allows for pushing and pulling to/from GAS seamlessly from VS Code, (or whatever other IDE you like to use, I guess) but also automaticallytranspiles TypeScript code into the best JavaScript GAS can use. This is HUGE, even for a noob like me. Why?
I had just started using TypeScript to build a custom Google Chrome extension (topic for a later post in this series I guess, even if chronologically it came before this), and what I noticed is that, by simply changing JavaScript files to TypeScript on VS Code, the main difference is you are forced to be more precise, which avoids running into stupid errors!
You will still get hit by your own stupidity, but at least you’ll get to do some cool stuff before that! 😄
Therefore, to my surprise, it is actually easier to code in TypeScript than JavaScript, even more so for a beginner like me, because:
There is not much to “unlearn” from JS, if you just started anyway.
You’re alerted when values can be of a type that would cause errors.
You’re forced to do something about it, basically debugging in advance.
Therefore, from now on, all the code I will share will be GAS, but written in TypeScript, even if most of the time there will be little to no difference.
⏭ Skip/skim the next TWO sections, if you’re not into coding! ⏭
Of batch-extracting words from webpages, and ancient coding…
Say you have a lot of leads you “magically” get every day (ask in private 🥸) into your Google Sheets, but you want to know at a glance what’s there, without even opening the link. And say these links are to job posts, so this at-a-glance info you want, is the skills the jobs require.
Since there’s no standard format for job posts, you need to parse the webpage word by word, and extract the words looking like skills—possibly counting how many times each is mentioned, to see which is more or less important.
Now, since I learned the basics of programming in ancient times, and then completely stopped until recently, I always tend to think the tasks I give to my code could be too big, and will make the application/script too slow… 🙄
I know GAS even has a limit for how long a script can run, so if I hit it, the results might not arrive, or data might get corrupted! So performance was my top concern: how would I give such a huge task to this thing, looking at the text of so many pages, without risking slow-downs..? 🤔
It may be more obvious to you than to me: in 2022, this way of thinking of mine is completely unjustified, and outdated!! 😅 It’s totally possible to split even a long webpage in all of its words, count the occurrences of specific words, and put the results into a Google Sheet note that magically appears next to the link, in less than a second per page!
With the knowledge I had when I wrote the first article, I would have probably tried to tackle this using a double array of keywords and the number of occurrences, with some crazy nested iteration to go through it… 🤔
The fact JavaScript is object-oriented, and I could have used objects where key-value pairs constitute the skill words and their frequency on a page, would have seemed to my past self of a couple of weeks ago like a sure way of overloading the script and slowing everything down! 😱
Needless to say, it turned out even this concern of mine was archaic BS, and working with objects in JavaScript is not slower than working with arrays in any meaningful way, so using objects, codecan become much more readable and less convoluted, without perceivable performance drops!
Batch-extracting skills from job posts: finally the code!
To begin with, I wanted a way to easily change the dictionary of terms I was going to search for with this custom function, without having to change the code, so that Lead Generators could do so without any coding. 🫶
Since we are on Google Sheets, this is as easy as creating a sheet with one word per row in one column, and maybe my beloved checkboxes in the next column, so that we can take stuff in and out of the dictionary without having to delete and rewrite, just by checking or unchecking the boxes.
Here’s an example. Case sensitivity is a bit of a pain, but easier to tackle here than in the code!
Here’s the code that reads that sheet, and creates an array with each word:
Then comes the nice part:
First of all it takes the function’s argument, content (the actual text of the webpage)and splits it into an array of words (inputWords) for easy parsing.
Then within the forEach loop, it builds the previously empty wordFreq{} object, adding keys named like the words/skills found, and associating to them a value that builds up to the number of times the word is found.
Note that this is done with a nested forEach loop on the previously built array of keywords to be found (called “search”), and works in two ways: if the search term is listed in double quotes, it will be found only if it’s a stand-alone. If not, also when attached to other words/characters.
Useful because otherwise “Java” would always be included in every “JavaScript” job post… 😄 But not if we search for it with the double quotes!
I know, this is not perfect for every case: looking for stand-alone words will fail if even just a coma is attached. I could easily take punctuation out from the content before starting the search, but for now this works like a charm.
Finally, let’s make this something that can look nice in a Google Sheet note.
The first fancy line here sorts the key-value pairs within the object by the size of their value, to sort skills by frequency, instead of the order they’re found in. It breaks the object into an array, sorts it, puts it back together.
This is one of the things that my “ancient coding mindset” would consider cutting out, to gain some speed. After all, the most frequent keyword is usually found first anyway, and even if not, the higher number will make it pop… 🤔 But again: a couple of seconds is not much, while a consistent order of keywords by frequency is, so I decided to trust modernity!
After this fancy sorting, another forEach loop on the object’s keys makes us build a string that is formatted nicely, with line returns and everything.
Finally, if no words are found, we return another nicely formatted note to be attached to the job post, explaining possible reasons.
Here’s an output: the note on the right, popping up from the job column.
And here the function that does this to all rows selected with checkboxes:
Straightforward: looks at the checkboxes I added in each row to perform a “sticky selection”, looking at the links column only on rows where boxes are checked, and adds a note with “setNote(extractSkills(content))” on every entry where we get a positive “200” response code from the HTTP request.
You might find that your favorite jobs site blocks requests from Google Apps Scripts, and once again, if you want to know the secrets to make this work, contact me or FusionWorks, and we can set it up for you… For a price. 😏
Still, this is not perfect, I know. For example, I just noticed that reading and building the dictionary of searched terms within the extractSkills() function is very inefficient: it should be read only once, and passed to extractSkills(), to avoid re-looking at the dictionary every time a page is analyzed. Finally an example of my ancient mindset being useful! 😎
P.S.: I tried, and indeed the the time was reduced by around 30%, down to 5.8 seconds to search/extract 40 keywords in 10 job posts! Sometimes thinking about performance pays. Out of curiosity, I tried taking away the sorting too, but no effect there, proving again that my ancient mindset needs an update! 😄
Lessons learned, AKA the only part worth reading!!
I really got carried away with the details above, so I hope the non-coders among you (and even most of the coders) skimmed till here.
In short: Google Apps Script written in TypeScript and managed with CLASP+Git on VS Code is an amazingly powerful thing!
I learned that while my concerns for performance sometimes lead to nice gains, they’re more often than not just fossils of my “90s computing mindset”, and I often tend to overestimate them: they surely don’t justify writing ugly code, or avoiding sophisticated stuff just to save some CPU cycles. The CPUs are Google’s anyway, and we use them for free! 😆
As long as the time it takes for scripts to chew your data is not too much for you personally, nor the MINUTES that Google puts as a limit, you’ll be fine. This stuff saves HOURS of work, not seconds. But you shouldn’t spend hours writing “perfect” code. Keeping it clean is more useful!
I also learned you can easily make something better than most commercial CRMs, with the most important advantages of Databases (since CRMs are nothing but frontends for Databases, I can’t repeat it enough): you just need Google Sheets plus a few hundred lines of code, that are quite quick to write, since with spreadsheets there’s little abstraction: you can almost touch an array, if you’re ok with fingerprints on your screen… 😜
There was no meme about touching arrays… Obviously! 😅
The most valuable lesson though, is something a bit abstract indeed, and I’m not sure I fully grasped it yet, so I’ll leave it to the next article, closing with a quote I remembered from my distant humanistic background:
We are like dwarfs on the shoulders of giants, so that we can see more than they, and things at a greater distance, not by virtue of any sharpness of sight on our part, or any physical distinction, but because we are carried high and raised up by their giant size.