Fine-grained authorization for APIs with NestJS and OpenFGA
Introduction
As modern applications grow in complexity, managing user access and permissions becomes increasingly challenging. Traditional role-based access control (RBAC) often falls short when dealing with intricate scenarios, such as multi-tenant platforms, collaborative tools, or resource-specific permissions. This is where Fine-Grained Authorization (FGA) comes into play, offering a powerful and flexible way to manage who can do what within your application.
What is Fine-Grained Authorization (FGA)?
Fine-Grained Authorization goes beyond simple roles like “admin” or “user.” It enables you to define and enforce detailed access rules based on relationships between users, resources, and actions. For example:
- “Alice can edit Document A because she is a member of Team X.”
- “Bob has admin access to Project Y because he owns it.”
FGA systems allow for:
- Relationship-Based Access Control (ReBAC): Defining permissions based on dynamic relationships (e.g., ownership, team membership, or project assignments).
- Scalability: Handling thousands of users, roles, and permissions without performance degradation.
- Flexibility: Supporting complex, domain-specific rules that adapt to your application’s needs.
This article guides you through setting up an FGA authorization for API’s using NestJS, Auth0, and OpenFGA.
By the end of this guide, you will clearly understand how these tools work together to build a secure and efficient permissions system.
We will build an example application for managing users’ access to projects. Projects will have three levels of permissions:
- Owner: Full access to the project.
- Admin: Can add members and view the project.
- Member: Can only view the project.
Understanding NestJS, OpenFGA, and Auth0
Before diving into the implementation, it’s essential to understand the roles each tool plays:
- NestJS: A versatile and scalable framework for building server-side applications. It leverages TypeScript and incorporates features like dependency injection, making it a favorite among developers for building robust APIs.
- OpenFGA: An open-source authorization system that provides fine-grained access control. It allows you to define complex permission models and manage them efficiently.
- Auth0: A cloud-based authentication and authorization service. It simplifies user authentication, offering features like social login, single sign-on, and multifactor authentication.
When combined, these tools allow you to create a secure backend where Auth0 handles user authentication, OpenFGA manages authorization, and NestJS serves as the backbone of your application.
This article assumes that you have some understanding of NestJS and Auth0 (and OAuth in general) but for OpenFGA I will give a basic intro.
Diving deeper into OpenFGA
OpenFGA is a modern authorization system built for handling complex access control with simplicity and flexibility. Inspired by Google Zanzibar, it provides fine-grained, relationship-based access control, letting you define “who can do what and why.” This makes it ideal for applications with intricate permission hierarchies, like multi-tenant platforms or collaborative tools.
At its core are two key concepts: authorization models and stores. Models define relationships between users, roles, and resources—like “John is an admin of Project X” or “Alice can edit Document Y because she’s in Team Z.” Stores serve as isolated containers for these models and their data, keeping systems clean and scalable.
Core Concepts of OpenFGA
Authorization rules are configured in OpenFGA using an authorization model which is a combination of one or more type definitions. Type is a category of objects in the system and type definition defines all possible relations a user or another object can have in relation to this type. Relations are defined by relation definitions, which list the conditions or requirements under which a relationship is possible.
An object represents an instance of a type. While a user represents an actor in the system. The notion of a user is not limited to the common meaning of “user”. It could be
- any identifier: e.g. user:gganebnyi
- any object: e.g. project:nestjs-openfga or organization:FusionWorks
- a group or a set of users (also called a userset): e.g. organization:FusionWorks#members, which represents the set of users related to the object organization:FusionWorks as member
- everyone, using the special syntax: *
Authorization data is stored in OpenFGA as relationship tuples. They specify a specific user-object-relation combination. Combined with the authorization model they allow checking user relationships to certain objects, which is then used in application authorization flow. In OpenFGA relationships could be direct (defined by tuples) or implied (computed from combining tuples and model).
Let’s illustrate this with a model we will use in our sample project.
model
  schema 1.1

type user

type project
  relations
    define admin: [user] or owner
    define member: [user] or admin
define owner: [user][
{
"user": "user:johndoe",
"relation": "member",
"object": "project:FusionAI"
},
{
"user": "user:gganebnyi",
"relation": "owner",
"object": "project:FusionAI"
}
]Based on this user “user:johndoe“ has direct relationship “member“ with object “project:FusionAI“, while for user “user:gganebnyi“ this relationship is implied based on his direct relationship “owner“ with this object.
At runtime, both the authorization model and relationship tuples are stored in the OpenFGA store. OpenFGA provides API for managing this data and performing authorization checks against it.
While this quick intro gives us enough information to proceed with further implementation, I strongly recommend checking Authorization Concepts | OpenFGA and Concepts | OpenFGA.
Implementation
The full project source code is located in our GitHub repo. You can check it out and use it for reference while reading the article. If you are familiar with NestJS and Auth0 setup, please skip right to the OpenFGA part.
Setting Up a Basic NestJS Project
Let’s start by setting up a basic NestJS project. Ensure you have Node.js and npm installed, then proceed with the following commands:
# Install NestJS CLI globally
npm install -g @nestjs/cli

# Create a new NestJS project
nest new nestjs-auth0-openfga

# Getting inside project folder and install dependencies we have so far
cd nestjs-auth0-openfga
npm install

# We will use MongoDB to store our data
npm install @nestjs/mongoose mongoose

# For easier use of environment variables
npm install @nestjs/config

# Adding Swagger for API documentation and testing
npm install @nestjs/swagger swagger-ui-express
This gives us all the NestJS components we need so far installed. The next step is to create our Projects Rest API.
# Generate Projects Module
nest generate module projects
nest generate service projects
nest generate controller projects
This will scaffold NestJS artifacts for Projects API and update app.module.ts file.
The next step is to create the Project’s Mongoose schema and implement projects Service and ProjectsController.
projects/schemas/project.schema.ts
import { Prop, Schema, SchemaFactory } from "@nestjs/mongoose";
import { Document, HydratedDocument } from "mongoose";
export type ProjectDocument = HydratedDocument<Project>;

@Schema({
  toObject: {
    virtuals: true,
  },
})

export class Project {
  @Prop({ required: true })
  name: string;
}

export const ProjectSchema = SchemaFactory.createForClass(Project);
projects/projects.service.ts
import { Injectable, NotFoundException } from '@nestjs/common';
import { InjectModel } from '@nestjs/mongoose';
import { Model } from 'mongoose';
import { Project, ProjectDocument } from './schemas/project.schema';
import { CreateProjectDto } from './dto/create-project.dto';

@Injectable()
export class ProjectsService {
  constructor(
    @InjectModel(Project.name) private projectModel: Model<ProjectDocument>,
  ) { }

  async findOne(id: string): Promise<ProjectDocument> {
    const project = await this.projectModel.findById(id).exec();
    if (!project) {
      throw new NotFoundException(`Project with ID ${id} not found`);
    }
    return project;
  }

  async create(createProjectDto: CreateProjectDto): Promise<ProjectDocument> {
    const createdProject = new this.projectModel(createProjectDto);
    return createdProject.save();
  }

  async findAll(): Promise<ProjectDocument[]> {
    return this.projectModel.findAll().exec();
  }
}
projects/projects.controller.ts
import {
  Controller,
  Get,
  Post,
  Body,
  Param,
  UseGuards,
  Delete,
  UseInterceptors,
  ClassSerializerInterceptor,
} from '@nestjs/common';
import { ProjectsService } from './projects.service';
import { CreateProjectDto } from './dto/create-project.dto';
import { ApiCreatedResponse, ApiOkResponse } from '@nestjs/swagger';
import { ProjectDto } from './dto/project.dto';

@Controller('projects')
@UseInterceptors(ClassSerializerInterceptor)
export class ProjectsController {
  constructor(
    private readonly projectsService: ProjectsService,
  ) { }

  /**
   * Get all projects.
   */
  @Get()
  @ApiOkResponse({ type: ProjectDto, isArray: true })
  async getProjects(): Promise<ProjectDto[]> {
    const projects = await this.projectsService.findAll();
    return projects.map((project) => ProjectDto.fromDocument(project));
  }

  /**
   * Get a project by ID.
   */
  @Get(':id')
  @ApiOkResponse({ type: ProjectDto })
  async getProject(@Param('id') id: string): Promise<ProjectDto> {
    const project = await this.projectsService.findOne(id);
    return ProjectDto.fromDocument(project);
  }

  /**
   * Create a new project.
   */
  @Post()
  async createProject(@Body() createProjectDto: CreateProjectDto) {
    const project = await this.projectsService.create(createProjectDto);
    return ProjectDto.fromDocument(project);
  }
}
projects/projects.module.ts
import { Module } from '@nestjs/common';
import { MongooseModule } from '@nestjs/mongoose';
import { ProjectsController } from './projects.controller';
import { ProjectsService } from './projects.service';
import { Project, ProjectSchema } from './schemas/project.schema';
import { ConfigModule } from '@nestjs/config';

@Module({
  imports: [
    MongooseModule.forFeature([{ name: Project.name, schema: ProjectSchema }]),
    ConfigModule,
  ],
  controllers: [ProjectsController],
  providers: [ProjectsService],
})
export class ProjectsModule { }
app.module.ts
import { Module } from '@nestjs/common';
import { ConfigModule } from '@nestjs/config';
import { ProjectsModule } from './projects/projects.module';
import { MongooseModule } from '@nestjs/mongoose';

@Module({
  imports: [
    ConfigModule.forRoot({ isGlobal: true }),
    ProjectsModule,
    MongooseModule.forRoot(process.env.MONGODB_URI),
  ],
  controllers: [],
  providers: [],
})
export class AppModule {}
As you may notice, the controller uses DTOs, ClassValidator, and ClassTransformer to control its input/output. DTOs are also important for proper Swagger documentation. I am committing them here for brevity but you can see them here: nestjs-openfga-example/src/projects/dto at master · FusionWorks/nestjs-openfga-example.
The last thing is to activate Swagger and set environment variables.
main.ts
import { NestFactory } from '@nestjs/core';
import { AppModule } from './app.module';
import { ValidationPipe } from '@nestjs/common';
import { DocumentBuilder, SwaggerModule } from '@nestjs/swagger';
import { ConfigService } from '@nestjs/config';
async function bootstrap() {

  const app = await NestFactory.create(AppModule);
  const configService = new ConfigService();

  app.useGlobalPipes(new ValidationPipe({ whitelist: true, transform: true }));

  const options = new DocumentBuilder()
    .setTitle('API')
    .setDescription('The API description')
    .setVersion('1.0')
    .addTag('API')
    .build();
  const document = SwaggerModule.createDocument(app, options);
  SwaggerModule.setup('api', app, document);

  const port = process.env.PORT || 3000;
  await app.listen(port);

  console.log(`Application is running on: ${await app.getUrl()}`);
}
bootstrap();
.env
# MongoDB Configuration
MONGODB_URI=mongodb://YOUR_USER:PASSWORD@HOST:PORT

# Application Port
PORT=3000
Our basic app is ready. You can launch it with npm run start:dev and access Swagger UI via http://localhost:3000/api/ to try the API.
Integrating Auth0 for Authentication
Authentication is the first step in securing your application. Auth0 simplifies this process by handling user authentication, allowing you to focus on building your application logic. Auth0 is a SaaS solution and you need to register at https://auth0.com to use it. To integrate Auth0 we will install PassportJS and configure it. Here are the steps.
Install required packages
npm install @nestjs/passport passport passport-jwt jwks-rsaCreate an auth module to manage authentication (this will also add it to app.module.ts)
nest generate module authauth/auth.module.ts
import { Module } from '@nestjs/common';
import { JwtStrategy } from './jwt.strategy';

@Module({
  providers: [JwtStrategy],
  exports: [],
})
export class AuthModule {}
Implement JWT strategy
auth/jwt.strategy.ts
import { Injectable } from '@nestjs/common';
import { PassportStrategy } from '@nestjs/passport';
import { ExtractJwt, Strategy } from 'passport-jwt';
import * as jwksRsa from 'jwks-rsa';
import { ConfigService } from '@nestjs/config';

@Injectable()
export class JwtStrategy extends PassportStrategy(Strategy) {
  constructor(private configService: ConfigService) {
    super({
      jwtFromRequest: ExtractJwt.fromAuthHeaderAsBearerToken(),
      secretOrKeyProvider: jwksRsa.passportJwtSecret({
        cache: true,
        rateLimit: true,
        jwksRequestsPerMinute: 10,
        jwksUri: `https://${configService.get<string>('AUTH0_DOMAIN')}/.well-known/jwks.json`,
      }),
      audience: configService.get<string>('AUTH0_AUDIENCE'),
      issuer: `https://${configService.get<string>('AUTH0_DOMAIN')}/`,
      algorithms: ['RS256'],
    });
  }

  async validate(payload: any) {
    return payload;
  }
}
Create JwtAuthGuard
auth/jwt-auth.guard.ts
import { Injectable } from '@nestjs/common';
import { AuthGuard } from '@nestjs/passport';

@Injectable()
export class JwtAuthGuard extends AuthGuard('jwt') {}
And use it to protect controller routes
projects/projects.controller.ts
...

import { JwtAuthGuard } from '../auth/jwt-auth.guard';
...
import { ApiBearerAuth, ApiCreatedResponse, ApiOkResponse } from '@nestjs/swagger';
...

@ApiBearerAuth('Auth0')
@Controller('projects')
@UseGuards(JwtAuthGuard)
@UseInterceptors(ClassSerializerInterceptor)
export class ProjectsController {
...
}
As a final step, we need to update the app configuration
.env
...

# Auth0 Configuration
AUTH0_DOMAIN=YOUR_AUTH0_DOMAIN.eu.auth0.com
AUTH0_AUDIENCE=YOUR_AUTH0_API_AUDIENCE
AUTH0_OAUTH_CLIENT_ID=YOUR_AUTH0_CLEINTID

...
Now Project API will require you to pass valid authentication information to invoke its methods. This is done by setting Authorization: Bearer YOUR_TOKEN header, where YOUR_TOKEN is obtained during the Auth0 authentication flow.
To make our testing of API easier let’s add Auth0 authentication support to Swagger UI
main.ts
import { NestFactory } from '@nestjs/core';
import { AppModule } from './app.module';
import { ValidationPipe } from '@nestjs/common';
import { DocumentBuilder, SwaggerModule } from '@nestjs/swagger';
import { ConfigService } from '@nestjs/config';

async function bootstrap() {
  const app = await NestFactory.create(AppModule);
  const configService = new ConfigService();

  app.useGlobalPipes(new ValidationPipe({ whitelist: true, transform: true }));

  const options = new DocumentBuilder()
    .setTitle('API')
    .setDescription('The API description')
    .setVersion('1.0')
    .addTag('API')
    .addOAuth2(
      {
        type: 'oauth2',
        flows: {
          implicit: {
            authorizationUrl: `https://${configService.get(
              'AUTH0_DOMAIN',
            )}/authorize?audience=${configService.get('AUTH0_AUDIENCE')}`,
            tokenUrl: configService.get('AUTH0_AUDIENCE'),
            scopes: {
              openid: 'Open Id',
              profile: 'Profile',
              email: 'E-mail',
            },
          },
        },
        scheme: 'bearer',
        bearerFormat: 'JWT',
        in: 'header',
      },
      'Auth0',
    )
    .build();

  const document = SwaggerModule.createDocument(app, options);
  SwaggerModule.setup('api', app, document, {
    swaggerOptions: {
      initOAuth: {
        clientId: configService.get('AUTH0_OAUTH_CLIENT_ID'),
      },
    },
  });

  const port = process.env.PORT || 3000;
  await app.listen(port);

  console.log(`Application is running on: ${await app.getUrl()}`);
}
bootstrap();
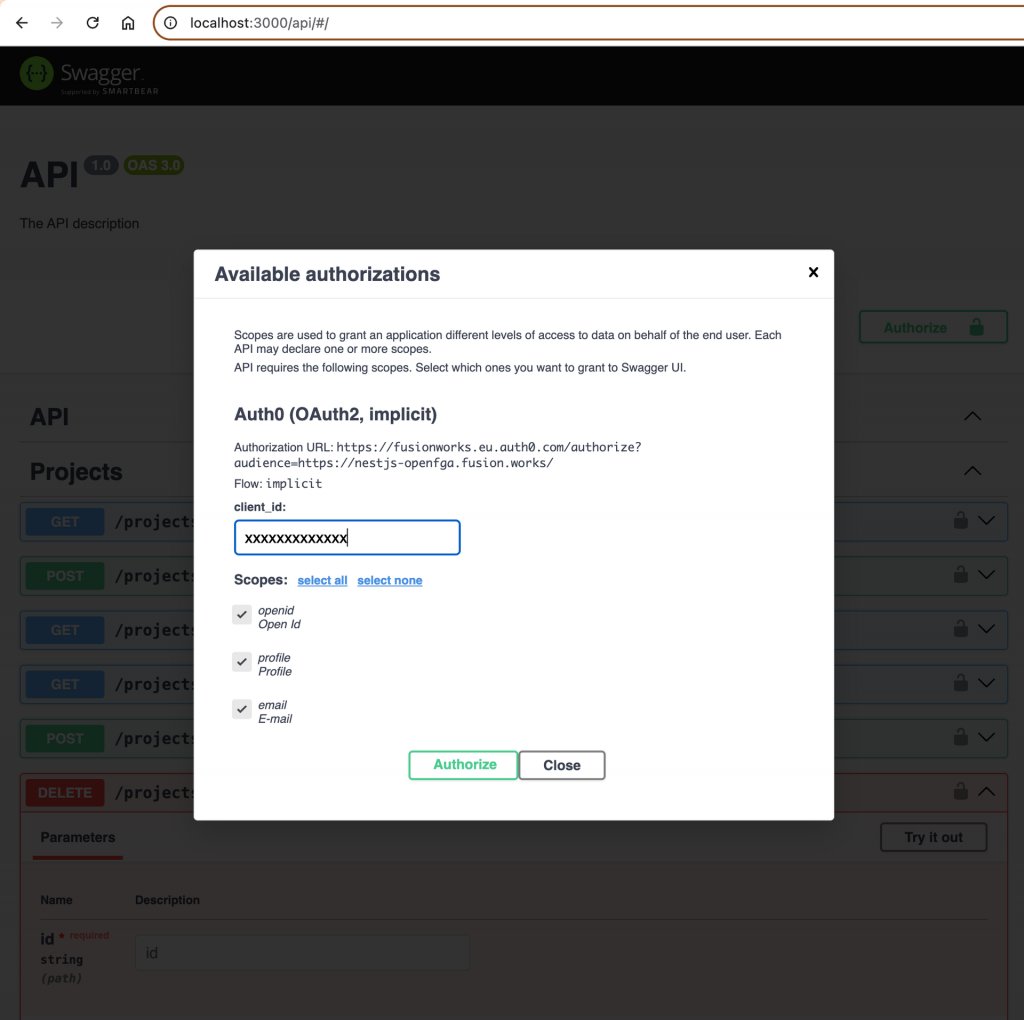
As a result, the Authorize option will appear in Swagger UI and the Authorization header will be attached to all requests.
Implementing OpenFGA for Authorization
With authentication in place, the next step is managing authorization using OpenFGA. We’ll design our authorization model, integrate OpenFGA into NestJS, and build permission guards to enforce access control.
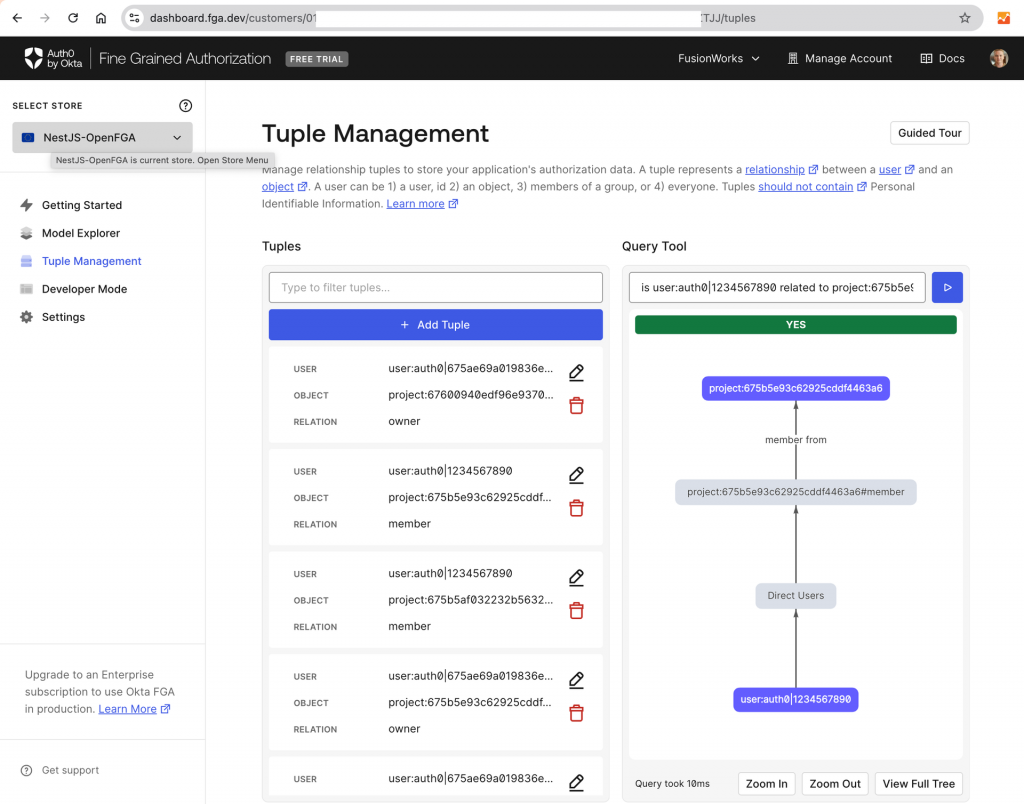
Since OpenFGA is a service you either need to install it locally (Docker Setup Guide | OpenFGA ) or use a hosted analog like Okta FGA. For this tutorial, I recommend using Okta FGA since it has a UI for designing and testing models and managing relationship tuples.
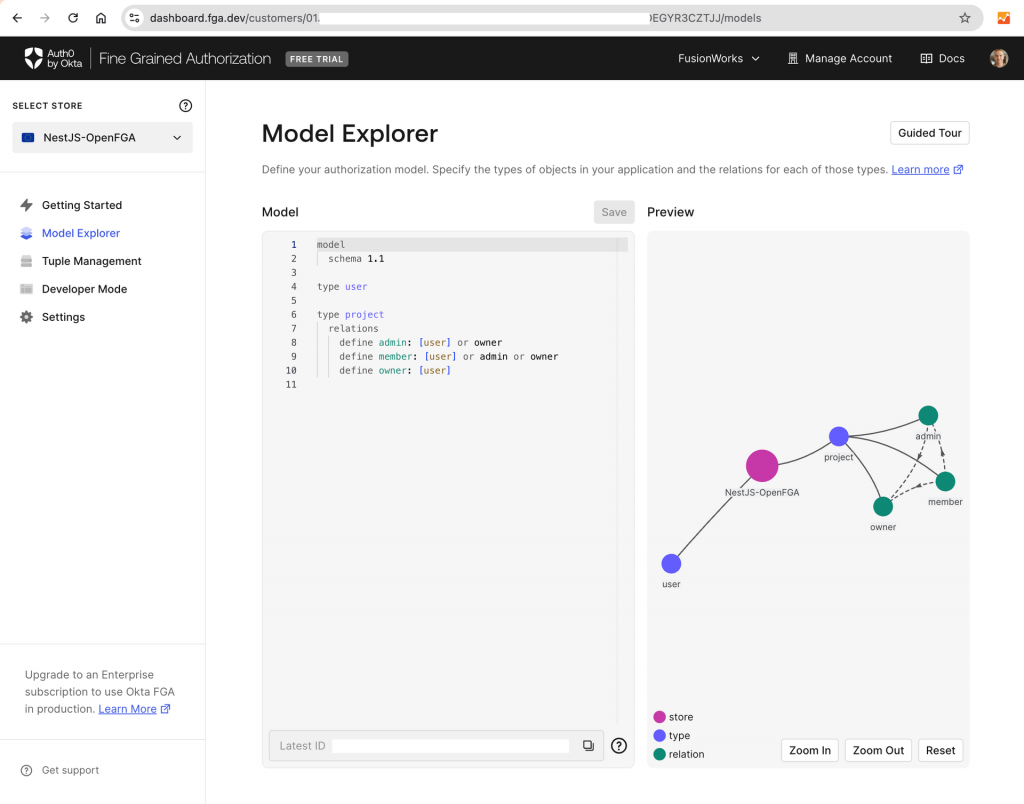
As the first step to implementing authorization, we will define our authorization model and save it in Okta FGA
model
  schema 1.1

type user

type project
  relations
    define admin: [user] or owner
    define member: [user] or admin
    define owner: [user]
The next step is to create Okta FGA API client
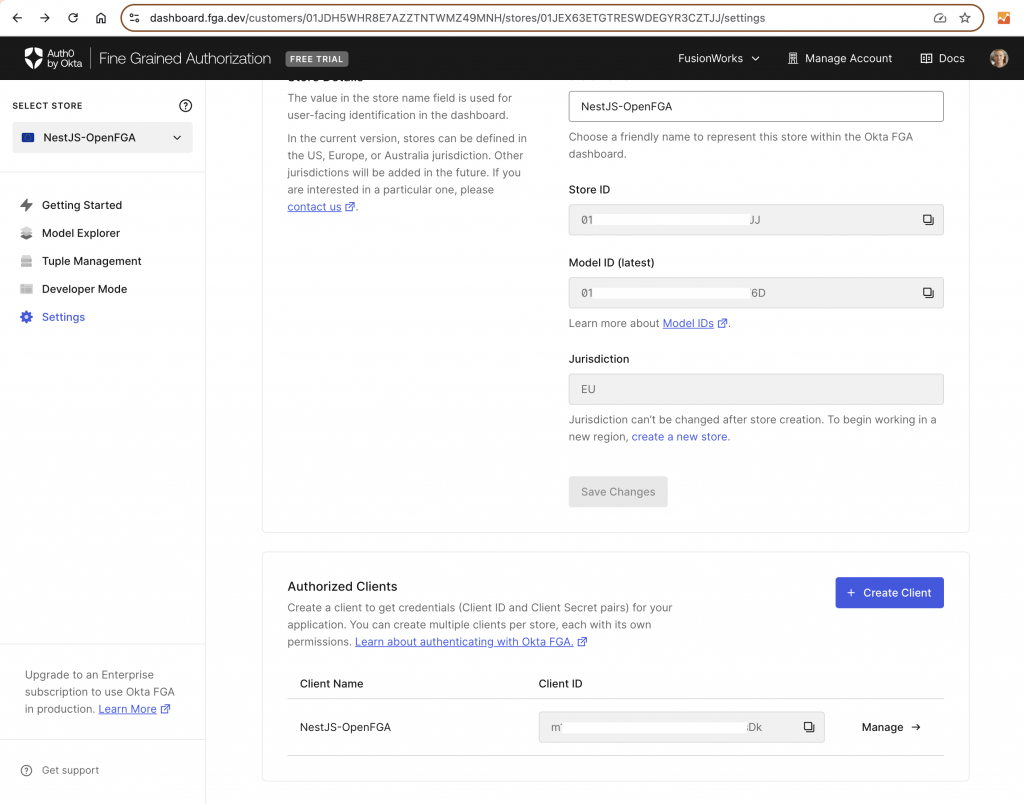
And update our .env with its parameters
...

FGA_API_URL='https://api.eu1.fga.dev' # depends on your account jurisdiction
FGA_STORE_ID=
FGA_MODEL_ID=
FGA_API_TOKEN_ISSUER="auth.fga.dev"
FGA_API_AUDIENCE='https://api.eu1.fga.dev/' # depends on your account jurisdiction
FGA_CLIENT_ID=
FGA_CLIENT_SECRET=

...
Now we install OpenFGA SDK and create an authorization module in our app
npm install @openfga/sdk
nest generate module authorization
nest generate service authorization
Next, we implement AuthorizationService around OpenFGA API. It provides methods to check user relationships and manipulate them. Below is the code for the service itself, for small artifacts referenced in the service class please check nestjs-openfga-example/src/authorization at master · FusionWorks/nestjs-openfga-example.
authorization/authorization.service.ts
import { Injectable, ForbiddenException, Logger } from '@nestjs/common';
import { OpenFgaClient, CredentialsMethod, TupleKey } from '@openfga/sdk';
import { ConfigService } from '@nestjs/config';
import { AuthorizationPartyTypes } from './authorization-types.enum';
import { AuthorizationRelations } from './authorization-relations.enum';
import { AuthorizationParty } from './authorization-party';

@Injectable()
export class AuthorizationService {

  private readonly logger = new Logger(AuthorizationService.name);
  private client: OpenFgaClient;

  constructor(private readonly configService: ConfigService) {
    this.client = new OpenFgaClient({
      apiUrl: this.configService.get<string>('FGA_API_URL'),
      storeId: this.configService.get<string>('FGA_STORE_ID'),
      credentials: {
        method: CredentialsMethod.ClientCredentials,
        config: {
          clientId: this.configService.get<string>('FGA_CLIENT_ID'),
          clientSecret: this.configService.get<string>('FGA_CLIENT_SECRET'),
          apiTokenIssuer: this.configService.get<string>('FGA_API_TOKEN_ISSUER'),
          apiAudience: this.configService.get<string>('FGA_API_AUDIENCE'),
        },
      },
    });
  }

  async checkPermission(
    userId: string,
    permission: string,
    objectType: string,
    objectId: string,
  ): Promise<boolean> {
    try {
      const response = await this.client.check({
        user: `${AuthorizationPartyTypes.USER}:${userId}`,
        relation: permission,
        object: `${objectType}:${objectId}`,
      });
      return response.allowed;
    } catch (error) {
      return false;
    }
  }

  async listObjectIds(user: AuthorizationParty, objectType: AuthorizationPartyTypes, relation: AuthorizationRelations): Promise<string[]> {
    const request = {
      user: user.toOpenFgaString(),
      relation,
      type: objectType
    };
    const response = await this.client.listObjects(request);
    return response.objects.map((object) => object.split(':')[1]);
  }

  async listUsers(object: AuthorizationParty, relations: AuthorizationRelations[]): Promise<{ userId: string; relations: string[] }[]> {
    const responses = await Promise.all(
      relations.map(async (relation) => {
        const response = await this.client.listUsers({
          object: object.toOpenFgaObject(),
          relation,
          user_filters: [
            {
              type: AuthorizationPartyTypes.USER,
            },
          ],
        });
        return { relation, users: response.users };
      })
    );

    const userRolesMap = responses.reduce((acc, { relation, users }) => {
      users.forEach(user => {
        const userId = user.object.id;
        if (!acc[userId]) {
          acc[userId] = new Set<string>();
        }
        acc[userId].add(relation);
      });
      return acc;
    }, {} as Record<string, Set<string>>);

    const aggregatedUsers = Object.entries(userRolesMap).map(([userId, rolesSet]) => ({
      userId,
      relations: Array.from(rolesSet),
    }));

    return aggregatedUsers;
  }

  async addRelationship(user: AuthorizationParty, object: AuthorizationParty, relationship: AuthorizationRelations): Promise<void> {
    const tupleKey: TupleKey = {
      user: user.toOpenFgaString(),
      relation: relationship,
      object: object.toOpenFgaString(),
    };
    await this.client.write({
      writes: [tupleKey],
    });
  }

  async removeRelationship(user: AuthorizationParty, object: AuthorizationParty, relationship: AuthorizationRelations): Promise<void> {
    const tupleKey: TupleKey = {
      user: user.toOpenFgaString(),
      relation: relationship,
      object: object.toOpenFgaString(),
    };
    await this.client.write({
      deletes: [tupleKey],
    });
  }
}
Now we can implement PermissionsGuard and PermissionsDecorator to be used on our controllers. PermissionsGuard will extract the object ID from the request URL, body, or query parameters and based on object type and required relation from the decorator and user ID from authentication data perform a relationship check in OpenFGA.
authorization/permissions.decorator.ts
import { SetMetadata } from '@nestjs/common';

export const PERMISSIONS_KEY = 'permissions';

export type Permission = {
  permission: string;
  objectType: string;
  objectIdParam: string; // The name of the route parameter containing the object ID
};

export const Permissions = (...permissions: Permission[]) =>
  SetMetadata(PERMISSIONS_KEY, permissions);
authorization/permissions.guard.ts
import {
  Injectable,
  CanActivate,
  ExecutionContext,
  ForbiddenException,
} from '@nestjs/common';
import { Reflector } from '@nestjs/core';
import { PERMISSIONS_KEY, Permission } from './permissions.decorator';
import { AuthorizationService } from './authorization.service';
import { ConfigService } from '@nestjs/config';

@Injectable()
export class PermissionsGuard implements CanActivate {
  constructor(
    private reflector: Reflector,
    private authzService: AuthorizationService,
    private configService: ConfigService,
  ) { }

  async canActivate(context: ExecutionContext): Promise<boolean> {
    const permissions = this.reflector.get<Permission[]>(
      PERMISSIONS_KEY,
      context.getHandler(),
    );
    if (!permissions) {
      return true; // No permissions required
    }

    const request = context.switchToHttp().getRequest();
    const user = request.user;
    if (!user) {
      throw new ForbiddenException('No user found in request');
    }

    for (const permission of permissions) {
      let objectId: string;
      // Check where the objectIdParam is located: params, query, or body
      if (request.params && request.params[permission.objectIdParam]) {
        objectId = request.params[permission.objectIdParam];
      } else if (request.query && request.query[permission.objectIdParam]) {
        objectId = request.query[permission.objectIdParam];
      } else if (request.body && request.body[permission.objectIdParam]) {
        objectId = request.body[permission.objectIdParam];
      } else {
        throw new ForbiddenException(
          `Cannot find parameter '${permission.objectIdParam}' in request`,
        );
      }

      const hasPermission = await this.authzService.checkPermission(
        user.sub,
        permission.permission,
        permission.objectType,
        objectId,
      );
      if (!hasPermission) {
        throw new ForbiddenException(
          `Insufficient permissions for ${permission.permission} on ${permission.objectType}`,
        );
      }
    }
    return true;
  }
}
Now let’s see how this integrates with ProjectsController. Besides permissions checking, we will also add the project creator as the Owner and give him and the project admins the possibility to manipulate project members. For easier user extraction from the authentication context, we added a User decorator.
auth/user.decorator.ts
import { createParamDecorator, ExecutionContext } from '@nestjs/common';

export const User = createParamDecorator(
  (data: unknown, ctx: ExecutionContext) => {
    const request = ctx.switchToHttp().getRequest();
    return request.user;
  },
);
projects/projects.controller.ts
import {
  Controller,
  Get,
  Post,
  Body,
  Param,
  UseGuards,
  Delete,
  UseInterceptors,
  ClassSerializerInterceptor,
} from '@nestjs/common';
import { JwtAuthGuard } from '../auth/jwt-auth.guard';
import { PermissionsGuard } from '../authorization/permissions.guard';
import { Permissions } from '../authorization/permissions.decorator';
import { ProjectsService } from './projects.service';
import { AuthorizationService } from '../authorization/authorization.service';
import { AuthorizationParty } from '../authorization/authorization-party';
import { AuthorizationPartyTypes } from '../authorization/authorization-types.enum';
import { AuthorizationRelations } from '../authorization/authorization-relations.enum';
import { CreateProjectDto } from './dto/create-project.dto';
import { User } from 'src/auth/user.decorator';
import { AddProjectMemberDto } from './dto/add-project-member.dto';
import { DeleteProjectMemberDto } from './dto/delete-project-member.dto';
import { ApiBearerAuth, ApiCreatedResponse, ApiOkResponse } from '@nestjs/swagger';
import { ProjectDto } from './dto/project.dto';
import { MemberDto } from './dto/member.dto';

@ApiBearerAuth('Auth0')
@Controller('projects')
@UseGuards(JwtAuthGuard, PermissionsGuard)
@UseInterceptors(ClassSerializerInterceptor)
export class ProjectsController {
  constructor(
    private readonly projectsService: ProjectsService,
    private readonly authorizationService: AuthorizationService,
  ) { }

  /**
   * Get all projects.
   */
  @Get()
  @ApiOkResponse({ type: ProjectDto, isArray: true })
  async getProjects(@User() currentUser): Promise<ProjectDto[]> {
    const user = new AuthorizationParty(AuthorizationPartyTypes.USER, currentUser.sub);
    const projectIds = await this.authorizationService.listObjectIds(
      user,
      AuthorizationPartyTypes.PROJECT,
      AuthorizationRelations.MEMBER,
    );
    const projects = await this.projectsService.findAll(projectIds);
    return projects.map((project) => ProjectDto.fromDocument(project));
  }

  /**
   * Get a project by ID.
   */
  @Get(':id')
  @ApiOkResponse({ type: ProjectDto })
  @Permissions({
    permission: AuthorizationRelations.MEMBER,
    objectType: 'project',
    objectIdParam: 'id',
  })
  async getProject(@Param('id') id: string): Promise<ProjectDto> {
    const project = await this.projectsService.findOne(id);
    return ProjectDto.fromDocument(project);
  }

  /**
   * Create a new project.
   */
  @Post()
  @ApiCreatedResponse({ type: ProjectDto })
  async createProject(@Body() createProjectDto: CreateProjectDto, @User() currentUser) {
    const project = await this.projectsService.create(createProjectDto);
    const userId = currentUser.sub;
    const user = new AuthorizationParty(AuthorizationPartyTypes.USER, userId);
    const object = new AuthorizationParty(AuthorizationPartyTypes.PROJECT, project.id);
    await this.authorizationService.addRelationship(
      user,
      object,
      AuthorizationRelations.OWNER,
    );
    return ProjectDto.fromDocument(project);
  }

  /**
   * List all members of a project.
   */
  @Get(':id/members')
  @ApiOkResponse({ type: String, isArray: true })
  @Permissions({
    permission: AuthorizationRelations.MEMBER,
    objectType: AuthorizationPartyTypes.PROJECT,
    objectIdParam: 'id',
  })
  async listMembers(@Param('id') projectId: string): Promise<MemberDto[]> {
    const project = new AuthorizationParty(
      AuthorizationPartyTypes.PROJECT,
      projectId,
    );
    const relations = [
      AuthorizationRelations.MEMBER,
      AuthorizationRelations.OWNER,
      AuthorizationRelations.ADMIN
    ];
    return (await this.authorizationService.listUsers(project, relations)).map(
      (user) => {
        return {
          userId: user.userId,
          roles: user.relations.map((role) => role.toString()),
        }
      }
    );
  }

  /**
   * Assign a member to a project.
   * Requires 'admin' permission on the project.
   */
  @Post(':id/members')
  @Permissions({
    permission: AuthorizationRelations.ADMIN,
    objectType: AuthorizationPartyTypes.PROJECT,
    objectIdParam: 'id',
  })
  async addMember(
    @Param('id') projectId: string,
    @Body() addMemberDto: AddProjectMemberDto,
  ) {
    const { userId, role } = addMemberDto;
    const user = new AuthorizationParty(AuthorizationPartyTypes.USER, userId);
    const project = new AuthorizationParty(
      AuthorizationPartyTypes.PROJECT,
      projectId,
    );
    await this.authorizationService.addRelationship(user, project, role);
    return { message: 'Ok' };
  }

  /**
   * Remove a member from a project.
   * Requires 'admin' permission on the project.
   */
  @Delete(':id/members')
  @Permissions({
    permission: AuthorizationRelations.ADMIN,
    objectType: AuthorizationPartyTypes.PROJECT,
    objectIdParam: 'id',
  })
  async removeMember(
    @Param('id') projectId: string,
    @Body() deleteMemberDto: DeleteProjectMemberDto,
  ) {
    const { userId } = deleteMemberDto;
    const user = new AuthorizationParty(AuthorizationPartyTypes.USER, userId);
    const project = new AuthorizationParty(
      AuthorizationPartyTypes.PROJECT,
      projectId,
    );
    await this.authorizationService.removeRelationship(user, project, deleteMemberDto.role);
    return { message: 'Ok' };
  }
}
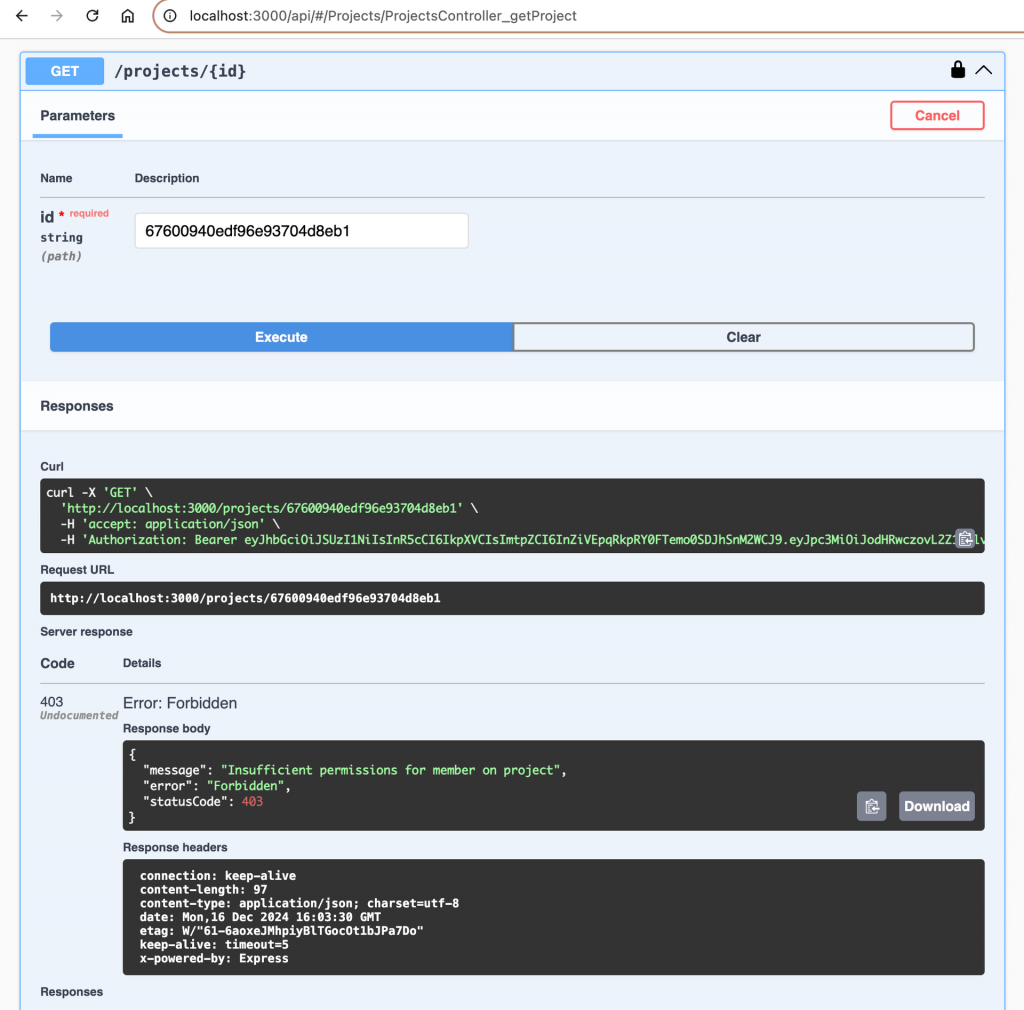
Now if we try to access a project, that we are not a part of we will get an HTTP 403 exception:

Conclusion
In today’s fast-paced web development landscape, establishing a reliable permissions management system is essential for both security and functionality. This article demonstrated how to build such a system by integrating NestJS, OpenFGA, and Auth0.
Key Takeaways
- NestJS provided a scalable and structured framework for developing the backend, ensuring maintainable and robust API development.
- Auth0 streamlined the authentication process, offering features like social login and multifactor authentication without the complexity of building them from scratch.
- OpenFGA enabled fine-grained access control, allowing precise management of user roles and permissions, ensuring that each user—whether Owner, Admin, or Member—has appropriate access levels.
Benefits of This Approach
- Enhanced Security: Clearly defined roles reduce the risk of unauthorized access, protecting sensitive project data.
- Scalability: The combination of NestJS, OpenFGA, and Auth0 ensures the system can grow with your application.
- Maintainability: Using industry-standard tools with clear separations of concern makes the system easier to manage and extend.
- Flexibility: OpenFGA’s detailed access control accommodates complex permission requirements and evolving business needs.
Final Thoughts
Building a secure and efficient permissions management system is crucial for modern web applications. By leveraging NestJS, OpenFGA, and Auth0, developers can create a robust backend that meets current security standards and adapts to future challenges. Implementing these tools will help ensure your applications are both secure and scalable, providing a solid foundation for growth in an ever-evolving digital environment.